
INTRODUCTION
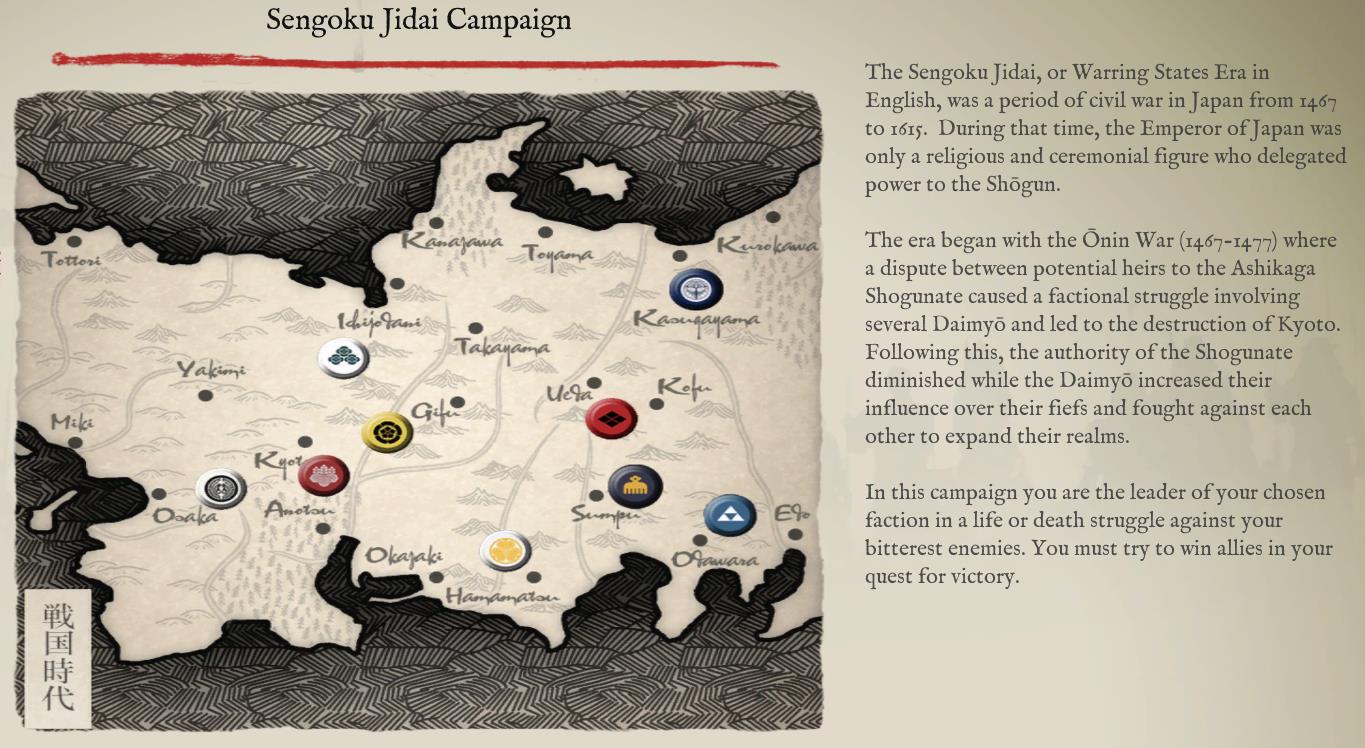
This is an after action report on the Sengoku Jidai sandbox campaign in Sengoku Jidai: Shadow of the Shogun written by the co-developer of the game, Jayson NG. The main goal is to break the enemy’s resolve by capturing territory and winning battles. With the introduction of generals, campaigns in Sengoku Jidai have persistent generals who can get promoted, demoted, or killed.
Each province has supply, taxation and manpower levels. These numbers can change based on what happens in the campaign. Supply and taxation for example decreases if the province has become a battleground. The player must be aware that an army that is larger than the province’s supply level will experience attrition. Money is collected only at the end of each year.
Individual campaigns may also have unique rules. The Sengoku Jidai Campaign for example has neutral sides which the two opposing factions can entice to join their side through gifting.
I chose to play the Oda (yellow mon
 ) against the Imagawa (purple mon
  ) at Daimyō (Hard) level with automated initial setup. The starting year is 1530.
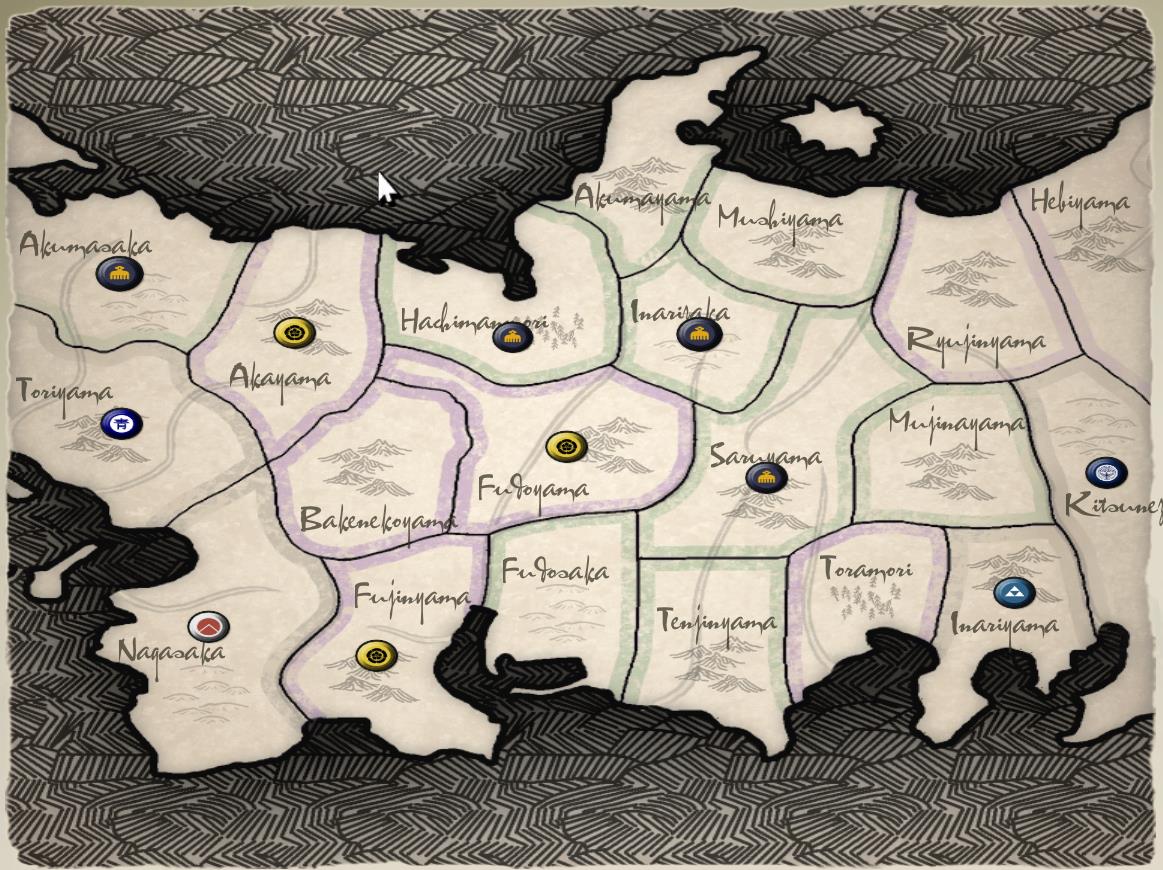
Purple is the player, Green is the enemy.
For this campaign, the province terrain and starting positions are randomised. Those who know the Japanese language will notice that the province names correspond to the terrain. Toramori for instance literally means “Tiger Forest”.
LATE SPRING 1530
1530 began with the Asakura clan of Akumasaka entering into an alliance with the illustrious Imagawa clan. This placed the Oda at a disadvantage as their armies are now surrounded from all sides. The Aoi and Akai clans in the east remain neutral but it wouldn’t take too long for them to take sides. The Uesugi and Hōjō clans in the west are pretty much uninterested in the brewing conflict in central Japan. The Oda sent several missions to Toriyama to secure an alliance with the Aoi lords but the lavish gifts were not enough to convince the Aoi to join their side.

Both sides began consolidating their armies. The Oda 3rd army moved from Fujinyama to Fudoyama and combined with the Oda 1st army. The Imagawa 2nd army moved from Inarizaka to Saruyama and joined the Imagawa 1st army. The Imagawa 3rd army moved from Hachimanmori to Inarizaka.
EARLY SUMMER 1530

The Oda 1st army marched into Inarizaka but the Imagawa 3rd army retreated into Saruyama to avoid battle. The Asakura army attacked Akayama. The outnumbered Oda army decided to retreat to Bakenekoyama without a fight. The Imagawa also sent an army into Oda-held Fudoyama.
Gameplay note: Lopsided engagements will automatically lead into a side retreating to avoid battle. The retreating force will lose a few troops due to desertion or rear guard action.
LATE SUMMER 1530

The Oda 1st army does not want to get bogged down in sieges so it continued to chase the Imagawa 3rd army and moved into Saruyama. Still not wanting to fight, the Imagawa 3rd retreated into Fudosaka while the rest of the Imagawa armies stayed put and conducted sieges on Akayama and Fudoyama.
Gameplay note: Sieges cause attrition to the attackers. The probability of capturing a province is related to the strength of the invading force and the number of turns the province has been under siege. Infantry are more effective than cavalry during sieges. Medium and Heavy Artillery are even more effective – but the Japanese clans have none.
EARLY AUTUMN 1530
The province of Fudoyama is in trouble and Oda Hidemori of the 1st army traversed the mountains from Saruyama to provide relief. When the battle has been joined, not all of the Oda forces have arrived in time due to the difficult terrain.
BATTLE OF FUDOYAMA
Oda Hidemori’s 1st army of 8,000 men faced an Imagawa force of 13,000. With the late arrival of some troops, the odds were greatly against the Oda. But a province is at stake so a battle must be fought to expel the invading Imagawa forces.

Oda Mototoshi’s division took the left flank, Oda Yoritaka the centre, and Oda Chikakatsu the right. Old and frail Oda Hidemori set up his honjin in the rear.

When the fighting began, Oda Mototoshi left his Mounted Yari Samurai unit and directly led a Yari Samurai (Foot) unit in close combat. Making the enemy samurai disengage.
Oda Chikakatsu charged an Ashigaru unit and sent it fleeing. His unit was eventually surrounded and was forced to retreat. The poor general was severely maimed while being chased by enemy Mounted Yari Samurai. Due to this incident, he would not be able to see combat for the rest of his life.
More misfortune fell on the Oda as Mototoshi was killed by some random ashigaru.
Oda Yoritaka’s and Imagawa Chikayoshi’s units locked in close combat. Yoritaka found Chikayoshi in the brawl and the two generals engaged in a fierce duel. Yoritaka prevailed over Chikayoshi and he customarily took the loser’s head as a trophy.
Oda reinforcements arrived before midday but there seemed to be no hope of winning. Oda Hidemori raised the signal for a general retreat into Bakenekoyama to meet up with the other Oda army. The Oda lost 2000 men that day, including one general killed and another incapacitated. The Imagawa, on the other hand, lost one general and 900 men. Fudoyama castle eventually fell into Imagawa hands.
To reward Oda Yoritaka for slaying Imagawa Chikayoshi, the Oda daimyō gave him command of the 1st army. Old Oda Hidemori wanted to commit seppuku for his failure at Fudoyama but his life was spared as the clan thought he was more useful on the battlefield.

LATE AUTUMN 1530

Akayama has been under siege since summer. To prevent it from falling, the consolidated Oda army marched from Bakenekoyama to confront the invaders. The Asakura army refused to fight. They abandoned the siege and retreated to Fudoyama. The far flung province of Toramori was besieged by the Imagawa but was abandoned due to the arrival of winter.
EARLY SPRING 1531

In the spring of 1531, an alliance between the Oda and Aoi was finally consummated through a lavish wedding. An Aoi army was subsequently mobilised in Toriyama under General Okiemon. The Oda also raised an army at Bakeneko Yama, commanded by Oda Sanemitsu.
The 2nd Imagawa Army has been mobilised in Hachimanmori under the leadership of Imagawa Satokatsu.
LATE SPRING 1531

The Oda 1st army moved from Akayama to Hachimanmori, forcing the small Imagawa 2nd army to retreat to Inarizaka. The Aoi army moved from Toriyama to Bakenekoyama and incorporated into the Oda 2nd army. To prevent the Oda from capturing the Hachimanmori, a larger Imagawa force from Inarizaka launched a counter-attack.
FIRST BATTLE OF HACHIMANMORI
Hachimanmori was a wooded province which provided several opportunities to conceal movement and conduct ambushes. The name of the province came from Hachiman, the deity of archery and war, who was fervently worshiped by the samurai. It was said that weapons crafted from the trees of Hachimanmori possessed magical abilities but most Japanese dismiss this as mere folklore.
Oda Yoritaka had an army of 14000 men while the Imagawa brought around 16000 men. The Oda army was deployed like a crane’s wing to take advantage of any flanking opportunities that arise. On the right of the army was a forest which somewhat protects the Oda flank assuming the Imagawa doesn’t use it for concealment. The disgraced Oda Hidemori took charge of the extreme left, with Oda Yosotsuna supporting. Oda Shigemasa took charge of the centre and right supported by Oda Yoritaka’s own troops. The Oda clan brought with them a lot of archers and deployed them behind the shock troops.

An enemy flanking force, mostly composed of sōhei warrior monks and archers, unexpectedly arrived behind the Oda army’s left wing. Oda Yosotsuna needed to turn back and confront the flanking force which he eventually defeated. But this prevented him from executing flanking upon the enemy’s main army.
The Imagawa army began the attack with Imagawa Sanehide as vanguard in the centre. Oda Hidemori’s division bore the brunt of the attack and eventually faltered.
Oda Shigemasa defended the hill on the right. His troops shot arrows from the hill which sent Imagawa Toshihisa’s cavalry fleeing. This was followed by a fierce charge of foot soldiers and samurai that managed to rout several Imagawa troops.

The battle turned into a confused brawl until nightfall. The Oda won the day but it was hardly decisive. The Imagawa lost 4000 men while the Oda lost 3000. A lowly ashigaru brought the head of Imagawa Toshitomo to Oda Yoritaka for viewing. He claimed to have killed the general during the battle by stabbing his yari in the general’s back. For his deed, the ashigaru was handsomely rewarded.
Oda Yoritaka received news that Akayama was invaded by the Asakura army while Toramori is also under attack.
EARLY SUMMER 1531

Oda Yoritaka’s 1st army need not worry about Akayama as the Aoi army was able to provide relief. The Asakura army returned to Fudoyama without a fight. As Oda Yoritaka continued to besiege Hachimanmori, a newly consolidated Imagawa army attacked from Inarizaka. This brought about the Second Battle of Hachimanmori.
SECOND BATTLE OF HACHIMANMORI
The Oda army of 10000 men faced an Imagawa army of 12000 in the Second Battle of Hachimanmori. Oda Hidemori’s cavalry division was positioned on the left, inside a forest. Hidemori was tasked to delay any Imagawa troops coming from the flanks. Oda Shigemasa was at the centre. He commanded some battalions armed with spears and swords which were supported by a lot of archers in the rear. The Oda battle plan was for Yosotsuna to hold the centre line while the archers shot at the oncoming enemy which came through the narrow clearing between the forests. Oda Yosotsuna commanded the right flank. The army’s taishō (commander in chief), Oda Yoritaka positioned his honjin in the rear.

Oda Hidemori ambushes Imagawa Toshihisa’s troops from the forest sending a few units routing. But the initial surprise was short lived as he had only a few troops who were quickly overwhelmed. Bitter fighting on the centre led to the loss of most of Oda Shigemasa’s close combat troops. The Oda archers were then left exposed and vulnerable. It was fortunate that Oda Yoshotsuna was there to provide support. The centre stabilised and the Oda was able to slowly push the Imagawa back but casualties were high.

Oda Hidemori, together with his last remaining riders, slipped through the Imagawa troops and heroically attacked Imagawa Takasato in his honjin. But Imagawa Toshihisa and Imagawa Sanehide are hot on his trail. Imagawa Toshihisa catches up and attacks Oda Hidemori’s unit from the rear.
The old and frail Oda Hidemori was in no shape to engage in a duel. Gameplay note: Hidemori’s duel rating is 2. The lowest possible rating. The disgrace from losing Fudoyama had spurred him to seek out the Imagawa taishō. By killing Imagawa Takasato, he would be able to regain his honor. Even if he failed and met his death, he would be remembered as an honorable samurai for this deed. His wish was granted. Imagawa Takasato easily defeated the old samurai and quickly put him out of his misery. Oda Hidemori will be remembered in history as a brave and noble samurai.
With their general dead, Hidemori’s troops fled. Imagawa Toshihisa gave chase. Oda Shigemasa attacked Imagawa Takasato’s flanks and routed the Imagawa general and his unit.

It was a battle where the Oda might have won. A second attack on the honjin was possible but casualties were too much to bear. In the end, the Oda lost 6000 men during the Second Battle of Hachimanmori. The army retreated to Akayama and Oda Yoritaka was replaced by Oda Shigemasa. The Imagawa, on the other hand, lost 3400 men and saved the province from falling into Oda hands.
LATE SUMMER 1531

The defeat at Hachimanmori was unfortunate. The Oda were desperate for a significant victory on the field; else it may mean the end of the clan. The Oda decided to invade Hachimanmori again after the army incorporated the Aoi troops in Akayama.
THIRD BATTLE OF HACHIMANMORI
The numbers were fairly even with the Oda fielding 10000 troops while the Imagawa has 11500.
Oda Yoritaka and his large cavalry force was positioned on the left wing. The Aoi General Okiemon was assigned to the centre and Oda Sanemitsu commanded the right. Oda Sanemitsu was taller than the average Japanese and had a great physique. He is also very skilled in wielding the Yari and Katana. He was likened to the ancient Chinese (Han Dynasty) general Lu Bu and is considered one of the greatest fighters in all of Japan.Gameplay note: Sanemitsu’s duel skill is 7. Having a skill of 7 and 8 is rare. As per samurai tradition, the taishō, Oda Shigemasa, set up his honjin in the rear.

When the two armies met, Oda Sanemitsu sent the Imagawa left flank, mostly composed of warrior monks, in disarray while the Oda Yoritaka and Genera Okiemon held their lines. Imagawa Toshihisa’s Yari cavalry foolishly engaged Oda Sanemitu’s unit. Oda Sanemitsu fought Imagawa Toshihisa in single combat, and cut his opponent in half.
The Imagawa centre faltered as Oda Sanemitsu’s right wing troops swept through the flanks after dealing with the monks. On the left, Oda Yoritaka’s cavalry division put up a valiant effort in sending the Imagawa troops on the left routing, but they were forced to withdraw due to a counterattack of Imagawa’s reserve cavalry.
The minor setback on the left flank was inconsequential, as the one-sided battle led to the early withdrawal of Imagawa troops. The Oda army lost 1500 men while the Imagawa lost 7000. The remnants of the Imagawa army retreated to Fudoyama.
EARLY AND LATE AUTUMN 1531

As the Oda army laid siege on Hachimanmori castle, the Imagawa 1st army attacked Akayama. The diversion worked and the Oda was forced to abandon the siege and confront the Imagawa at Akayama. But no battle was fought as the Imagawa retreated to Fudoyama. The Oda once again failed in their attempt to capture Hachimanmori. Elsewhere, the Asakura army moved to Mushiyama.
EARLY SPRING 1532
The Uesugi clan joined the Imagawa cause in 1532. As the Imagawa threatened the undefended Oda lands near Kitsunezaka in the East, the Uesugi thought that this was an opportunity for them to capture more territory and also to preserve their clan in the event that the Imagawa turn on them.

The Imagawa 5th army has been mobilised in Mushiyama, commanded by Imagawa Harunaga. The Oda 2nd army has been formed in Bakenekoyama, commanded by Oda Naosato.
LATE SPRING 1532

The Oda clan devised a plan where Oda Shigemasa’s 1st army would attempt to capture Akumasaka, the home of the Asakura, clan. They hoped that this would make it easier to convince the Asakura to abandon the Imagawa alliance. To make this possible, Oda Naosato’s 2nd army would delay any attempts to relieve the siege by setting up a blocking force in Akayama.
The Imagawa armies converged in Hachimanmori and invaded Oda held Bakenekoyama, Ryujinyama and Toramori.
EARLY SUMMER 1532
FIRST BATTLE OF AKAYAMA
Imagawa Harunaga’s 5700 strong army finally entered Akayama in early summer of 1532 and Oda Naosato’s 3900 men was there to meet them on the field.

The Imagawa army deployed behind tall mountains and dense woods. Oda Naosato positioned himself at the centre and waited for the enemy to come to emerge from the mountains. Oda Morihira and Oda Katsuyasa’s cavalry on the left would try to confront any potential attackers from the side while Oda Sadayoshi hid in the woods on the right.
Imagawa advance troops came in one by one and the Oda troops defeated them easily. Due to unfamiliarity with the rugged terrain of Akayama, the Imagawa main force got lost behind the mountains. Since there was no big enemy push in the centre, Oda Naosato ordered his troops to move up the hill in front of them.
Imagawa Katsunosuke emerged from the woods on the left with his cavalry. Oda Morihira and Oda Katsuyasa positioned themselves in order to catch the Imagawa cavalry’s flank.
Imagawa Katsunosuke chose to engage Oda Morihira, giving Oda Katsuyasa the opportunity to attack from the flank. Oda Katsuyasa engaged Imagawa Katsunosuke in personal combat but there was no victor. Oda Morihara joined the fight and was able to cut off Imagawa Katsunosuke’s arm sending the rest of the Imagawa cavalry in retreat.
There were no more Imagawa troops that came out to fight for the rest of the day. Oda Naosato held Akayama and inflicted 500 casualties on the enemy while losing 130 men in the process.
LATE SUMMER – EARLY AUTUMN 1532

In late summer, Ryujinyama and Bakenekoyama had fallen into Imagawa hands and they moved on to besiege Toriyama, Fujinyama and Hebiyama. As the season changed and the leaves turned red, the Asakura army arrived in Akayama with the goal of cutting a path into their homeland.
SECOND BATTLE OF AKAYAMA
Asakura Okifasa’s invading army of 7600 men, found a way around the mountains. Now the opposing armies met in a valley wide enough for a relatively open battle. A Buddhist temple was located at the centre of the valley. Monks and rōnin have joined in to defend Akayama, bolstering Oda Naosato’s numbers to 5700.
The Oda went on the defensive with the main force positioned on top of a hill while Oda Sadayoshi’s cavalry positioned themselves at the very far right. Both armies waited for each other to make the first move for most of the morning.

By midday, Asakura Okifasa grew impatient and ordered the attack. Asakura Toshimasu’s cavalry division engaged Oda Sadayoshi to secure the Asakura flank. In the centre, Oda Katsuyasa and Oda Morihira engages Asakura Sumisue’s division mostly composed of rōnin.
Oda Sadayoshi has been severely wounded while leading his men in combat. This sent the Oda cavalry on the right fleeing. Oda troops on the left were able to push back the Asakura but it took a lot of casualties to make Asakura Sumisue’s rōnin finally retreat.
Asakura Katsutsuna and his Yumi Samurai emerged from the woods to engage Oda Katsuyasa’s Yari Samurai on the outskirts of the temple. They fought in a duel where Oda Katsuyasa was killed. Asakura Katsutsuna in turn was surrounded by Oda troops and was slain.

Despite a valiant effort which almost sent the Asakura army into retreat, the Oda troops’ morale was broken by the end of the day. They lost 1700 men and two generals while the Asakura lost 2000 men and one general. The defeated Oda army retreated to Akumasaka to join up with the main force.
AFTERMATH

Oda Naosato’s delaying tactics at Akayama led to the fall of Akumasaka castle before winter. Elsewhere, Toriyama, Fujinyama and Hebiyama remained under siege while Toramori fell into Imagawa hands.
In 1533, after the annual collection of taxes, the Oda realised that province income was not enough to bring the Asakura into the negotiation table. This was due to the loss of several provinces during the previous year. The brilliant plan of making the Asakura switch sides did not materialise.
Gameplay note: Gifting a clan costs 100 and I ended up with only 86 in my treasury due to the loss of provinces. By capturing a clan’s homeland, the chance of convincing them to join my side would have been higher.
The Oda clan is not finished but I will end the story here as the campaign can either result into a defeat or drag on for a long period if I play it well. I hope you enjoyed reading the tragic story of the Oda generals.
