

My Core going in:
Infantry x8
Tanks x13 (includes 5 captured)
Recon x1
Anti-tank x1
Artillery x6
88 x1
Fighters x6
Stukas x3
Fighter/Bomber x1
Bombers x4
Storming Stalingrad
I was warned by High Command of partisan attacks from the west so my first order was to pull the Italians back to guard the rear and destroy the partisans. I drove two spearheads into the city. I quickly learned an important lesson when my veteran 15th Fallschirmjaher was KIA to the south after be swarmed by hordes of Russian SMG and Conscripts; the formations must be held tight with armour and infantry backed up my artillery and my flanks must be guarded at all times. The Red Air Force offered little resistance and weather was on my side allowing my powerful Luftwaffe to bomb with impunity. This was the 2nd hardest scenario of the three. DV 21/24.
The Docks
I expected this one to be tough. I sold 3 of my unused captured tanks and my Bruckenpionere for enough prestige to over strength all of my units to the max. Again the Red Air Force was no match and my new Fw190A knocked enemy fighters out the sky with ease. My Stukas and Bombers destroyed countless Conscripts in their landing crafts before they could make it to the docks. Meanwhile, my two battle groups pushed through the city with ease. I could have won on turn 15 but decided to go for the prestige and experience. This was the easiest of the three. I took all hexes but two for a DV 22/22.
The Ruins
This one, this one was tough and lots of fun to play. I decided to follow orders and fight. It was the longest time I’d ever spent studying a tactical map before a battle. I come to the following conclusions:
1. Gumrak to the west currently held by the Italians was likely to be overrun and there was nothing I could do about it. (I was right)
2. My air field guarded by the Italians was in danger. I needed to secure another airfield. The Russians had one to the north and one to the south. The southern airfield sat behind a VH and was likely heavily guarded. (I was right again)
3. If I tried to be at all places my forces would be spread too thin leaving my flanks would be exposed and I would probably lose a lot of units.
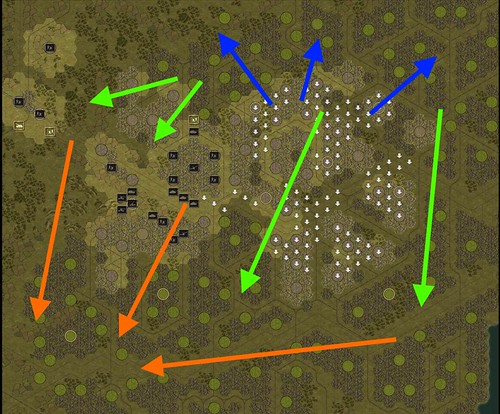
I needed a strategy, and then it occurred to me. I decided to call it the ‘Mushroom’ strategy. Instead of pushing towards the VH south, I decided to mass my forces and push north, taking the airfield and wiping out any chance of the Russians attacking me from behind. Then I would mushroom out my forces, sweeping down, recapturing Gumrak and taking all VH. The question was, would I have enough time? This is my battle map; Blue, Green, and then Orange.
Fighting was tough! So many Russians! But I kept my formations and made my way through the ruins wiping out all enemy resistance. Again, the Red Air Force was no match and my Stukas and Bombers took a heavy toll. Though, I was caught off guard on occasion as enemy aircraft would fly in from off the screen, didn’t expect that, and would sometimes catch a Stuka unescorted. They suffered some damage but thankfully no loses. As I approached the final VH in the SW corner of the map with the airfield, the fighting intensified. The Russian threw everything they had at me and pinned down some of my forces. I lost a new Stug IIIF/8 and unfortunately, I lost my elite 14* 10th Gebirasjager. They were swarmed by hordes of Russian infantry and lost. They will be missed. I managed a DV 21/24. If I played the map again, I would use the same strategy but try to better coordinate the timing of my forces meeting for the final VH.
Highest Award
1st JU87D – 2,674 kills – Nov 08 1942
Knights Cross with Oak leaves, Swords and Diamonds


