

Stephen and I were joined by Phil Giles for the third game. This time we decided to play 600pts in an attempt to get a conclusion to the game and record the time taken for each phase. We decided to also change armies for variety but keeping the historical match-ups. I played Later Hungarian and Stephen & Phil played Later Ottoman Empire.
From my own point of view I spent a little time thinking about this game after my last disaster. This centred around three main points:
* You have to take cohension tests. So I was unlucky in the last game, but I also fought with predominately 'C' class troops.u Maybe that was the source of the problem and so I resolved to fight with 'B' class wherever possible. On average a 'C' class unit is going to fail a test 15/36 or 57% of the time. A 'B' class get to re-roll 9 of those 15 results making it significantly less likely (my maths fails me at this point but somewhere around 25%) and 'A' class are even better.
* I'd tried a reactive deployment in the first game, a mixed deployment (different types of units in each quartile) in the second game and having played DBM at the Chester round of the doubles with a sweeping army I thought I would try the old DBM sweep in AoW. To this end I figured out a deployment that would allow me to pick a side as late as possible.
* I would keep the same number of generals. Again to allow a better chance of rallying but also to increase movement to help both of the above.
Here is my list:
1 IC General 75
1 FC General 50
1 TC General 30
6 Foot Archers LI 'C' Unprot. Bow 24 1
6 Hungarian Horse Archers LH 'C' Unprot. Bow 42 1
4 Szeklers Cv 'B' Unprot Bow Lance Sword. 48 2
6 Clipeati and Armati HI 'C' Armour. Def. Sp. 42 2
3 Shooters supporting LI 'C' Unprot. Bow 12
4 Szeklers Cv 'B' Prot Bow Lance Sword. 56 3
4 Szeklers Cv 'B' Prot Bow Lance Sword. 56 3
4 Royal Banderium Kn 'A' Lance Sword. 92 4
4 Hungarian Nobles Kn 'B' Lance Sword 72 4
This is Stephen & Phil??™s list:
1 FC General
1 FC General
4 Light Horse Archers
4 Light Horse Archers
4 Light Horse Archers
8 Azabs
8 Azabs
8 Mob
8 Janissaries
8 Janissaries
2 Qapu Khalqi cavalry
4 Timuriots
4 Timuriots
4 Timuriots
Pre-Game
19:50
The Ottomans invaded and chose Steppes to captialise on the open spaces. Stephen declared 26 scouting elements, and I had pre-decided to declare 10 (hoping to persuade them I had a Cv light army) and an IC CinC. Even with the advantage I was still out-scouted on the dice.
20:04
Terrain ended up like this:
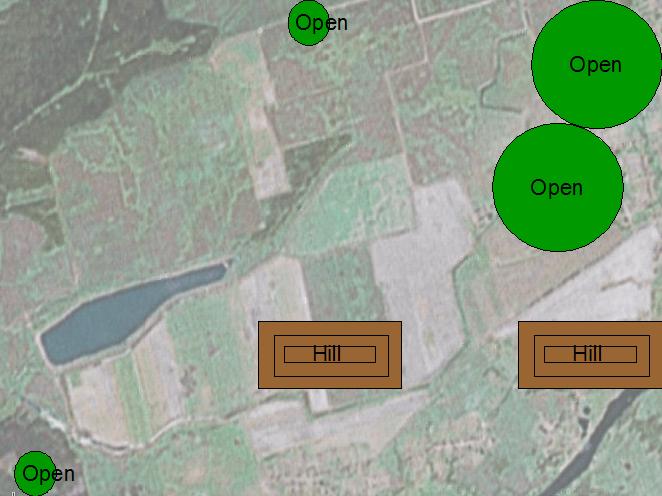
Stephen and Phil went for maximum open (the two small bits are the compularies). I decided against rough or broken going - I wanted an open table as well so there was no where for the Janissaries (I presumed they would take them) to hide and my knights and cavalry would have a chance to attack them in the open. Instead I went for hills. It was hard to judge where I should put them and in retrospect a little further forward would have been better.
20:10
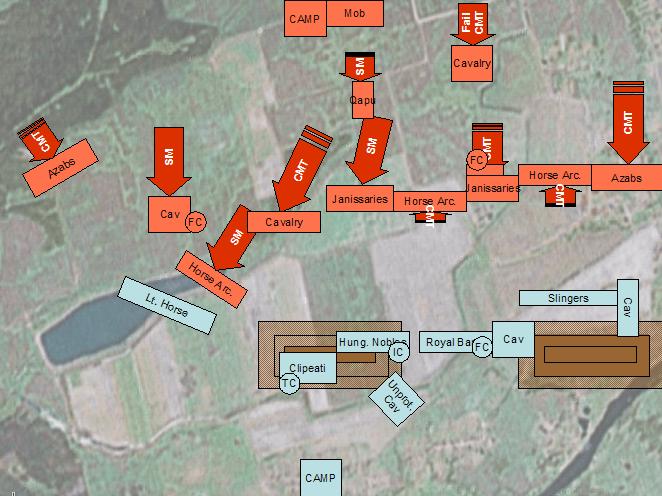
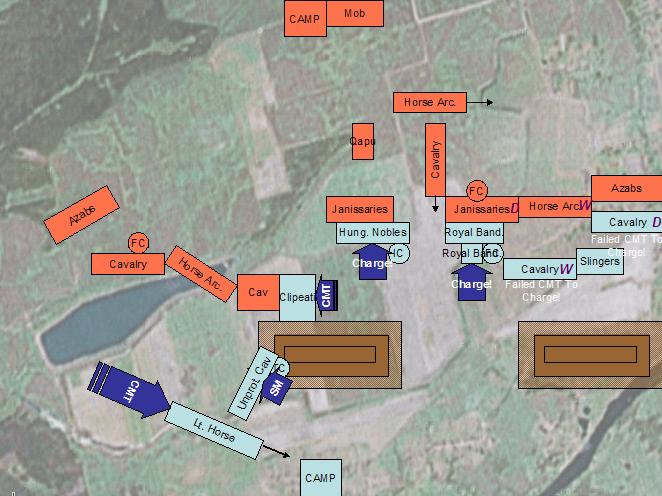
We deployed as shown below:
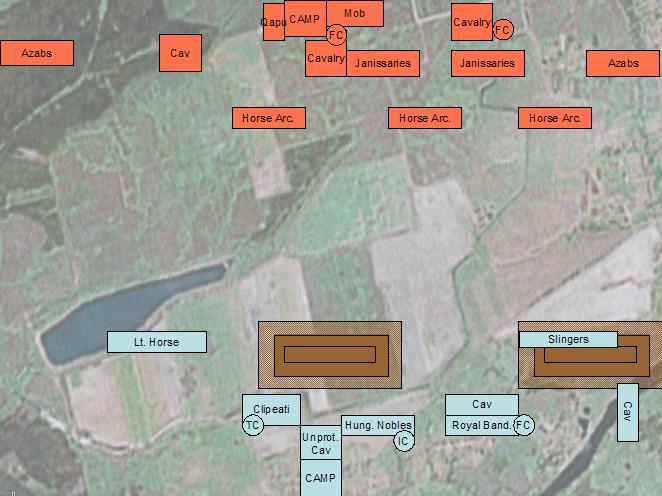
A couple of points immediately sprang to mind:
* Stephen and Phil's army was 50% larger but only had 2 generals. Would maneouver win over size - in DBM there is every chance it would at least provide a 6-4 when sweeping.
* A flexible deployment allowed me to get my knights opposite the Janissaries. In DBM this would be a massacre for the knights. But under AoW I hoped it would be a little better for the knights.
* His cavalry were armoured and mine where unprotected and protected. So I would have to stay in 1 rank or get shot to pieces but with lances I should win at impact. Would Stephen and Phil stand and fight in deeper ranks hoping to survive impact and hope there better armour and deeper ranks would win in melee. Or would they skirmish?
* Qapu Khalqi cavalry in units of 2 elements strike me as silly. You could take 3 units of 2 elements and use them to bulk out the deployment and skirmish, snipe, flank attack with. Feels a little like cheese waiting to happen.
20:30
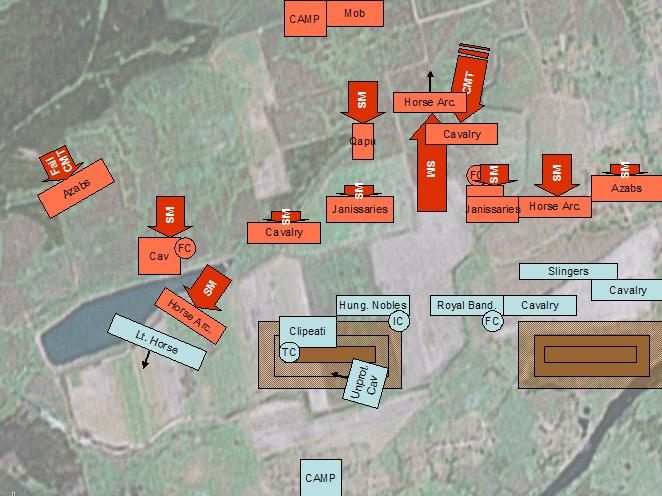
Bound 1 (Ottomans)
We had agreed to try and get a result of this game and that meant playing a more aggressive and up front game than the others. Stephen and Phil moved their troops forward, hoping that the bow armed infantry would survive until the cavalry got into play. They also pressed forward on the left, hoping to turn the flank.
20:43
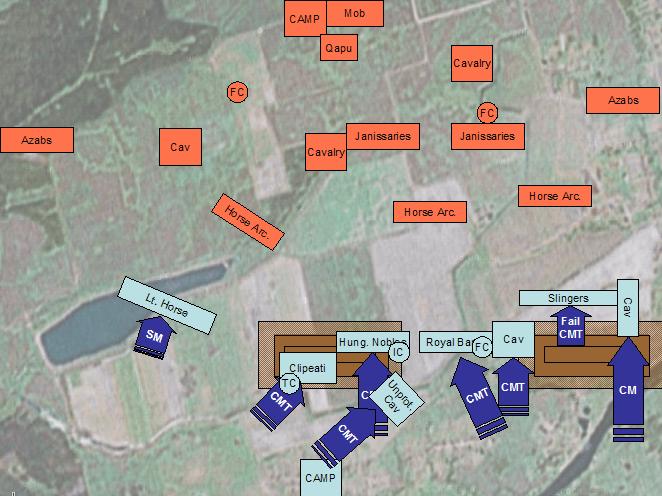
Bound 1 (Hungarians)
My game plan was about as simple. Anchor my flank with the heavy infantry, light horse and reserve cavalry while smashing everything is front of me with the knights and szekler lance armed cavalry. I went right with the unit of unprotected cavalry thinking I would need to cover the gap between the knights. However some inclining later on meant I could pretend this was a brilliant fake and move them to cover the rapidly collapsing left flank. However the gap between the knights gives me idea about where to put the Ottoman Qapu Khalqi cavalry in the return match.
20:55
Bound 2 (Ottomans)
The general advance continued.
21:09
Shooting - An exchange of fire at long range resulted in nothing.
21:10
Bound 2 (Hungarians)
I fell back on the left and advanced on the right and set the cavalry for a last dash against the bows. The needed to be in a single rank to survive the bow fire. I could only hope my 'B' class status would allow me to survive long enough to get into impact. I have no idea whether they should win or not - I presume the Azabs should go down and the Janissaries should be a more even fight with their extra dice.
21:24
Shooting - More exchanges of bow fire did not result in anything.
21:25
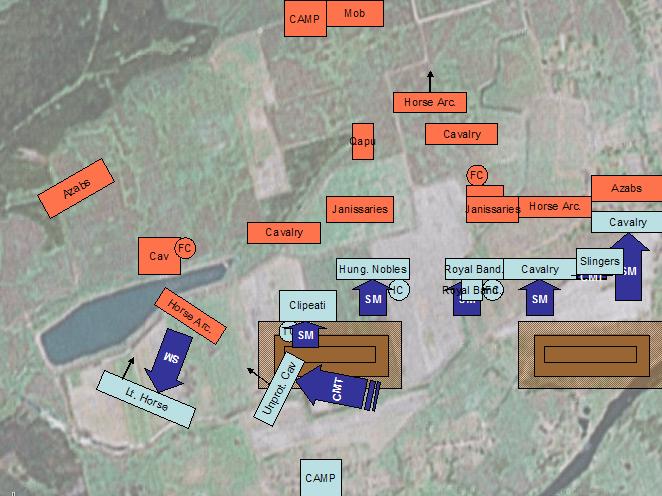
Bound 3 (Ottomans)
The advance continued as the archers stopped at 6" to maximise shooting as the knights and cavalry came in.
21:31
Shooting - The left hand Janissaries scored 2 hits on the Hungarian Nobles who just survived a cohension test - the difference being the IC general. A sweaty palms moment and the heart rate was up for a moment.
21:36
Bound 3 (Hungarians)
The rush was on, with the cavalry and knights hoping to close with the bow as quickly as possible. On the left I continued to fall back and decided that the reserve cavalry would be needed to bolster that flank. Good thing I faked that right move to lure the enemy cavalry reserve across...
21:48
Shooting - Now that the distances were closed, the right hand Janissaries scored 4 hits on the cavalry and they scored 2 hits on the Janissaries. Although no deaths were caused the cavalry needed to take a CT and rolled 3+1(3) causing them to fall to disrupted. A cold sweat broke out over by brow and memories of the last game surfaced. In return the cavalry shooting at the right hand Akinjis caused a similar result on the enemy. Even so I felt a little cheated. Other shooting was without effect - that armour investment was proving to be a good buy (and serious cause for thought for the next game).
21:58
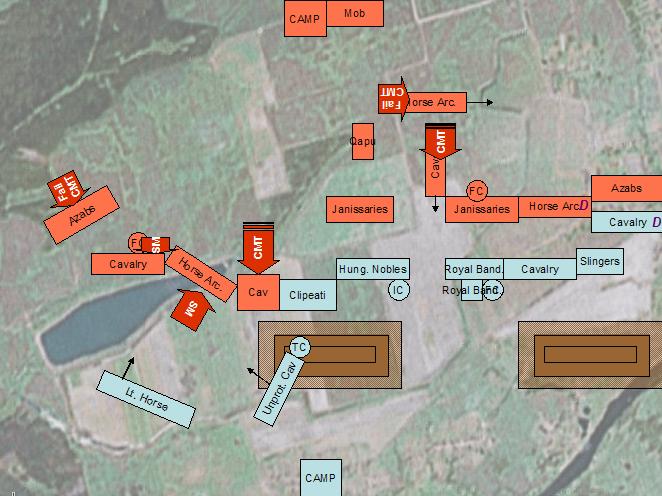
Bound 4 (Ottomans)
Stephen and Phil decided to stop the advance on the left flank, and pushed up another unit of cavalry trying to sneak past the infantry to support the attack. On the right they stood to receive the charge.
22:08
Shooting - The Ottoman Akjinis on the right failed another test reducing them to wavering but in return aided by the Janissaries they disrupted the other unit of cavalry. Both units of 'B' class cavalry were now disrupted and would need to pass CMT to charge home. This seemed to make it even worse as the cavalry might well stand there and take another two rounds of shooting rather than charging home. Yikes. Personally I would charge home or run away - it would safer. Maybe there should be an option to charge home if you become disrupted by bow fire without a CMT? However the knights were unscathered, their better armour saving the day.
22:13
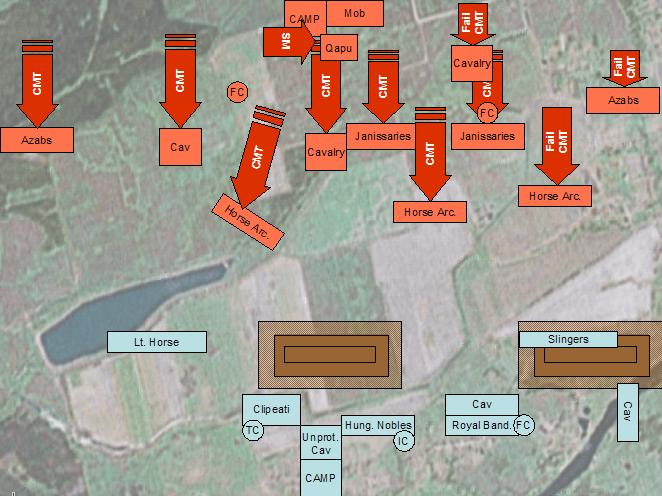
Bound 4 (Hungarians)
Time for impact! I declared charges from the knights and two disrupted cavalry units. Both cavalry units failed their CMT rolls leaving them stranded. Ah. Oh well. Fortunately the left hand unit would protected from the worst of any shooting by the knights going into contact with the Janissaries. However the unit on the right would be vulnerable to the full force of the azabs for another two rounds. Frustrating!
3 Royal Banderium (general fighting in the front rank) fought against 6 Janissaries (also with general). BANG! Two sixes and my general was dead. Both sides suffered an element loss, but the Janissaries took more casualties. They failed their CT and went to disrupted. I'd moved one of the knights back to a second rank to add flexability to the resulting melee (plus I forgot they don't get a second rank in melee).
On the left the Hungarian Nobles did not fare so well against the Janissaries. Both units lost an element, and although the Janassaries lost the combat they passed their CT.
At the end of the phase the cavalry next to the Royal Banderium took a general death CT and failed again, reducing them to wavering. I was beginning to wonder why I had bothered taking the 'B' class...
22:39
Movement - Not much to be done here. On retrospect maybe I should have moved the cavalry out of harm's way, but I hoped to charge them in next go. I didn't realise the wavering ones were unable to charge. I also moved my IC across in hopes of rallying some of the units. Again in retrospect this seems more hassle than it is worth - it takes too long and you might as well concentrate on killing the enemy by bolstering units by fighting in the front rank.
On the left I moved the infantry to "pin" the cavalry trying to slip down their flank. It felt almost DBM like. Hah, pinned!
22:45
Shooting - Amazing the disrupted cavalry on the far right caused three hits against the Azabs, forcing a CT which resulted in a disruption. Maybe leaving them there was a good thing after all.
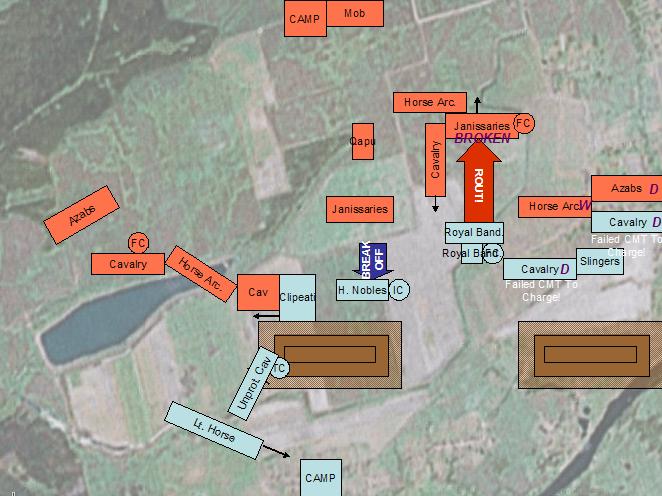
22:50
Melee - The Royal Banderium were fine even though they had lost a general. Seeing an opportunity to close off the advancing cavalry column and improve the odds they expanded out on the spare element on the left (good planning there - honest). With a serious advantage in the melee they inflicted enough hits to cause a death and the Janassaries failed another CT causing them to rout. Yipee.
On the other side the Hungarian Nobles caused another death, but the Janassaries passed another CT. This caused the Knights to break-off and ultimately having to run the gauntlet of bow fire again. Not part of the plan.
It was at this point after 3 hours that we realised there was no chance for a result in the evening and we talked through a few ideas, questions and thoughts.
As it stood we figured no result was possible. Sure the Ottoman infantry units would be routed, but that would not be enough to take the army and the advancing knights would be swallowed by the spare cavalry and light horse - or they could just run away. By two cavalry units were looking sick and eventually the Azabs would cause enough shooting to rout them. Still this is all speculation - we really need to get a game to completition to get a thorough evaluation of the rules.


