

Stephen and I decided to swap armies ??“ he played Sassanid Persians and I played Early Imperial Roman.
Here is my list:
1 IC General
1 FC General
1 FC General
1 Fortified Camp
4 Moorish or Numidian Cavalry
6 Legionaries
6 Auxilary Foot (After 195AD)
6 Slingers
6 Legionaries
6 Auxilary Foot (After 195AD)
6 Auxilary Cavalry
6 Legionaries
6 Auxilary Foot (After 195AD)
6 Auxilary Cavalry
4 Catafractarii / Contarii (Only From 100 AD)
2 Light Bolt-Shooters
This is Stephen??™s list:
1 IC General
1 FC General
1 FC General
4 Light Horse Archers
4 Light Horse Archers
6 Archers
2 Elephants
6 Slingers
4 Cavalry
4 Cavalry
2 Elephants
4 Cavalry
4 Cavalry
4 Cavalry
6 Cataphracts
2 Elephants
Pre-Game
The Romans invaded again and chose Rugged/Hilly. We chose to let the invader declare scouting first again and I declared 23 elements. Stephen declared 14, thus nullifying my scouting advantage. Thanks to list_lurker for the great idea of using powerpoint which I found made reading the battle report a lot easier and clearer. I have therefore shamelessly ripped off his idea.
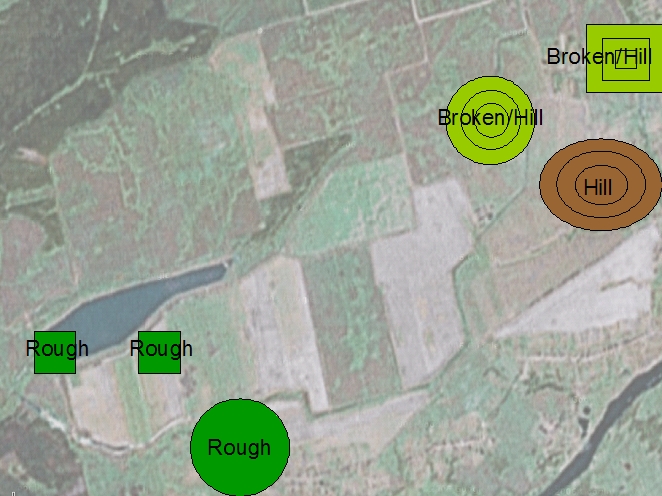
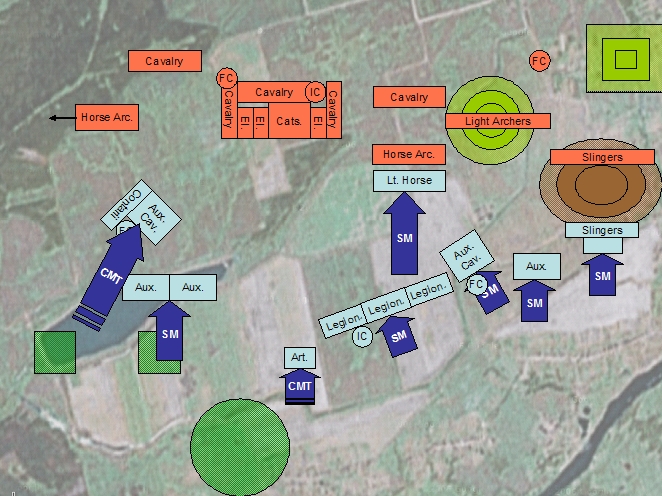
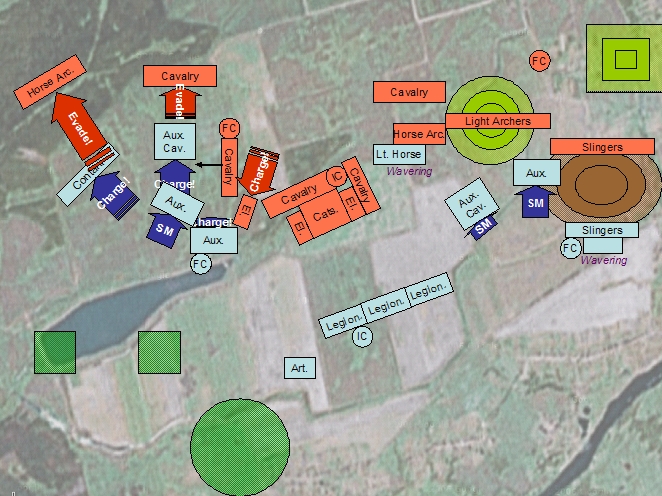
We deployed as shown below.
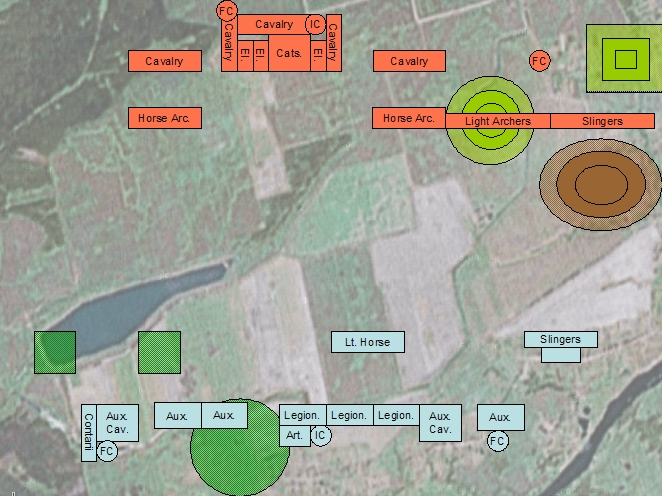
Bound 1 (Romans)
Realising that the centre of the Sassanids would be too strong, I decided to incline the legionaries to unmask the artillery and force the Sassanids to wheel, hopefully exposing the flanks. I also decides to press on the left with the Cav, figuring that the combination of light spears and lancers would drive off the enemy cavalry. Then I could use the auxilaries to attack the elephants and they wheeled past to get to the legionaries. On the right I figured my slingers supported by the auxilaries would drive off the enemy skirmishers and I could turn the flank through the rough. I would use the light horse to attack the enemy light horse and slow the main lines advance. The cavalry were in reserve.
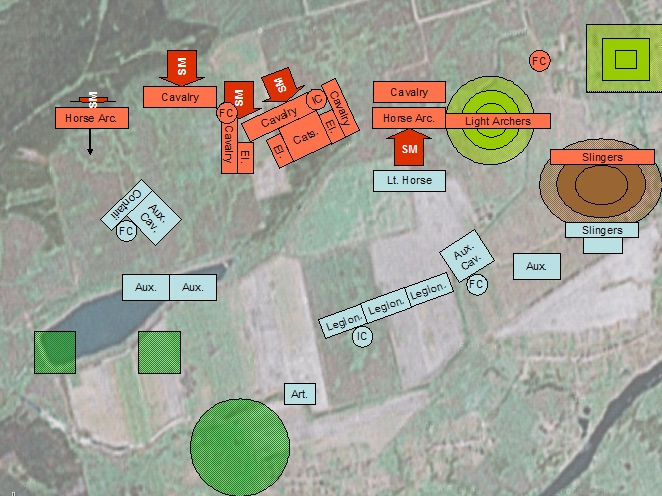
Bound 1 (Sassanids)
The game plan seemed simple enough. Push forward with the cataphracts and elephants while keeping the wings protected without risking anything.
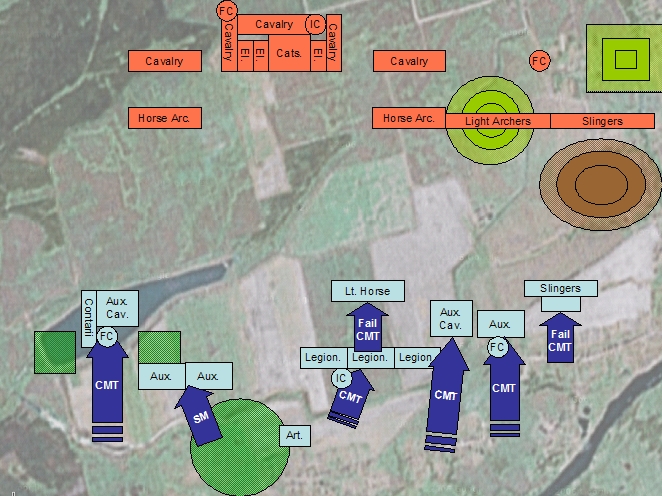
Bound 2 (Romans)
I kept to the plan, wheeling the legionaries to accentuate the exposure of the enemy flanks. The reserve cavalry on the right were looking increasingly out of position, and would have to stand in front of the archers until the light horse battle was resolved.
Shooting was resolved between the light horse and slingers with little effect.
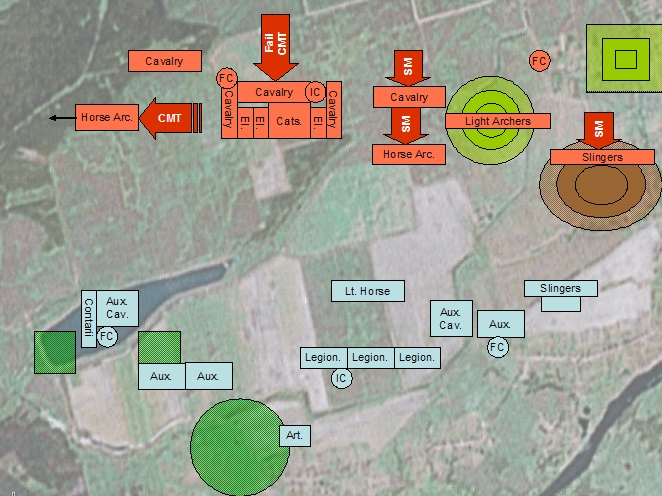
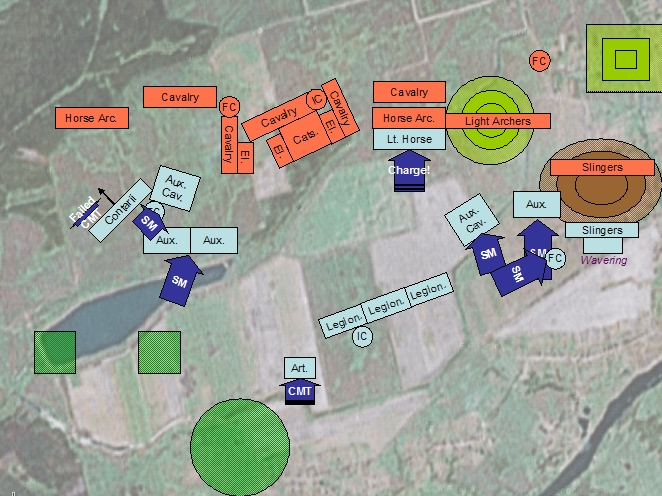
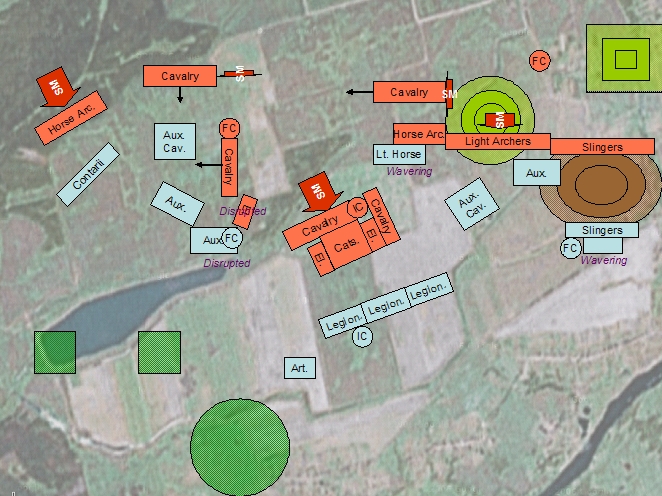
Bound 2 (Sassanids)
The Sassanids started their wheel in the centre, retreated outside of javelin range on the right and boxed in the cavalry advance on the left.
Shooting against the light horse did nothing.
The slingers exchanged fire with the Romans inflicting 2 hits (Sassanids ok) and receiving 3 hits (rolling a 3 for cohesion and immediately dropping to wavering). I thought this was extremely harsh, but thought no more of it, thinking I could move the general over to rally them and use the Auxilaries to drive the slingers off.
Bound 3 (Romans)
After forgetting about charges and having moved the auxilia, we started again. I charged the light horse archers with the numidians. Stephen decided to stand, both because we wanted to see combat, but also because we thought he might not be able to evade.
The combat was 8 dice for each side and the Numidians with a POA for their light spears. However, both sides inflicted 4 hits. Stephen rolled a 1 for his death roll and lost a LH. There was no need for cohesion tests.
I continued to advance on the left, figuring this was my only chance to turn the slowly encroaching tide of the Sassanid centre.
More shooting between the slingers did not result in anything.
The melee between the light horse was now even with 4 dice on each side (we realised afterwards that the light infantry giving an overlap might have been on a different POA but it did not matter). The Romans took 3 hits and lost an element, the Sassanids took 2 hits and lost none. I rolled a 2 for my cohesion and immediately wavered. Still, this was only the skirmishing battle. The rest of the army would be ok??¦
Bound 3 (Sassanids)
Steve continued his advance in the centre, boxing me in on the left and skirmishing on the right.
Shooting at the cavalry on the right resulted in nothing.
The artillery now in range of the elephants also did nothing.
In melee the light horse continued to fight each other with Steven getting 3 dice and me getting 2. We both got 1 hit each.
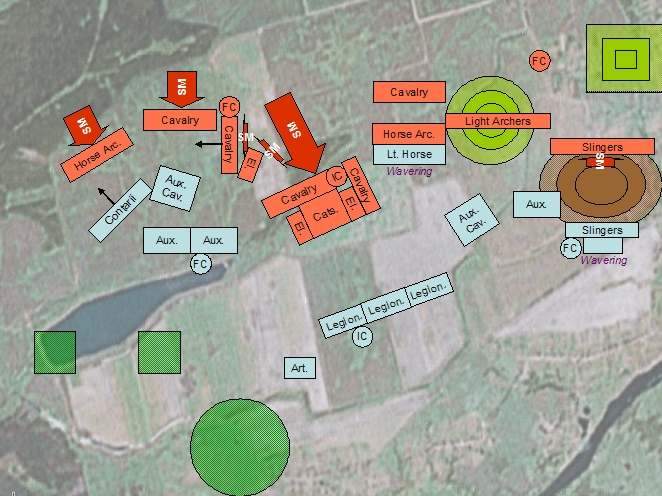
Bound 4 (Romans)
This proved to be the most complex and longest bound as there was a lot going on.
I charged the cavalry on the left to clear out the skirmishers, my only hope to try and pin them against the table edge and force a contact in later bounds. I charged my auxilia into the flank of the cavalry, but the elephants counter-charged to prevent it.
In the end the elephants fought the auxilia in the impact phase. 2 dice versus 2 dice resulted in the elephants doing 1 hit and the auxilia doing none (even though I had a general in the front rank and re-rerolled a 1 into a 2). Another cohesion test and I rolled a 5 leaving the auxilia disrupted! Third CT and third failure!
In movement I pressed the auxilia on the right forward while I tried to rally the slingers. Pushed the cavalry forward a little to within charge distance of the light horse. The legionaries remained stationary, bracing themselves for the crunch.
On the left I wheeled the auxilia not in contact with the elephants just enough to prevent the cavalry from attacking my cavalry.
I needed to be within 3??? and when I moved forward just close enough to prevent the cavalry pressing elements forward into contact. I had mm spare and this was the first piece of micro-move / cheese. I was preventing contact without any real danger.
Lots of shooting resulted in not a lot.
In melee we struggled with the wording of the alignment and expansion rules and so ignored this. 4 auxilia fought the elephant and caused a single hit. Stephen failed his cohesion test and became disrupted as well.
The light horse continued to fight each other with little conclusion (1 hit each).
Bound 4 (Sassanids)
Shooting was mixed. The light infantry on the right shot the cavalry, and caused 2 hits. I rolled a 2 on the cohesion test and dropped to wavering. I could see where this game was heading??¦
The remaining light infantry shot the auxilia, causing 2 hits. I rolled a 6 which caused a disruption. This was getting silly now??¦
The game was rapidly degenerating into a farce as small hits caused cohesion tests that failed.
In combat the elephants fought the auxilia, the elephants caused 3 hits and the auxilia caused 2 hits. I rolled a 10 for the cohension test, thus passing my first and only one of the game.
The light horse fight was finally resolved with 1 hit being caused and you guessed it I failed another CT. My Numidians routed.
My slingers failed to rally, another failed CT.
Bound 5
We continued for another bound, but I stopped recording things. I charged the light infantry with my cavalry and auxilia. Both units took more casualties than they dealt, both failed their CT. The cavalry routed and the auxilia went to wavering. The slingers again failed a CT and failed to rally again.
I turned my legionaries around 180 and marched them away ??“ using the CMT can include a SM rule.
In the end this game was only going one way - once the cataphracts and elephants got into the legionaries it was going to be all over.


