Scenario XIV -- Stalingrad
 Initial Prestige: 72594
Final Prestige: 84972
Core
- Infantry
- Pioniere w/ SdKfz 250/1
- Pioniere w/ SdKfz 250/1 [NEW]
- Pioniere w/ SdKfz 250/1 [NEW]
- Fallschirmjäger
- Fallschirmjäger
- Tanks
- M3 Lee [NEW]
- T-50
- T-60
- T-60
- Panzer IVF [NEW]
- Panzer IVF [NEW]
- Panzer IVF [NEW]
- Recon
- SdKfz 232 8Rad
- SdKfz 232 8Rad
- Artillery
- Schwerer Gustav [NEW]
- 17 cm K 18 w/ SdKfz 7 [NEW]
- 17 cm K 18 w/ SdKfz 7 [NEW]
- 15 cm sFH w/ SdKfz 7
- 10.5 cm leFH w/ SdKfz 11
- 10.5 cm leFH w/ SdKfz 11
- 15 cm Nebelwerfer 41 w/ SdKfz 11 [NEW]
- 15 cm Nebelwerfer 41 w/ SdKfz 11 [NEW]
- StuG IIIB
- StuG IIIB
- StuG IIIB
- Anti-Aircraft
- 8.8 cm FlaK 36 w/ SdKfz 7 [NEW]
- 8.8 cm FlaK 36 w/ SdKfz 7
- SU-6
- Fighters
- Bf 109F
- Bf 109F
- Bf 109F
- Bf 109F
- Tactical Bombers
- Strategic Bombers
- Do 217E
- Do 217E
- Do 217E
- Do 217E
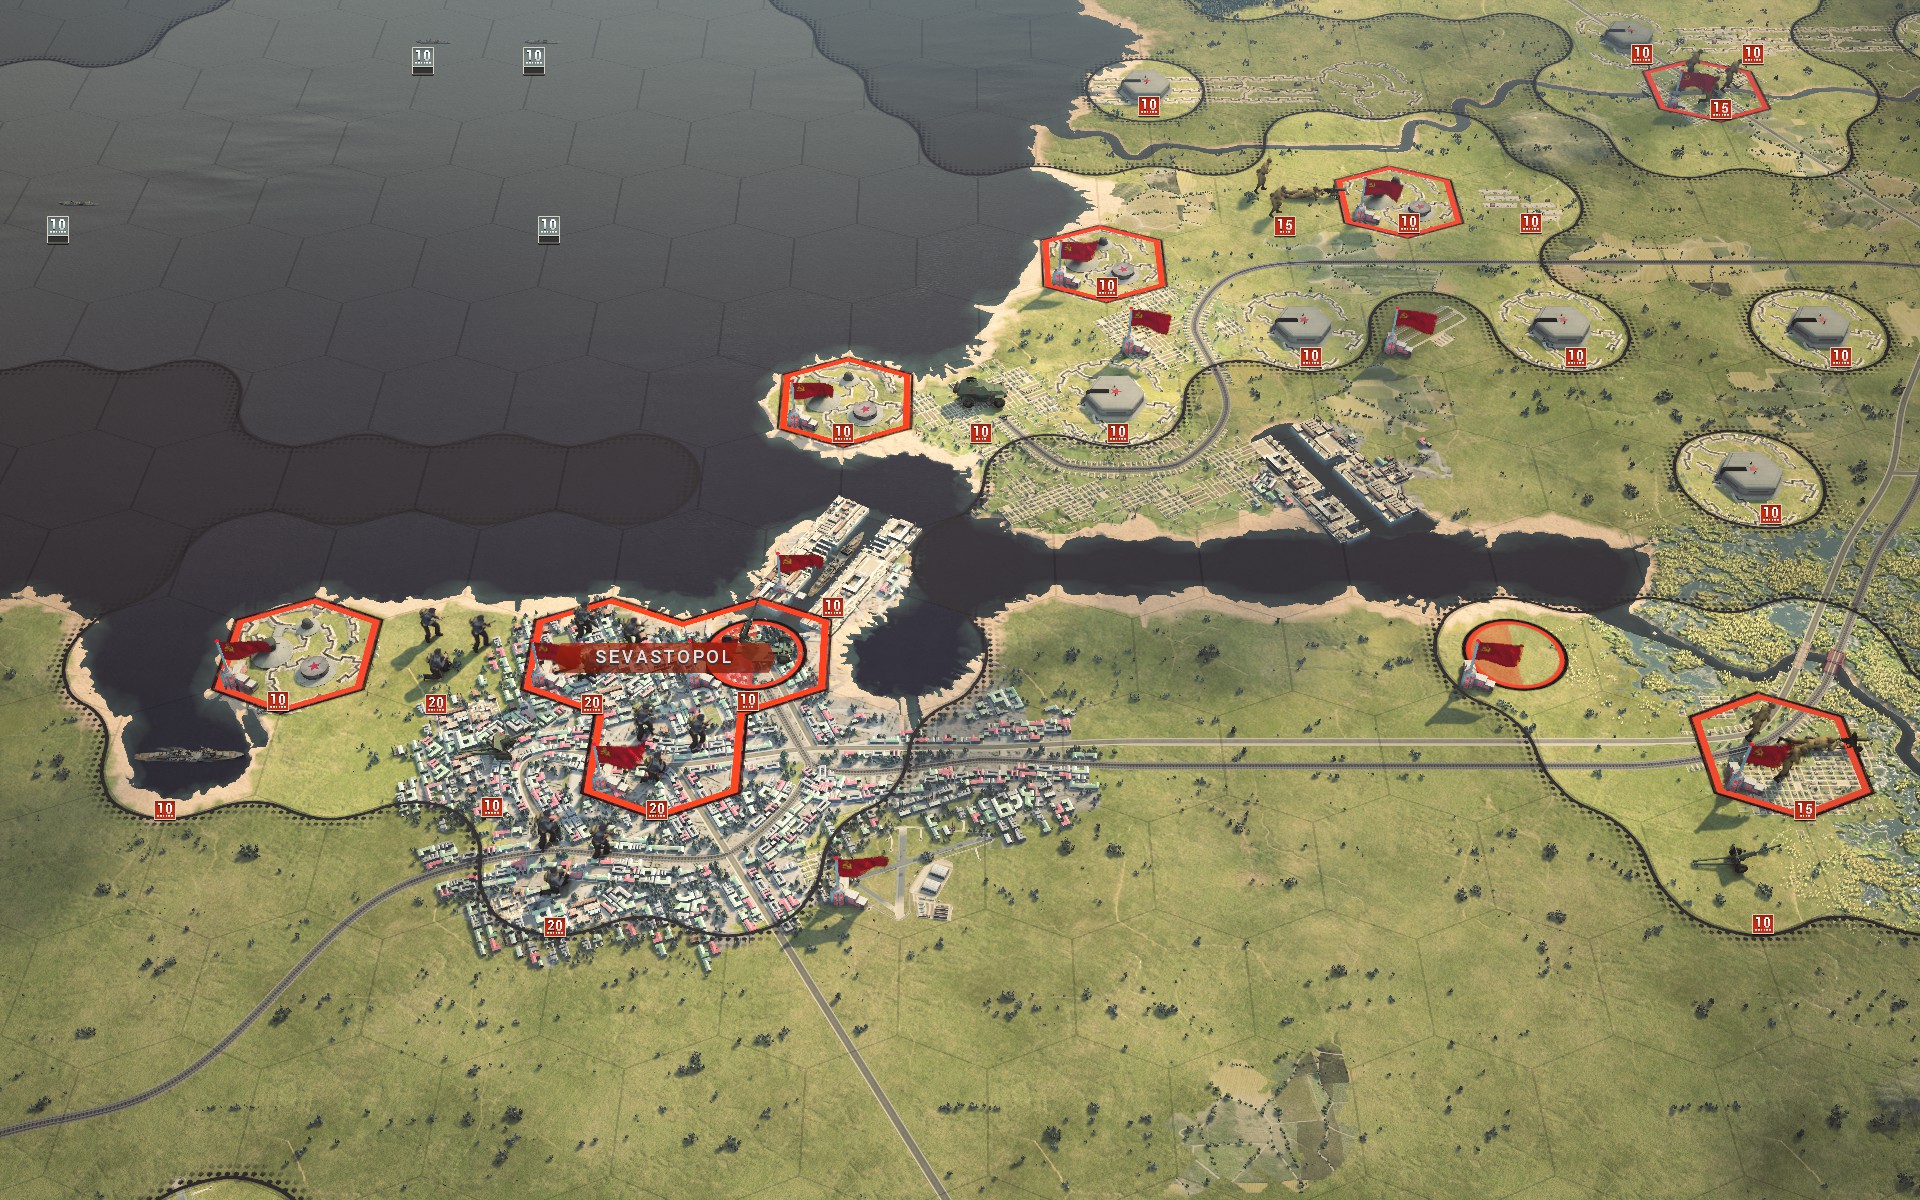
While the main objective of Operation Blue remains the oil fields of Baku, my forces have been assigned to the 6th Army in preparation for the assault on Stalingrad. Situated on the west bank of the Volga, Stalingrad is an important strategic location and home to one of the largest industrial complexes in the Soviet Union, the Red October. Capturing the city would deal a heavy blow to the Soviet industrial base, as well as cut off the Persian Corridor through which the Allies provide the Soviet Union with Lend-Lease supplies.
Once again I've tinkered heavily with the core. Looking at the map it was clear that unlike in the Battle of Moscow there would be no easy way to encircle defenders due to the amount of supply hexes, and with no overstrengthen or heroes to facilitate a breakthrougth the 3 battalions of Pioniere will have to do most of the heavy lifting. Fallschirmjäger will provide a mobile reserve, but considering the number of Soviet infantry it might prove difficult to deploy them safely.
As the Panzers will primarily be protecting the flanks and engage targets of opportunity rather than swiftly advancing to entrap enemies, I've refitted the battalions with more expensive models that offer a good balance of ground defence and soft attack. 3 Panzer IVFs and a Lee will provide resilient flank protection, while the T-60s are fast enough to exploit any weakness in the enemy lines. Finally, the T-50 is the only tank capable of easily damaging heavy Soviet armour, and as I expect at least some to be present I don't want to be forced to rely on converted AAs. That is a lot of armour for what is expected to be an urban battle, but they're good value at 2 core slots each (with Panzer General).
One SdKfz 232 has been dropped to help make room for the Schwerer Gustav. There will no doubt be many fortified Strongpoints in the city, and while Gustav is expensive it offers me a way to deal with these at long range. 2 batteries of 17 cm K 18 heavy artillery will provide further long-range fire and crucial counterbattery support to help suppress Soviet artillery. 2 Nebelwerfer 41s have been requisitioned to provide close-range fire support for the Pioniere, as their poor range is offset by their firepower, and with 2 17 cm to suppress Soviet artillery they shouldn't be too exposed. The StuGs remain cost-effective workhorses as always, offering suppression against soft targets while being highly resilient to infantry attacks, with the notable -- and painful -- exception of the Soviet Guard.
The 8.8 in reserve has been rotated in to help defend against the initial onslaught of the Soviet air force, as my fighters won't be able to protect the northern flank. I wish I could deploy more SU-6s, but unfortunately this unit is as rare as it is powerful. The bomber fleet has been reduced, mainly owing to a need to conserve slots and the lack of airfields large enough to accomodate the Do 217Es; as it is, they won't be able to operate at all in the southern part of the city. As the Soviets will no doubt be bringing in reinforcements from across the Volga I considered switching a few models to ones better equipped to target landing craft, but the operational limits and the uncertainty of whether I'd actually have the luxury of being able to target them made me decide against it.
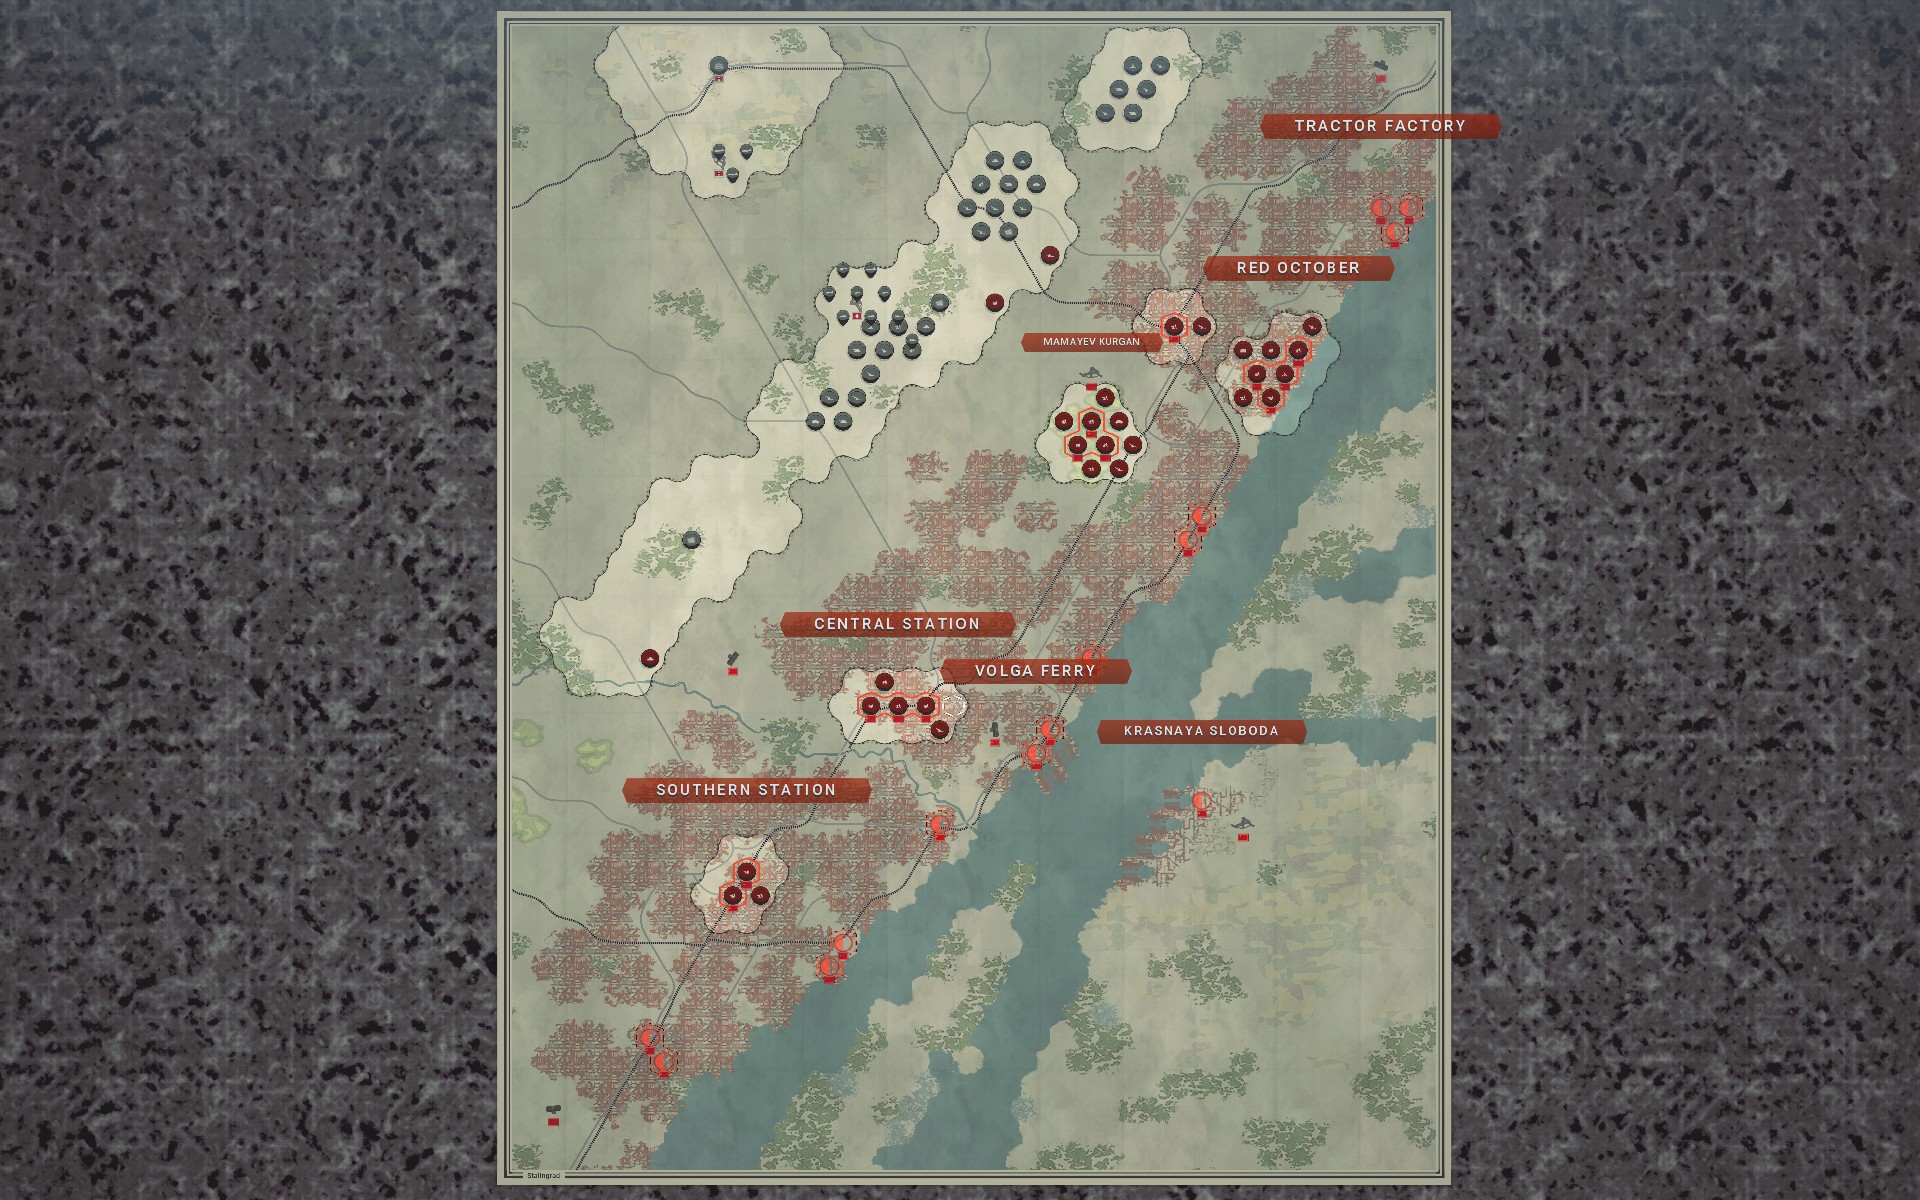
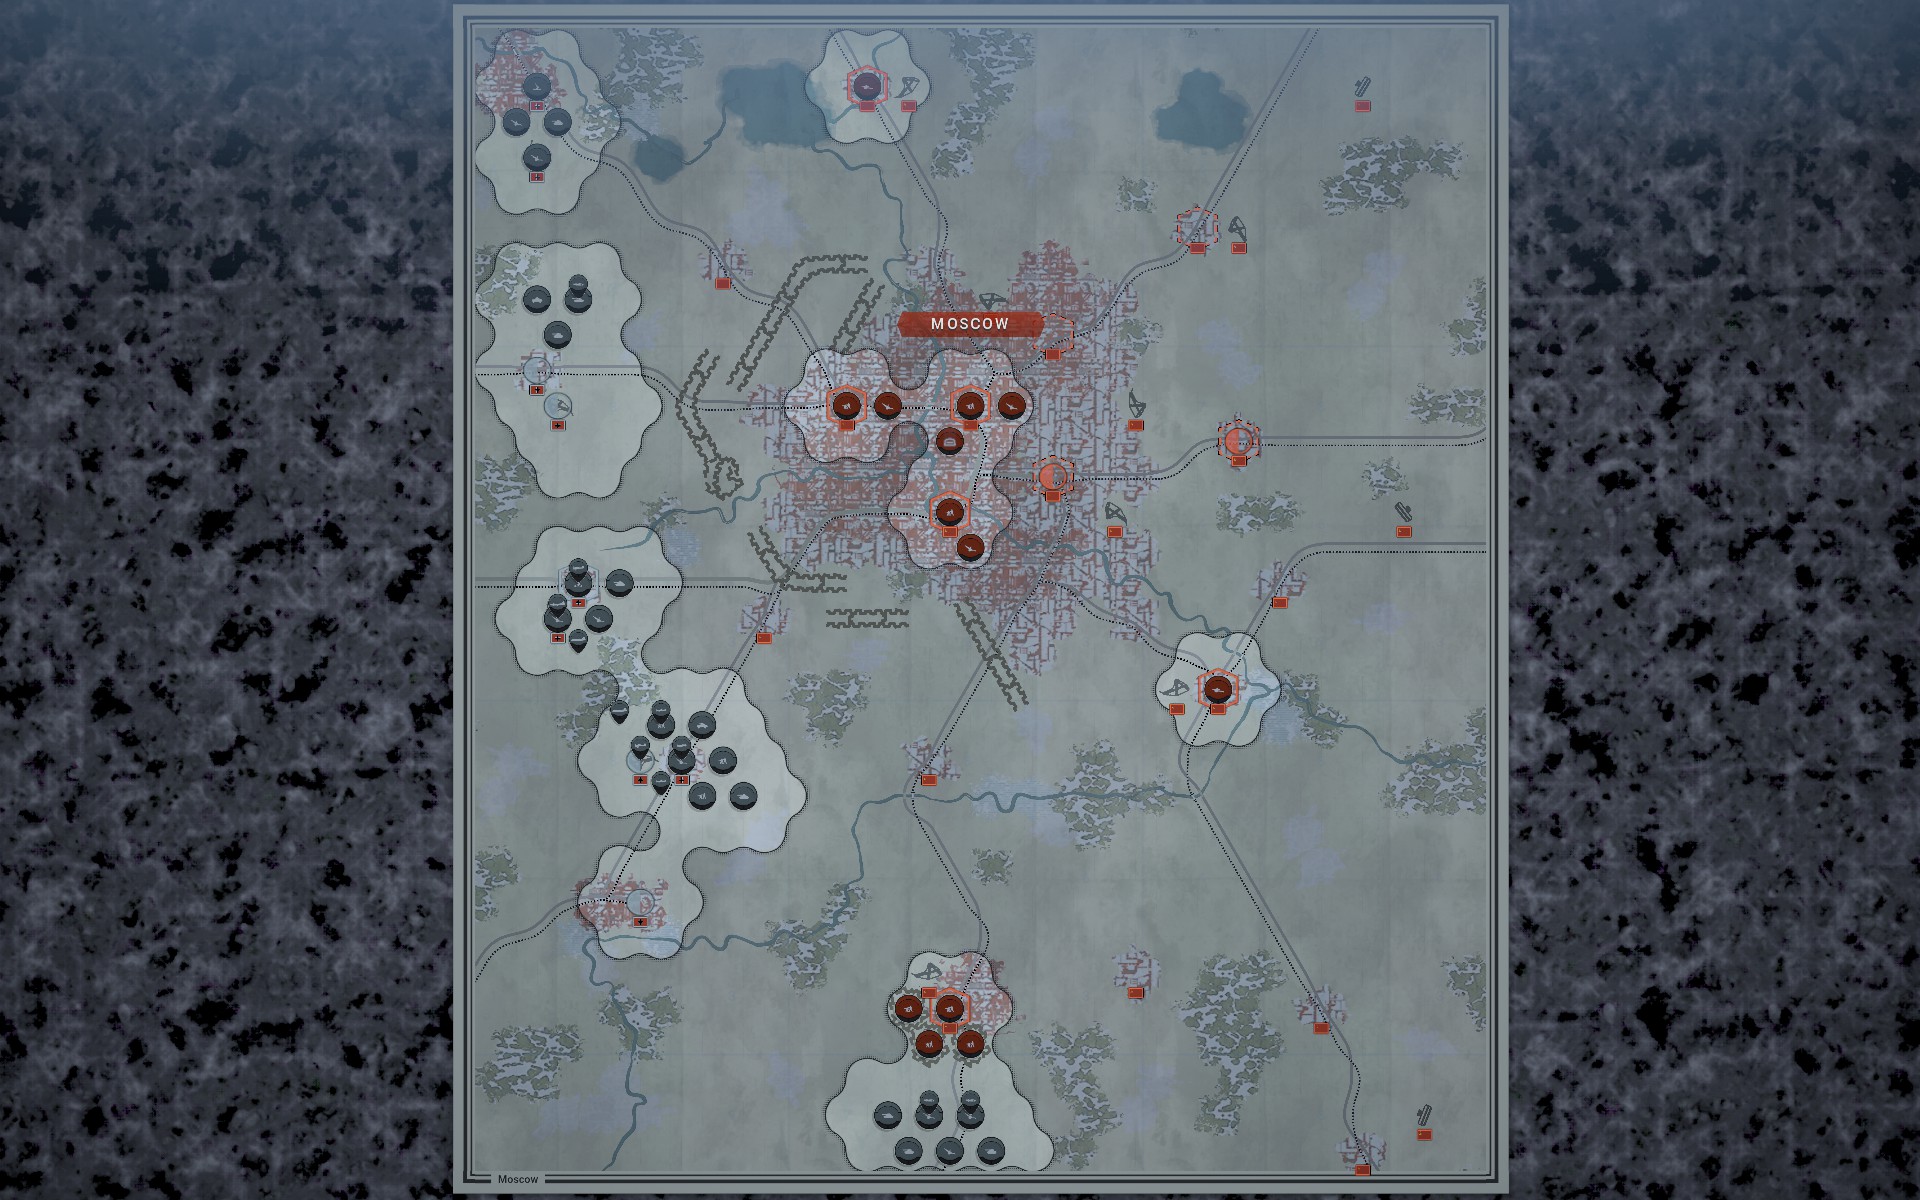
Stalingrad is a large scenario, with objectives spread in every part of the city. To make matters worse, most of these are supply hexes, which makes them significantly harder to capture. The German deployment area runs along the western perimeter of the city, but I opted to concentrate my forces in the center, with a smaller force in the north to secure the flank. As my forces rely on combined arms rather than heroes, spreading them too thinly would mean I could find myself unable to advance at all. While I'm confident that this'll allow me to break through the Soviet positions, it does mean that time could become a problem down the line. Having noticed my tendency to draw conflicts out to secure more captures I've decided to change the Rules of Engagement, so most infantry -- Conscripts, Regulars and SMG Infantry -- will be killed unless they can be easily captured; the prestige values are too low and I need to find a way to advance faster.
My forces will advance southeast towards the waterfront, aiming to secure the Mamayev Kurgan, a large hill overlooking central Stalingrad. This is an ideal position for artillery, and the only major Soviet airfield is located just north of it, which means I need to secure it for the Do 217Es to operate further south. Initially it'll also help my fighters clear out the Soviet air force this side of the Volga. A separate battlegroup will then turn north to capture the Red October and Tractor Factory complexes, but it Soviet opposition proves too fierce they will first assist the main battlegroup in securing the optional ojectives on the bank of the Volga. The fighters will rebase to the Mamayev Kurgan to provide them with the range and accuracy bonus they need to put an end to the Soviet air force, after which they will swap positions with the Do 217Es.
Once this has been accomplished the main battlegroup will push south towards the Volga Ferry and the Central Station; the former is particularly important as it serves as a landing area for Soviet reinforcements from Krasnaya Sloboda on the other side of the Volga. If possible I want to prevent more Soviet forces landing in Stalingrad. By now the Luftwaffe should have destroyed the Soviet air force, so the AA guns and armour that have suffered heavy losses will take up positions along the Volga to prevent any further attempts to bring in more reinforcements.
For the final part of the operation, the northern battlegroup will be rerouted south, and my forces will advance towards the Southern Station and the last optional objectives. Time is likely to be a factor at this point, and if the Soviets have managed to build up significant forces in the area my forces could end up suffering heavy losses. The risk is an acceptable one, however, as this plan of approach allows the bulk of my forces to support one another for the initial advance into the city, which should help make me make good time while minimising losses. The Fallschirmjäger will be deployed if there's an opportunity to use them, but with so much Soviet infantry I'll have to be careful lest they end up surrounded and destroyed.

The Mamayev Kurgan is heavily defended, which is to be expected considering its strategic value. It might be possible to encircle the hill, however, as there is no supply hex there. Unfortunately, The Red October complex has several, and is defended by a large concentration of Soviet forces. You can also see why I've decided to deploy so much armour despite the urban nature of the battle -- there are plenty of open spaces and avenues running through the city, and I'm hoping that my resilient Panzers will be able to prevent the Soviet infantry from flanking my Pioniere, who otherwise risk being overwhelmed; the Soviet numbers along with the accuracy bonus of Generalissimus mean that it's inevitable that the spearhead will suffer attritional damage, but I don't want to have to reinforce them constantly.

Soviet reinforcements will be moving across the Volga from Krasnaya Sloboda. The Volga Ferry is close enough to allow them to move across in a single turn, so it's an important location to capture. As I've access to several trains for this operation, securing the Central Station will provide my northern battlegroup with a way of quickly travelling south; they'll be able to disembark here to join the southern battlegroup after embarking in the north. Unfortunately the Do 217Es won't be able to reach these locations as there are no suitable airfields close enough, which is why the bulk of the artillery, including the Gustav will head south.

The southernmost part of the city doesn't appear to be heavily defended, but that could change by the time my forces arrive. However, if everything has gone according to plan so far there should be enough artillery to allow the Pioniere to quickly push through the remaining Soviet defences if needs be.

A T-34 is captured in the north, so there is some heavy Soviet armour present. As the fighters cannot reach these forces, two AA guns provide protection.

There is an impressive array of Soviet artillery behind the Mamayev Kurgan. The 17 cm batteries should prove valuable here.

With the Soviet armour in the north defeated, the northern battlegroup begins to fall back to assist the assault on the Mamayev Kurgan.

I suspect the T-34 has been ordered to defend the airfield, as even though it's in range of my forces it won't move. Vary that proximity might draw it out, I use the recons to surround the Soviet armour, allowing me to capture it before moving the recons out of harms way.

A few fighters swap positions with the remaining Do 217Es in preparation for the assault on the Mamayev Kurgan.

The northern battlegroup falls back towards the center.

The Luftwaffe shoot down a Soviet bomber while the Panzers advance in an attempt to cut off supplies to the Mamayev Kurgan.

The operation is successful, although a few Panzers suffer heavy damage at the hands of Soviet Guard, with one detached StuG destroyed. The Fallschirmjäger were not deployed due to the sheer number of high-quality Soviet infantry east of the Mamayev Kurgan; they would almost certainly have been destroyed.

The Soviet air force west of the Volga has effectively been destroyed. By now it has become clear that the AI has next to no prestige in this scenario, which means that while it does have access to a large number of units, it won't replace losses it sustains. This makes the strategy of using armour to protect the flanks even better, as Soviet infantry suffer attrtional damage while vainly seeking to damage them. Units that would normally be reinforced as a matter of course are now allowed to whittle themselves to death, which suits me just fine.

The Storch reveals that both industrial complexes are heavily defended, and another T-34 is heading towards my lines.

The defenders of the Mamayev Kurgan have been supressed, and my forces will now storm the hill.

The Bridgeburners suffer heavy casualties holding off several Soviet units and have to be reinforced. With the Soviet infantry in disarray, the Fallschirmjäger deploy to cut them off from the Volga.

More Soviet infantry cross the river, but the bulk of their forces have been supressed and will be captured. The bank of the Volga should soon be secure.

The number of highly experienced overstrenghtened Soviet infantry is a headache. A few units of Guardsmen inflicted heavy losses of my Panzers, and here is a Heavy Weapons Team approaching from the south. I initially made the painful mistake of assuming the 20 strength units were Conscripts; suffice to say my losses quickly dissuaded me of that notion.

The Bridgeburners clear out the last of the waterfront defenders.

The Crimson Guard are likewise reinforced to prepare for the assault on the Red October.

Aircraft, tanks, bunkers -- the 8.8 does it all.

The Bridgeburners wipe out another unit of Soviet infantry as the main battlegroup begins to advance south.

One of the more painful realisations when using Retrograde is that the Soviets have access to better fighters than you do -- the La-5 is substantially stronger than the Bf 109F.

While my Do 217Es cannot reach Krasnaya Sloboda, Soviet landing craft heading north are fair game.

As expected, there are large concentrations of Soviet forces near the Volga Ferry and the Central Station.

Even surrounded and suppressed, my Panzers and StuGs easily hold off Soviet infantry. The high ground defence of these units means they really only need to respect Soviet Guard.

In the north, the assault on the Red October begins. The Crimson Guard have been reinforced by a second battalion of Pioniere to make their job easier.

The bulk of my forces advance slowly to minimise damage while Soviet infantry keep suffering losses while trying to force their way through my Panzers.

The battle for Red October rages on.

Gustav is brought in to help thin out the numbers of the Soviet infantry.

There are around a dozen or so Soviet infantry battalions waiting to cross over the Volga.

Despite fierce resistance from the Soviets, Red October is captured and my forces turn north towards the Tractor Factory.

Something. Something. Fish. Barrel.

There are another half dozen battalions by the southern river crossing. The sheer number of Soviet infantry is beginning to become a problem.

Despite the numbers I haven't abandoned my ambition to capture enemies; these Soviet Engineers are valuable.

That my best Pioniere only now attain the first Anti-Infantry Veteran award is telling. Apart from the Battle of Moscow they haven't really seen heavy fighting until now.

The Bridgeburners capture the Volga Ferry.

Soviet infantry land on the western bank of the Volga, but have suffered such losses that they are easily encircled and destroyed.

8.8s lock down the Volga Ferry, preventing Soviet forces from disembarking there.

The last Soviet forces in the north outside the Tractor Factory complex are encircled and captured.

The AA guns and heavily damaged Panzers are positioned to deny Soviet forces any chance to disembark in Stalingrad.

Outside the city, there are few Soviet forces remaining.

The Crimson Guard lead the assault on the Tractor Factory.

Elements of the northern battlegroup begin to file south to assist with the assault on the bastion of Soviet resistance in the city.

To abandon a 10/10 entrenched position in order to attack a significantly stronger enemy from a vulnerable position is not the acme of excellence. Sun Tzu would be most disappointed.

The Tractor Factory falls and northern Stalingrad is under the control of the Wehrmacht, save for a lone Strongpoint.

The final objectives are in reach, but time is running out. With Soviet reinforcements effectively neutered my forces prepare for one last push south.

The Pioniere suffer heavy losses as the remaining Soviet forces offer fierce resistance, but my forces advance south inexorably.

The Southern Station is secured, but there are still a number of optional objectives left.

Another airfield is secured after the SU-6s destroy the Strongpoint, and the last of the Soviet forces outside the city captured.

The Red Army has fought long and hard, but this is the end for them.


Despite my intentions to change the RoE and advancing faster I still ended up relying a lot on my proven tactics, and while this means I once again finished the scenario just in time, I made a substantial amount of prestige from what could've been a very bloody battle. This would've been even more difficult with no reinforcements, though, as my Pioniere suffered heavy casualties at an early stage while holding back the Soviet infantry in the center. I quite enjoyed the scenario, as I found it an interesting tactical challenge to achieve the objectives without relying on the brute force of mass reinforcing.
The developers chose a different approach here, as while the AI has access to a large number of units it gets next to no prestige, making it impossible for it to keep its units up to strength. This means that you won't be seeing the usual mass reinforcing, and so it's possible to whittle down the Soviet forces through attrition. My Panzers proved very useful for this, as they were -- with the exception of the Soviet Guard -- effectively immune to infantry attacks and even the detached ones would regularly inflict 3-4 casualties on Soviet units during the AI's turn. Most of the Soviet forces are quite aggressive and will move to engage, saving you the effort of having to deal with their entrenchment.
Perhaps I should've used a few Ju 88As instead for their better naval attack, but I didn't get to sink that many landing craft in the end. In general I feel I got the disposition of the core right, as I never found myself short on tactical options. Of course it'd have been nice with more Pioniere or supporting infantry, but then I'd have to cut something else, and the Panzers provided more utility than I'd anticipated due to the lack of enemy prestige. If I were to reduce anything it'd probably be the air force, as the operational limitations are a nuisance, and as the AI doesn't repair its aircraft you need fewer fighters to bring them down effectively.
Mildly pretentious Swede. Goes by Path on most platforms, including Steam.
http://www.slitherine.com/forum/viewtopic.php?f=596&t=98034 -- Generalissimus AAR (no Trophies / Heroes)