

Very nice Trenchers, Bardolph. It is almost impossible to see the Dip.
MarkSieber, is the reflecting surface of your Indians a result of the Minvax or photography?
Has anyone tried Armypainter Quickshade?
Moderators: hammy, philqw78, terrys, Slitherine Core, Field of Glory Moderators, Field of Glory Design

-
MarkSieber
- Sergeant - 7.5 cm FK 16 nA

- Posts: 208
- Joined: Thu Feb 21, 2008 1:23 pm
- Location: Portland, Oregon US
The reflectiveness is in part the photography. I'd call the Minwax a medium gloss coat--I've used full glossy spray coating that was much shiner. The gloss level ('satin') is almost identical to Krylon spray satin finish (a commonly used clear coat in the U.S.) If you prefer less shine, a further coat of matte spray works well. One of my friends used to do this with a plain gloss base coat; matte sprays tend to be less durable than gloss, and when the matte began to wear off the gloss would show through instead of the paint coming off.
I've used the Minwax on some other BG's since the nellies, and learned to control it better.
Brushing works better than dipping, as I can control the amount being applied--dipping results in a coating that's a bit thick. I use the brush to pull off areas where it's gotten too dark.
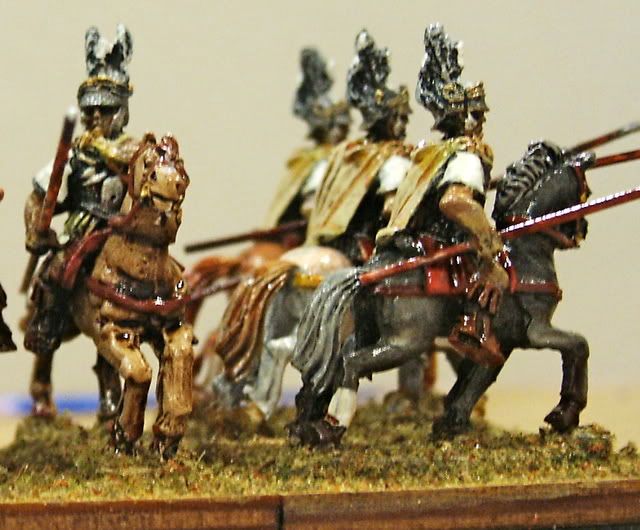
I sometimes leave off painting some brighter areas altogether. On the Xystophoroi I did not use Minwax on the capes, and I left it off the Gallic cavalry's shields, which I detailed with ink before adding the brighter colors. The horses are inked and drybrushed, the main effect of the Minwax shows on the tack, manes and tails. All these figures were base primed white, so any black (except on the shields) is from the Minwax.
Afterward, I used Krylon satin spray after the Minwax had completely dried and the figures mounted on bases (doing double duty to also seal the flocking).
I've zoomed in a bit on some pictures I posted on an earlier Old Glory thread (apologies for not having a better closeup lens):

I've used the Minwax on some other BG's since the nellies, and learned to control it better.
Brushing works better than dipping, as I can control the amount being applied--dipping results in a coating that's a bit thick. I use the brush to pull off areas where it's gotten too dark.
I sometimes leave off painting some brighter areas altogether. On the Xystophoroi I did not use Minwax on the capes, and I left it off the Gallic cavalry's shields, which I detailed with ink before adding the brighter colors. The horses are inked and drybrushed, the main effect of the Minwax shows on the tack, manes and tails. All these figures were base primed white, so any black (except on the shields) is from the Minwax.
Afterward, I used Krylon satin spray after the Minwax had completely dried and the figures mounted on bases (doing double duty to also seal the flocking).
I've zoomed in a bit on some pictures I posted on an earlier Old Glory thread (apologies for not having a better closeup lens):

Thanks.Kaptajn_Congoboy wrote:Very nice Trenchers, Bardolph. It is almost impossible to see the Dip.
MarkSieber, is the reflecting surface of your Indians a result of the Minvax or photography?
I do spray my dipped figures with a matte sealer afterwards. I don't like the shiny effect of the "satin" finish.
Either Krylon Matte or Testors Dullcote.
-
MarkSieber
- Sergeant - 7.5 cm FK 16 nA
- Posts: 208
- Joined: Thu Feb 21, 2008 1:23 pm
- Location: Portland, Oregon US
I mixed the Minwax Tudor Satin with Royal Walnut Satin, about equal parts, which I used to stain some pikemen with linen armor. This gives sharper outlines than the brown (walnut) but not so sharp as the black (Tudor). I cut it with thinner--about 15%--which helped avoid some of the piling up in the openings under crooked arms and so forth. It also reduced the shine a little.
It's always a risk to apply a complete bath to the figures you just spent any number of hours painting, but this came out pretty well.
Painting for the 'dip' is quite a different style than I have used for other figures. I paint all the basic colors but use little or no shading, and let the stain do most of the work. I have to restrain myself at times as my habit has been to use inks, contouring and drybrushing. I still use these on Xyston figures, for example, that have strong sculpting, and skip the dip. I like the dip for Old Glory where the casting detail is smaller and less precise.
Again, one needs to be very careful to remove any casting seams from the figures.

-
MarkSieber
- Sergeant - 7.5 cm FK 16 nA
- Posts: 208
- Joined: Thu Feb 21, 2008 1:23 pm
- Location: Portland, Oregon US
I use an X-acto knife for almost all cleaning of flash. I've tried files but they usually make scratch marks and don't fit in the smaller openings. I polish off the seams by dragging the knife perpendicularly to the seam, and at a 90 degree angle (straight up) to the surface. Lightly applied, really buffing rather than cutting, using the edge of the blade like a file. If the seam is not just a mold line but a mis-match (like the the two halves of the figure are not quite lined up) I'll hold the blade at a very shallow angle and shave off the excess.
Contouring is a term used in this article http://www.seekingsolis.co.uk/miniatures/contouring.htm which I ran into the other day--it may have other names, I think of it as blocking. It's where you paint on patches of color that match the contour of the figure, of a single color, leaving the background in between. Used with black undercoating or on top of a darker version of a color underneath. Dry brushing provides a similar result but has less paint on the brush and feathers the edges more gradually. The article also defines blending is adding a lighter or darker shade to the edge of the area to smooth it into the adjacent color (see the links at the bottom of that web page.)
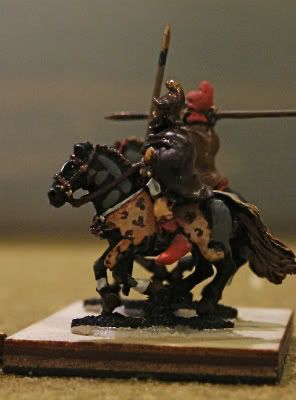
Xyston 15mm Thracian LH--contouring on the horse. I was inspired to try this after reading the thread on the Swedish painters. Not yet coated; no dip. I'll use satin clear spray once the flocking is on.
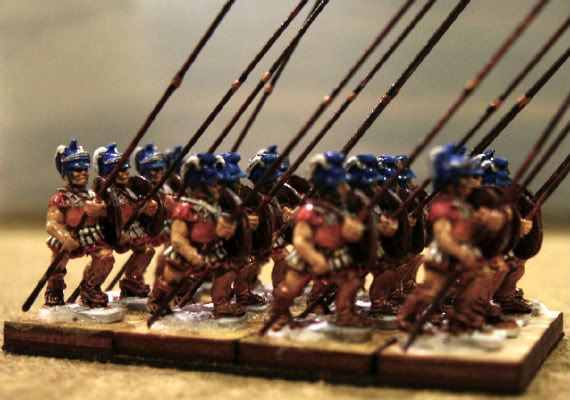
Old Glory 15mm Pike with the black & brown mixed 'dip'. Brushed on. The base colors were painted except the sandals were stained with GW 'Flesh Wash'.
(Apologies, the pictures are a little dark; lightening them increases the shiny look and wipes out the highlight detail.)
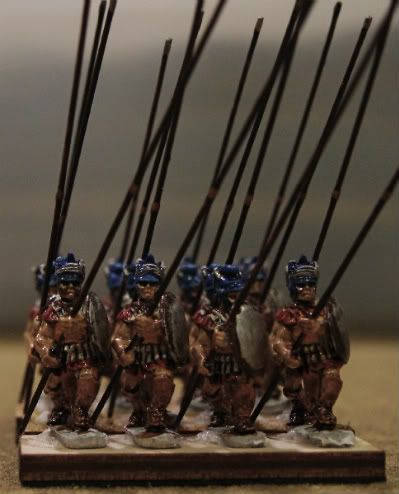
For 10mm, there's a fast way to paint using contouring. Prime white. Paint the flesh areas a very pale flesh. Stain the entire figure with Flesh Wash or similar. When dry, contour all the areas except the web gear and other brown leather--which included the hats, scabbards, boots and ammo belts here. These are out of period (30YW) but show how this works:
(well, I did a little drybrushing on some baggy pants...) It means you don't need to paint the belts and fiddly bits, because you've done them first, and the stain gives some depth.
I hope all this gives some ideas to play with.
Mark
Contouring is a term used in this article http://www.seekingsolis.co.uk/miniatures/contouring.htm which I ran into the other day--it may have other names, I think of it as blocking. It's where you paint on patches of color that match the contour of the figure, of a single color, leaving the background in between. Used with black undercoating or on top of a darker version of a color underneath. Dry brushing provides a similar result but has less paint on the brush and feathers the edges more gradually. The article also defines blending is adding a lighter or darker shade to the edge of the area to smooth it into the adjacent color (see the links at the bottom of that web page.)
Xyston 15mm Thracian LH--contouring on the horse. I was inspired to try this after reading the thread on the Swedish painters.
Old Glory 15mm Pike with the black & brown mixed 'dip'. Brushed on. The base colors were painted except the sandals were stained with GW 'Flesh Wash'.
(Apologies, the pictures are a little dark; lightening them increases the shiny look and wipes out the highlight detail.)
For 10mm, there's a fast way to paint using contouring. Prime white. Paint the flesh areas a very pale flesh. Stain the entire figure with Flesh Wash or similar. When dry, contour all the areas except the web gear and other brown leather--which included the hats, scabbards, boots and ammo belts here. These are out of period (30YW) but show how this works:
(well, I did a little drybrushing on some baggy pants...) It means you don't need to paint the belts and fiddly bits, because you've done them first, and the stain gives some depth.
I hope all this gives some ideas to play with.
Mark

hello- In my early attempts I used Windsor/newton inks for my shading..nut brown-peatbrown(also used brighter colors over a black primerdrybrushed dark grey upto white) to good effect...
my only problem was they were not lightfast-i.e. the ink colors will fade over time losing their intensity.
a good substitute has been FW inks (from dickblick) they are lightfast will not fade intense color pigments and they have many colors both transparent and opaque.. they actually have a nice opaque white ink and an opaque flesh ink.
nice consistensy for a base coat,much less shading.
and now for my current shading instant preference I mix up several jars of FUTURE FLOOR WAX AND FW INK(brown/black) and brush on --great results for 1/72 plastics im sure would work nice for 15/10mm-nontoxic.nonfume
I cant access my notes at moment but I remember it may be a mixture of futurefloorwax and water and fw ink to taste.
you will get a slight satin finish-not gloss and a protective coating like windsor/newton finish...personally too much of a chicken to use the varnishes too messy. hope this helps.
try out the fw inks over a black primed figure that has been drybrushed in succesive layers of dark grey ,grey,light grey ,white. amazing.
steve
I have used wood stain on both 15 mm and 28mm figures. My method is to paint base colors only, when working with 15mm, or base plus one somewhat overdone highlight on 28mm. Then I brush on varnish. Dipping did not give much control so I went with brushing on the stain. I usually work with some thinner close to hand and I work with slightly thinned stain. In some instances I will go back over areas which have come out a bit too dark or "muddy" and thin the area down. For larger pieces, a few cotton swabs are very handy to wick away stain from the high points of contour on models (for example, the peak folds of cloth in horse barding) Since the stain takes a while to dry you have a bit of time to decide if and where you need to remove a bit of stain. Doing so is a bit like "un-painting"and, properly done, it will really make the contour work come out even better.nikgaukroger wrote:Well I tried it (Quickshade that is) and am a bit underwhelmed by itnikgaukroger wrote:
Previously I've used Windsor & Newton ink (Peat Brown) but have splashed out on a tin of Strong Tone to give it a go as I suspect it'll be better than ink on 28mm figs.

Compared to ink it doesn't seem to settle in the creases, etc. as well and, IMO, too much sits on the flatter areas of the figure which makes some colours (lighter ones) just look dirty.
However, I think it may, therefore, work quite well for horses but I may stick with ink for men.
As others have mentioned, this method gives some good protection against the rigors of table top warfare (in the case of Polyurethane wood varnish); after all, coating a figure in something that is designed to protect surfaces meant to be walked on really does give a model a bit of "armor". Varnish can turn a "meh" figure into a "WOW" figure and can be brought down to a less blinding sheen with a bit of non-glossy spray sealer. The spray also helps to keep the flock from having a life of it's own.
Word of warning; do not hope to rush the dying time. You only have to apply flocking too early once to know the joy of picking wee foam bits from varnish covered figures.