Battlefield Europe - Best Mod so far for me

Battle Reports & After Action Reports (AAR's)

Moderators: Slitherine Core, Panzer Corps Moderators, Panzer Corps Design

Post Reply
verstaubtgesicht
Senior Corporal - Destroyer
Posts: 117
Joined: Mon Feb 18, 2013 9:39 pm

Battlefield Europe - Best Mod so far for me

Post by verstaubtgesicht »

This is my 2nd playthrough. First, let me congratulate McGuba on his accomplishment. I've played all available PzC official scenarios and several mods multiple times, and this to me is by far the most interesting scenario/mod. There is complexity - many units, tasks, surprises, and the sheer scale of it. There is a number of strategies, so it is playable multiple times, as evidenced by several AAR's in the library and posted on this forum. It has a more natural feel and the desired style of play is closer to the real world - one big battle where casualties are taken, and not the artificial imperative of the GC of constantly winning with next to zero casualties. What is really remarkable, though, is the almost eerie resemblance to the historical outcome - unless the player learns from history.

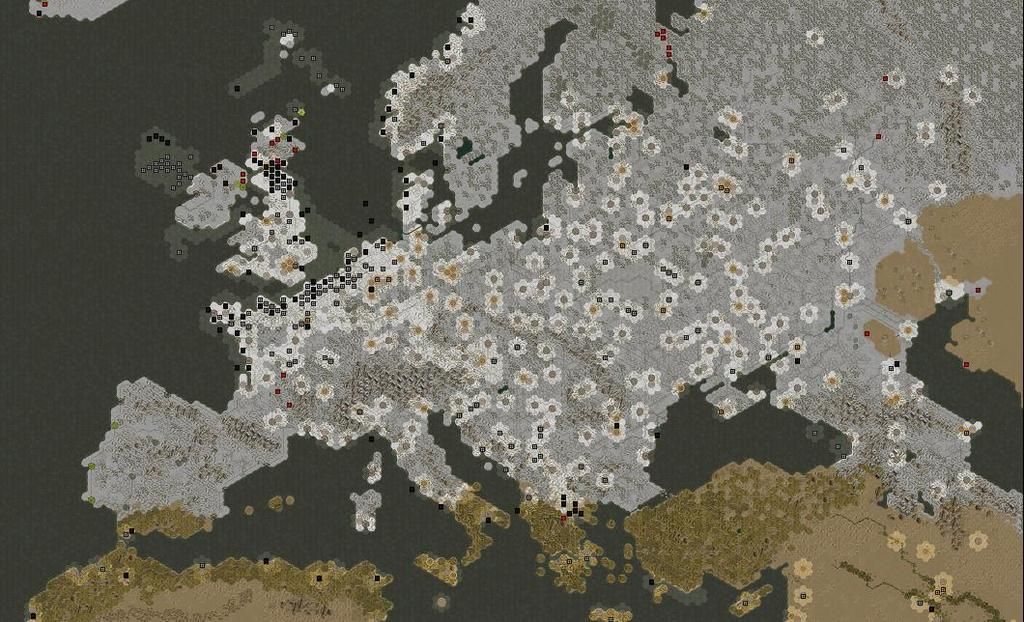
The final outcome was decisive victory. All cities except Scotland and N. Ireland are in Axis hands (the game ended on turn 86). The endgame map:
Image

Below is my battle plan, based on history lessons. One might argue that it is partially Monday morning QB using the historical facts, but I do not think so, because the scenario is tough even with the historical knowledge, and it is fun to play the "what if" scenario. Furthermore, it rewards a player who did his homework.

1) Blitzkrieg in the East so that 3 objectives are achieved by end of 1941 / early 1942: (A) Capture Moscow for prestige and favorable terrain defending the winter counterattack; (B) Blockade of Leningrad; (C) surround Kiev for surrender. The first objective is key, as it is widely recognized that halting/slowing the march on Moscow to divert troops towards the Kiev pocket was Germany's big blunder. This is modeled very nicely here.

2) Play Afrika more or less historically, but send some reinforcements to Rommel early - imagine if he had had a couple of panzer divisions at El Alamein! Destroy British offensives Battleaxe and Crusader at Halfaya Pass leveraging the bottleneck and the deadly anti-tank trait of the 88mm AA gun. Bring the rebuilt Regia Marina between Malta and Tobruk, try to clear the seas in the Eastern Med. as much as possible (beware of subs!), while keeping an eye on Malta to search and destroy reinforcements. Then capture Tobruk, followed by Mersa Maruth and the trenches at El Alamein, so that you can await, repel and destroy the 3rd and the strongest wave of Brits.

3) Transfer strong bunker-busting air capabilities to Malta (I used two stukas - Rudel and a str. 13 unit from the previous core) as soon as weather worsens on the Eastern front. I've also seen a suggestion of a range 4 arty in Sicily, but I did not use this. Malta should fall by late summer of 1942, so that one can concentrate on Operation Torch at the end of '42. Begin transferring Italian units with some German support to Sardinia and along the N. Afrikan coast.

4) On the Western front try to maintain air superiority over the Continent by upgrading all air units in a timely fashion and networking AA units. Use a protected tac bomber and destroyers (if necessary) to clear mines that impede the transfer of ships to the Atlantic and later landing craft. This is important. After rebuilding the fleet, make opportunistic forays into the shipping lanes of the N. Atlantic to collect prestige, but withdraw in a timely fashion to: (A) avoid unnecessary casualties; (B) transfer the fleet to the S. Atlantic for a showdown with the British Gibraltar fleet and later US invasion force for Operation Torch (yes, history tells us it's coming, but it was not rocket science to anticipate it even back in early 1942 after USA entered the war).

5) Execute defensive maneuvers, repel and destroy the Soviet winter offensive in '41/42. Hold the line Moscow-Kaluga-Orel-Kursk-Belgorod-Harkov-Dnepropetrovs-Zaporozhye.

6) Eastern Front: Spring/summer/early fall 1942 - play more or less historically, except of course avoid the blunder of pushing into Stalingrad. Another deviation from history is that you can push East of Moscow and if an opportunity arises capture Leningrad to free up forces for 1943 battles on other fronts. A strong infantry-mountaineer force to capture Grozny and the first oil field by end of 1942. Prepare for countering Operation Uranus.

7) Afrika '42/'43: In Egypt the priority is defense against a big armored offensive, hold the trenches at El Alamein and advance towards Suez only slowly and opportunistically. Finish the naval battle in Eastern Med. Big naval battle in the West. Med. and S. Atlantic - the goal is to prevent as many US landing craft from reaching the shore. I succeeded in eliminating them all, so that no ground battles took place. By end of '43 occupy Cairo and Alexandria and start transferring troops to the Near East over Suez (heavy armor only due to the fort fire on the other side) and via Alexandria port in transports.

8) Execute defensive maneuvers, repel and destroy the Soviet winter offensive in '42/'43. The tactics are a bit different here then in the winter of '41/'42 as the Soviet push is more forceful and the front line rather stretched. One can call it a flexible defense that combines inf. entrenchment in cities and forests with orderly withdrawal to stretch the Soviet line of advance. The goal is to separate their mobile units from infantry and arty. Let the armor blindly crash into a wall on the first wave, then withdraw to secondary positions, where the 2nd blind crash in snowy weather will occur, while the slow moving Soviet inf/arty will be left behind and not able to engage, so that they will be an easy prey in the 3 phase of offensive crushing.

9) Finish Soviets by the end of '43

10) West '42/'43: Transfer the Atlantic fleet after the victory in the South to England and start preparing for invasion with naval bombardment. If time allows, go back to N. Atlantic to gather some prestige and destroy enemy ships (this is clearly a secondary goal, and I'm not even sure it's worth it, but I did it anyways). As you transport troops from the East prepare for Operation Seeloewe. Good time to land is during the winter snowy weather.

11) After the victory against Soviets assemble and army group to go South and conquer Iraqi oil fields.

12) '44: Invasion and finishing of the UK and mopping up the Middle East. For the UK invasion, here are the key considerations: (A) clear the landing area and the surroundings with naval and arty bombardment as much as possible (I used range 4 heavy guns from Calais/Dunkirk in addition to ships) (B) plan first landings in snowy weather to avoid air attacks and reduce vision (C) select carefully a good mix of units for the 1st wave - a tiger, str. 12-13 grenadiere or pioniere, 88m AA, StuH 42 is a nice start.

I will post a more detailed account with pics in subsequent posts.
Last edited by verstaubtgesicht on Thu Oct 20, 2016 8:09 pm, edited 1 time in total.
verstaubtgesicht
Senior Corporal - Destroyer
Posts: 117
Joined: Mon Feb 18, 2013 9:39 pm

Re: Battlefield Europe - Best Mod so far for me

Post by verstaubtgesicht »

OK, now to the actual AAR - there will be spoilers - Phase I (1941):
(A) Blitzkrieg in the East to capture Moscow surround Kiev and Leningrad; Finns to aurround and prepare to take Petrozavodsk
(B) Afrika: hold-off and destroy British at Halfaya Pass; start clearing East Med. of enemy ships;
(C) Western front: Rebuild the Atlantic fleet and harass convoys for prestige. Keep shipping lanes in La Manche as open as possible. Air superiority over the Continent.

Starting core: 2 str 12 Pz IVF with heroes, 1 str 12 Px IIIH with a +1 ATT hero, str 13 10.5cm arty, 2 str 12 Bf 109F fighters with heroes, 1 str 13 stuka 87R

'41 Upgrade policy/strategy:
Exp 200+ infantry into grenadiers (gradually), with a mix of mostly motorized, but a few on foot. On-foot grenadiers will be used for cracking tough targets in rough terrain, and they remain on foot so that elite replacements are not expensive. Mobile grenadiers will be used for close and soft target combat when the odds are X:0 and X:1 and movement speed is of the essence. No over-strength until superfluous prestige in late game for UK invasion.
Arty: First priority are useless pieces like the 7.5cm arty in Paris (made a sIG 33). Second priority is to improve range. Third priority is to pick advanced special pieces wisely and in a timely fashion (these are expensive upgrades and can be made only once. For example, it's good to have 1-2 range 4 guns. Typically I avoided them early in 1941, because prestige is needed for other purposes, mostly Luftwaffe replacements and upgrades. Good to have some for the '41/'42 winter offensive).
Tanks: Study the equip. file and note when key upgrades occur so that you position your pieces in cities on time. Avoid premature costly upgrades. Priorities in '41- Pz II's into Flamm, Pz III's into IIIJ version, Pz 38's into Pz III's (if enough prestige).
Air: Do 17z into Do 217, stuka into 87D version 13.11.1941 before/while transferring to Malta,109F's into A-2 (start in the West), etc.

Situation after end of DAY 1:

Image

The North column is pushing towards Leningrad. Pinzer movement to bypass Byalstock and reach Minsk to force a surrender, per briefing. Note that all grounded planes that were not destroyed on Day 1 are covered by a Luftwaffe unit on top of them, so that not a single Soviet plane engaged.

Image

If you compare this map with the starting map (of your own), it is instructive to realize that a detailed unit movement and attack plan is necessary to maximize impact. Ideally, each arty piece and ground unit will see action in the early days of Barbarossa. Note the bridge engineer positioning and the destruction of the Brest fortress on 1 day with a combo of Karl Geraet (after firing withdrawn to Warszaw for transfer towards Odessa). The counter-attack did some minimal damage, but also put their prized T-34 armor into close terrain.

Image

Getting ready to cross Dniester and encircle Odessa. Motorized Hungarians are on the march. Note a bomber trap in the Black Sea - after air-scouting Odessa and mapping the fortress, position the destroyer 4 hexes away and trap with fighters.

Image

Getting ready to block the Halfaya Pass after the mines are gone. Note successful fighter/bomber traps with a proper distance from the Tobruk fortresses - important because Brits have air superiority.

Image

Nice fighter trap at Malta.

Situation after DAY 3:

Image

Minsk has fallen and the Byalstock pocket is collapsing. A strong position discovered via air-scouting at Smolensk. Notice the train in Mogilev with arty inside - an aggressive move to be able to fire the next day on the infantry below.

Image

Air harassment of gateway cities to the Kiev pocket flanks. Do 17 ready for upgrade to Do 217.

Image

Getting ready to encircle Odessa and start bombardment with Karl-Geraet. Upgraded a 10.5cm into a Nebelwerfer.

Image

While the British armor goes after Fort Capuzzo, Rommel sneaks behind and destroys artilery and infantry. The air trap always there.

DAY 6:

Image

The noose around Leningrad is beginning to tighten. Circled is the first heavy arty upgrade (nice for the siege). Discovered a defensive unit in Rzhev (circled). I made a mistake of not using the ultra-fast SdKfz 232 scout car on this road, because in a previous game I was able to get to Rzhev before a defender appeared This will cost me of not completing Moscow before the counter-attack. Historically, a SdKfz at the gates of Moscow is a legend (the furthest point the Germans ever got to), I should have known better.

Image

Upgraded some of the tanks and arty. Push towards Moscow and Kiev continues. Rudel is degrading a T-34 at Smolensk. Further North in Mozhaysk is the above mentioned SdKfz (at least it got Mozhaysk). Note the 88m in the triangle, which was transferred from the Atlantic coast to counter Soviet armor.

Image

Work on Kiev continues. From the West clearing the fort directly, preparing to encircle. Push towards Dniester.\

Image

Odessa is encircled. Concentrated arty ready for action (in the trapezoid). From the West the tactic is to combine bombardment and direct attack with cheap infantry (mostly non-motorized Romanians), which is expendable. The sub is destroying the light cruiser.

Image

Naval assets in place to blockade Malta. The old air trap still there.

Image

A brief excursion to Mersa Maruth in order to upgrade Rommel - this is important! Regia Marina arriving for battle. Fallschirmjaeger reinforcements.

Image

Convoy harassment for prestige.

After DAY 10:

Image

Leningrad encircled (actually since day 7). Battle for Petrozavodsk by the sturdy Finns.

Image

Battle for Moscow. It is important to penetrate into the city itself, at least half-way, for a good defensive position before the winter counter-offensive. Also important to conquer Orel at the bottom of the map. The engineer is ready to remove the mines. heavy arty and 88m will play a big role in the battle for Moscow.

Image

Kiev almost encircled. Partisans showing their ugly face on the Western edge of the map. Besides the aforementioned Orel, Kursk and Kharkov are important strategic objectives in order to form a defensive line prior to the winter offensive. In the triangle there is an A-2 - upgrading the air force in the East.

Image

Odessa pocket eliminated and the K-G will be transferred towards Sevastopol. In the Southwestern corner one can see a Stuka on its way to Malta (Rudel is already a few steps in front). The defensive line will be between Mariupol and Kharkov further North.

Image

A Kriegsmarine sub is approaching London harbor to sink HMS London, which blocks La Manche. Not important at the moment, because bad weather is underway, but in rectangles there are future air-traps. A trap will be laid also in the North around the coastal fortress next to Wilhelmshaven. The Luftwaffe Geschwader are all upgraded to the latest models.

Image

After entering Mersa Maruth to upgrade Rommel, we have been attacked by a battleship, and we also expect (historically) another counter-attack. Hence, we must withdraw and first destroy the British Navy in the area, a job that is underway. The most dangerous units are subs, and they should be destroyed or at least damaged with tac bombers before bad weather appears. The job will be finished with destroyers, and then our subs and weather-permitting strat bombers will tackle the cruisers and battleships, while our battleships and cruisers finish off the destroyers. Circled is an artillery piece West of Tobruk, indicating further reinforcements via transports.

Image

British resupply convoy to Malta was destroyed East of the island, and now the subs are finishing off the accompanying battleship, while our large ships are taking care of the destroyer. In the East, one can see two additional reinforcement transports heading to Cyrenaica. We also airlifted an AA gun to Sicily from France, just in case.

After DAY 13 (end of 1941):

Image

As expected, bad weather is here. Petrozavodsk is about to fall to the Finns. Leningrad is in a strong grip. Interestingly, placing an infantry next to the heavy tanks (triangle), caused them to repeatedly attack in rough terrain, losing SP. The fortress is being taken care off with brute force (attacks by rotating non-motorized infantry to minimize prestige loss; an Italian unit is also brought in because it's the cheapest - still in the train here). It is very useful to have a Flamm panzer around (for dealing with infantry counter-attacks from the East, and later for breaking the Leningrad defenses).

Image

We could not take all of Moscow before the winter counter-attack. However, we have a stronghold in the city to place a strong infantry unit, and also a decent line of defense from Kalinin to Orel. Note a dangerous T-34 next to Kaluga - this is an instance of a flexible defense that will be much more important in '42/'43, where an attacking unit can penetrate the line, but will be eventually stopped after losing fuel and being detached from supporting units. However, the main defense in '41 is a typical line like Kalining-Moscow-Kaluga here. On the Western edge in a rectangle is the Finish tac bomber, which is on its way to the Atlantic to degrade mines blocking La Manche once the weather clears.

Image

Defensive line ready.

Image

Mariupol-Kharkov line. K-G positioned for bombarding Sevastopol without detection in low visibility. Sub going after the battleship Parizhskaya Kommuna.

Image

British offensive in Afrika (Operation Crusader) is giving us some headache. However, low visibility, 88m, and Regia Marina guns will help us stop them and destroy them. Rommel took some hits and will not be str 12 for a while... We have also transferred some strat bombers from the East (mainly He111H2's, which are low on soft suppression, but quite good for naval battles) for future use in this theater of ops. Those can be seen in rectangles at the Crete air base.

Image

At Malta, I am not allowing their damaged fighter to refuel (just in case). Two stukas are here, ready for action when the weather clears (i brought them down maybe a bit prematurely, but I wasted max one cloudy day in the East, and there were no attractive targets at the time there). Initial transports for reinforcing the Maghreb are being assembled.

To be continued in 1942.
Last edited by verstaubtgesicht on Sat Nov 12, 2016 8:17 pm, edited 2 times in total.
verstaubtgesicht
Senior Corporal - Destroyer
Posts: 117
Joined: Mon Feb 18, 2013 9:39 pm

Re: Battlefield Europe - Best Mod so far for me

Post by verstaubtgesicht »

Phase II (1942) objectives:

(A) Defeat the '41/'42 winter offensive on the Eastern Front. Finalize Moscow capture which was missed at the end of '41 and push further East towards Gorky and Yaroslavl.
(B) Capture Crimea and commence Fall Blau - clear Soviets West of the Don, make a strong push South and capture Grozny and its oil field. Needless to say, do not attack Stalingrad. Prepare for '42/'43 winter offensive (Operation Uranus).
(C) Further isolate Leningrad by clearing the area between the city and Petrozavodsk. Attack the city itself if an opportunity arises.
(D) Clear La Manche of mines as much as possible, transfer Atlantic fleet towards the N. African coast and prepare for Operation Torch, which will start with a big naval battle. Prevent US landings in Maghreb as much as possible and defeat the landing force with pre-positioned reinforcements.
(E) Capture Malta, Tobruk, and the El-Alamein line, where a strong defensive posture is to be built.

Starting with the first sunny day (DAY 18):

Image

If you compare to Day 13 in my last post, the last 5 days have been, as historically, a "meatgrinder" around Moscow (except that it took place in and around the city itself, as opposed to the Rzhev-Vyazma area in real life). Our goal of capturing Moscow is still not fully achieved, but we are on the verge of victory, the defensive line is very strong, and there are just a few Soviet armored units left. Looking at the flags in the city center, you can see that the Spanish volunteers did quite a good job! One slight concern is the gap North of Rzhev, but there do not appear enough enemy units to explore it, and there is a our captured T-34 just in case of a need to plug the hole. At Leningrad, we are repelling a strong infantry offensive in the forests East of the city, and the flamm panzer is quite useful. The fortress is almost gone, although the on-foot infantry attacks followed by constant replacements are tedious and time consuming.

Image

Not much to report with the Army Group Center, except that after heavy battles the winter offensive is losing steam and the Moscow-Orel-Kursk line (going further down to Kharkov and Mariupol) is holding. One can spot units Southwest of Moscow recuperating behind the front line, as well as a few PzIII's getting ready for the important IIIJ/1 upgrade.

Image

Similar to the Army Group Center, not much going on in the South, except that we have pushed a bit further East and are poised for Fall Blau with amassed troops ready to roll across the Donets river. One can notice a low count of armored units, which will be corrected shortly after upgrades are completed and the fresh panzer divisions transferred via rail from the Army Group Center.

Image

The next key objective in Afrika is Tobruk. The best path is through the AT unit that is weak towards infantry and has no arty back up (but it's certainly not a walk in a park due to entrenchment). Rommel can help by working against the infantry, and we have reinforcements assembled in the West for the final push. The whole operation will be supported by Regia Marina bombardment. HMS Queen Elisabeth near Alexandria will be sunk by a sub and strat bombers. With the 109F, we finally have air superiority. There is a first glimpse of the troubles ahead at El Alamein.

Image

Attack on Malta commences.

DAY 23:

Image

Fortress West of Leningrad is gone. We are using captured T-34 East of the city to degrade/destroy the strong arty positions behind the enemy lines, which are preventing us from destroying the infantry formations. As the approach to Tula is blocked by mines, the Oka river, and strong infantry position backed by arty, we will use a bridge engineer to cross the Oka from the North and storm behind Tula with heavy armor.

Image

The previous point about the bridge engineer and Tula envelopment is reiterated here. We have not only captured Voronezh and achieved the goal of clearing the Western bank of the Don, but we have actually crossed the Don and established a bridgehead on the Eastern bank. There will be some pitched battles in this theater for the rest of the year, so that the enemy is weakened before the next winter offensive. It's time for a very important Pz IV upgrade into the IVF/2 version - initiative jump from 5 to 9 and hard attack from 7 to 15 - finally a panzer that can go toe-to-toe with the latest versions of the T-34. Note a nasty T-34 in the triangle on the Oka East of Tula, which is posied to penetrate behind our lines. Our units from Moscow/Mozhaisk will take care of it, but it's a pity we did not have a unit nearby to attack it while on the river.

Image

Fall Blau continues according to plan. Rostov-on-Don is a choke/strong point. We will eliminate it with a surprise attack by forcing the Don further East with a bridge engineer. I have marked with an "X" mountain infantry that is getting ready for the Caucasus.

Image

I have a confession to make. I forgot to move KG out of the "freezing zone" in winter of '41, so I cheated and put it back to str 5. It is an important tactic to move expensive and non-essential units out of Russia before they lose a SP (mostly KG and planes). Marked with an "X" are cheap non-motorized allied nations' infantry units, which will be useful in conquering Sevastopol via a brute force approach.

Image

Tobruk on the verge of collapse after a heavy naval and arty bombardment. The key to a quick victory is overwhelming force - in addition to bombardment, there is an array of powerful and specialized weapons that are good on forts and entrenched units, such as Fallschirmjaegers, 88mm, and of course, Rommel. A Gebirgsjaeger is already en route to the Maghreb after helping at Tobruk. We now have a grenadier at Mersa Maruth after upgrade.

Image

Malta occupied. Stukas will rush to the Eastern Front (the other unit already on its way further Northeast).

Image

A destroyer and the Finnish tac bomber clearing the minefield, so that the capital ships can pass and join the Atlantic fleet in the South.

Image

I thought that the best way to show preparations for Operation Torch would be via a global view. As mentioned, the North See fleet is passing through La Manche to join the Atlantic fleet, which is already along the coast of Portugal. In the Western Mediterranean we have mostly destroyers, subs, and a fleet of transports that are slated for the Maghreb.

DAY 29:

Image

Resistance East of Leningrad is collapsing. We are pushing East of Moscow towards Gorky. There is a strange suicidal action by the Soviets to cross Oka South of Gorky.

Image

An armored group, which bypassed Tula from the North, will tackle a strong Soviet position East of the Don. Tula will finally fall as we are using a non-motorized str 11 grenadier. The pocket East of Voronezh is expanded, but it's a pitched battle, and it will become more so during the winter of '42/'43. Ideally, we would like to conquer Tambov and reach the forrest Northeast of the city for a strong defensive position.

Image

As you can see, quite some progress on the Southern front and Fall Blau. All clear West of the Don. Poised to get into the Caucasus. Plan to cross the Kuma river with armor with the help of a bridge engineer. I must say that bridge engineers and forcing rivers at the right place/moment play an important role in 1941/1942 Barbarossa. BTW, all these plans are not the consequence of prior knowledge, but a logical product of careful aerial surveillance.

Image

Could not fit all the action into one pic, so here is Caucasus again with Crimea. Sevastopol is in our hands. KarlG will now focus on the fortress at Novorossiysk. Entering the mountains with a mountaineer-heavy infantry force along the road to Grozny, which will be backed by a strong arty contingent.

Image

The best way how to crack the formidable defenses at El Alamein is to destroy arty and AA gun behind the lines with dropped Fallschirmjaegers with the help of naval bombardment. Once that is done, we have 2 grenadiers and Rommel to break through.

Image

The combined Atlantic Fleet of the Kriegsmarine is engaging the Royal Navy West of the Gibraltar and positioning itself off the coast of North Africa to intercept the US invasion. A few remaining ships are on their way from the North Atlantic, and the whole expeditionary force for the Maghreb is assembled in the West Mediterranean.

DAY 35:

Image

The 21cm arty with a range hero and the flamm panzer, coupled with Soviets' repeated stupid attacks by heavy tanks against infantry in rough terrain West of the city, were instrumental in creating an opportunity to storm Stalingrad. Further progress East of Moscow towards Gorky and Yaroslavl. Still upgrading AT's into StuG's.

Image

We have established the desired line of defense around Tambov-Voronezh. As discussed previously, we do not plan a solid line of defense in the open terrain South of Voronezh along the Don, but rather a flexible defense where we are prepared to withdraw as the Soviet armor rolls forward and we will fight them step-by-step, for which we are already preparing anti-tank assets deep behind the front lines.

Image

Similar mobile fighting will take place in the open terrain East of the Don and North of the Caucasus mountains. We will use the narrow passage between the Azov Sea and the impassable Don "lake" East of Rostov as a key line of defense. A couple of StuG's are already in position. We might have to withdraw armored units North of Grozny to assist. Hopefully, some already achieved chipping away at Soviet units in the Astrakhan desert during 1942 will blunt the force of the Uranus blow.

Image

Novorossiysk is about to fall. The mountain force is engaged at the outskirts of Grozny. Snow and frozen ground actually work in our favor here - Terek river is no longer an obstacle, and we can lure the entrenched infantry guarding Grozny into arty traps (see triangle).

Image

Well, we were a few turns late to establish a strong defensive line in the trenches, as British armor arrived too soon. We might have to withdraw to the secondary line of defense in front of Mersa Maruth.

Image

Operation Torch is being thwarted. No US transports reached land and their fleet is decimated. Note that we snuck one sub past the Gibraltar to sink HMS Resolution. A strong land defensive force is at Oran, but alas, they might not have an opportunity to fire even one bullet!

Things are progressing well, with some minor delays at Grozny and El Alamein, but this will corrected in 1943.
verstaubtgesicht
Senior Corporal - Destroyer
Posts: 117
Joined: Mon Feb 18, 2013 9:39 pm

Re: Battlefield Europe - Best Mod so far for me

Post by verstaubtgesicht »

This is a look at 1943. Objectives are:

(A) Win the war against Soviet Union
(B) Begin Operations to capture Iraq
(C) Conquer Egypt and begin operations in the Levant
(D) Logistics of troop upgrades and transfer to France. Begin Operations Seeloewe.

DAY 39:

Image

I figured I could start with a big picture on Russian New Year's Eve (Jan. 13). The front in the East has stabilized, but there are still two active pockets of open terrain (South of Voronezh and SouthEast of Rostov) that need to be eliminated. After the capture of Grozny, we are poised to proceed further South towards the Baku oil fields, and subsequently to Northern Iraq. Operation Torch was a disaster for the Allies, and our formidable forces in the Maghreb will be transferred either towards the Levant and South of France (land and some naval forces), or towards the North Atlantic (the bulk of the fleet).

Image

Leningrad is firmly in our hands. A two-pronged group is assembling to clear remaining resistance around Vologda and to march on Archangelsk. Note how air transports are being used for non-motorized "crack" infantry troops. East of Moscow we are still just holding the line in front of Gorky, because Soviet armor keeps streaming from the East.

Image

I am showing the Central front with the fog of war lifted here for better clarity. The Tambov-Voronezh line is holding. Note the flexible defense South of Voronezh: a strong but isolated enemy armored column is moving through our lines, but they will be met by a rude surprise in the form of a Tiger and an 88mm. An IVF/2 is engaged Southeast of Voronezh - the first panzer that can freely roam the steppe without fear of being attacked by enemy tanks. Partisans are becoming annoying, but manageable.

Image

At the very top of the map is a group of three StuG's that have just finished off some Soviet armor West of Stalingrad in the same flexible warfare mode, while at the same time a new strong back-up position was formed between Rostov and Voroshilovgrad, so that the StuG's can be withdrawn and brought to full strength. The second open terrain theatre North of the Caucasus is a "free for all" battleground, and despite the fact that the Soviets have advanced westward considerably, their forces are stretched thin. Grozny with its oil field is finally in our hands.

Image

The situation in Afrika looks far from great, but our forces appear to hold a line...

Image

...that is until one lifts the fog of war, and then it looks borderline catastrophic! As originally planned, we need to fall further back and hold the Mersa Maruth line, but even that is questionable. The good news is that upon sighting this strong enemy group a couple of turns ago, we have initiated a transfer of reinforcements incl. some formidable AT assets from the Maghreb and the Eastern front towards this theater of ops. The truly sad news is the loss of one of the two very valuable Fallschirmjaegers... This should be avoided at all costs, because these units cannot be replaced, and they can be very helpful in attacking enemy from behind, as already witnessed at El Alamein.

Let's look at DAY 45:

Image

An infantry- and arty-heavy force moving towards Archangelsk. The pesky T-34 Northeast of Vologda has been around for a while and we kept it down with our own captured T-34, but could not destroy it. It was actually OK, because our T-34 gained experience >200, and it will eventually become a Tiger. With the arrival of a StuG and the Russian T-34 resting on a river, this will be over soon.

Image

Soviet paratroopers landed around Moscow and cause some havoc! Fortunately, we have a couple of weak infantry units to hold them back until reinforcements arrive. All-in-all, losing some cities to partisans is not such a bad thing, as reconquest yields prestige. I think this "bug" actually should be corrected, and a loss of a city or an airfield should be punished with a loss of prestige. Gorky is finally in our hands. Although the Soviets are still capable of throwing a few T-34/43 into the battle, their lines are disorganized and mixed up with arty units in transports thrust forward for easy destruction.

Image

The pocket South of Voronezh was wiped out with the Tiger leading the charge, as was the Soviet armor around Tambov, but at a high cost (see circled low strength units). There are still pockets of resistance West of Stalingrad, but now odds are in our favor - for example a potential IVG with +2 ATT hero vs. T-34/43 shows 6:0 odds, plus we have arty, and they don't. Note how impenetrable this line around the IVG is. For the first time, warfare in the East is being conducted with ease, and victory is in the air...

Image

Now some bad news: our lines at Mersa Maruth have been broken. The only assets holding the British armor are Rommel and the airforce. Fortunately, help is on its way from Tobruk - a StuG, a Pz IIIL, and a couple of AT units. Note that I have been using a scout around El Alamein to harass enemy arty, thus preventing it from joining the front, where it could have caused further trouble and possibly even an attack on and abandonment of Mersa Maruth.

Image

Victory at Gibraltar. Just for fun, we used capital ships to destroy the radar unit, and then we landed an Italian infantry on the airfield, so that the whole Gibraltar-based RAF will fall out of the skies.

Image

Some of the Atlantic fleet has already reached La Manche. I decided to split it and send some assets, mainly subs, through the channel, and some further North to resume the harassment of convoys. In retrospect, I don't think that the North Atlantic battle was worth it, as any prestige gained was probably wiped out by naval losses, but it was fun.

DAY 49:

Image

Final assault on Archangelsk is ready. The scout car with its hopping ability might play an important role in neutralizing any possible arty in the back. Division Azul is also slated to see heavy combat, as its usefulness will come to an end soon.

Image

The Central front keeps moving further East. This is turning into a routine mopping up operation.

Image

Stalingrad will take some time and cannot be rushed (tell this to von Paulus!). The key is to cross the Volga North of the city and neutralize the back-up arty. Strong armored patrols are destroying counter-attacks across the Volga marshes around Astrakhan.

Image

Baku and its oil fields are in our hands. Two columns are going further South towards Iraq - a mountain/infantry force in the West and a much stronger combined army in the East.

Image

What a difference a few days make! With the arrival of armored and AT reinforcements, the British army has been wiped out West of El Alamein.

Image

Contact with the enemy has been established in the N. Atlantic. We have overwhelming superiority over those forces that are in close proximity. They key is to wipe out each wave of forces without being detected. We also have the 2nd wave of subs coming up, and they will be decisive in occupying the shipping lanes, and then destroying enemy's capital ships.

Image

I thought that it might be good to give an update on the air battle over the Continent that is beginning to heat up. Stronger and stronger Allied planes are showing up in greater and greater numbers. We are countering this with a network of AA units and Wuerzburg radars, as well as some hero souped-up planes like the one shown. The enemy seems to like bombing the fort next to Wilhelmshaven, and we are taking advantage of that with strong AA presence.

DAY 55:

Things are turning decisively in our favor.

Image

Soviet resistance is dying. After a decisive victory in Afrika, we are poised to attack and occupy the Levant (after careful scouting, we found a landing spot far North in Syria, but we will also cross the Suez and attack from the South). There are still reinforcements coming from the Central Mediterranean. The combined naval fleet of the Kriegsmarine with Regia Marina reinforcements is battling it out in the N. Atlantic. Partisan activity has picked up significantly in Yugoslavia, but we have stationed enough units to keep them under control.

Image

Archangelsk finished.

Image

Soviets not giving up just yet. However, their isolated T-34 forays into the forrest are easily manageable. Our cradschuetzen scout has done a good job spotting and then conquering an empty city and then on top of it ambushing an oncoming katysha.

Image

The Central front is almost completely under control, except for Stalin holed up in his bunker (kind of Berlin 1945 in reverse).

Image

Stalingrad fell quickly after the bridgehead was established over the Volga North of the city and the Tiger was brought to bear on the rear arty units. We will use Stalingrad railway station to start transferring units to France.

Image

Forces for the penetration into Iraq are being assembled in two columns, but it takes some time because of the absence of a railway or an airfield and a long trek along the road from Baku.

Image

We have the port of Alexandria, which will help us transport our forces into Syria. The other line of attack will be over the Suez, but it has to be a careful crossing because of the fort fire. Go with a Panther first, destroy the fort, and then transfer the rest of the units. There are still some remnants of the Royal Navy, which will be taken care of with Regia Marina's battleship and heavy cruiser, plus strat bombers.

DAY 61 (end of 1943):

No more reports from the Eastern Front - all quiet there. The main activity is logistics of transferring troops to France.

Image

The most lively action is at the gates of Iraq. Because we had detected a strong armored enemy formation backed up by arty, we have assembled a formidable combined force of our own Southeast of Hamadan. The discovery was the work of a scout, which unfortunately did not survive. The mountain-infantry column further West continues to advance carefully towards Kirkuk and Mosul, and the engineers destroyed a mine field.

Image

Our attack into the Levant proceeds according to plan. A Panther crossed the Suez and destroyed the fort, so that now we can safely cross with other units. At the same time, we sent units from Alexandria port via naval transports, and on top of it infantry was dropped onto the Beirut airport supported by battleship guns (the good thing about airborne regular infantry is that they do not land suppressed like fallschirmjaegers, which I consider a bug in the game, but will take it unless it gets fixed).

Image

As indicated before, a careful mapping of the Levant coast revealed a "blind spot" West of Aleppo, where we are landing naval transports safely. Further reinforcements keep arriving. At the same time, the remaining fallschirmjaeger will attack from behind East of the city. Note my mistake of landing an Italian tank on Cyprus, which cannot be moved and it will be a spectator for the rest of the game, because Nicosia has no port!

Image

SeeLoewe underway! First landing units are a Tiger and a Pz IVH with +3ATT and +2INI heroes. The East Anglia coast has been cleared of radars/forts with naval/air bombardment, so the first units will land unopposed, but we certainly expect the bulk of the Royal Navy from the Scapa Flow to show up in no time. We are rushing more subs to counter this naval threat, but I must admit that I have left too many naval assets stuck in the N. Atlantic. Note the 2nd wave of units getting ready, some of them still in trains. Due to abundant prestige, I am also over-strengthening some key units, especially arty (Nebelwerfer in the triangle) and non-motorized crack infantry.

Image

You can see my point about too many ships stuck in the N. Atlantic here. But they are drawing 200 prestige points per turn, and also destroying enemy ships.

That's the situation at Christmas Eve 1943.
verstaubtgesicht
Senior Corporal - Destroyer
Posts: 117
Joined: Mon Feb 18, 2013 9:39 pm

Re: Battlefield Europe - Best Mod so far for me

Post by verstaubtgesicht »

OK, finally got a few minutes to provide the epilogue in 1944. There is not much to learn here, as it is mostly a grind to finish off the British. One lesson is that the foray into the N. Atlantic after the battle for Gibraltar was a waste of time, as I have pointed out earlier. It is better to concentrate the fleet for Operation SeeLoewe.

D64 Feb :

Image

Global View: Mopping up the Levant, about to take Bagdad and its oilfield, landed on British soil in East Anglia, occupying shipping lanes in N. Atlantic and destroying the mostly US fleet

Image

Iraq: We have destroyed the strong armored group North of Baghdad and are on the outskirts of the city. Took some unnecessary losses due to snowy weather and impatience. However, everything is 100% under control, and with this superiority in tanks, artillery and air, it's just a matter of time before we grind through the remaining resistance.

Image

Aleppo and Beirut firmly in our hands

Image

and Jerusalem will be very soon, too.

Image

Landed a Tiger in East Anglia. As mentioned, it is a good idea to start SeeLoewe under the cover of snowy weather. Note heavy arty, two of which are range 4 firing across the Channel from Calais.

D69

Image

Significant progress in Iraq, as expected. Only Basra left.

Image

No other resistance in the Middle East. Panzers heading East over the desert are certainly an overkill.

Image

At the gates of London. I am not very efficient in '44 as things take time and I rushed it. One should provide a 2nd landing site in the South sooner, but my fleet was stuck in the N. Atlantic.

D77 (penultimate report):

Image

The only fighting still going on is in the UK and the pesky partisans in the Balkans.

Image

a tedious trek back from Iraq to France via the Caucasus

Image

The only real resistance is in the air with strong combined RAF and USAF waves, but our fully upgraded fighter Geschwadern are up to the task. I have also transferred a couple of AA units and one mobile radar for extra initiative.

D86 - Well, that's it!

Image
Post Reply

Return to “Panzer Corps : AAR's”