

A quick question before I play a game tonight - Early Germans versus Phil's Early Imperial Romans - a game of quality versus quantity and therefore deserving of a full report as this is an examination of core mechanics (or at least I hope it will be).
* Under the movement rules you can turn 90 degrees and advance. Can you do the 90 degrees turn at the end of the advance or must it be at the start?
Cheers.
Sixth Battle Report
Moderators: philqw78, terrys, hammy, Slitherine Core, Field of Glory Moderators, Field of Glory Design
-
rbodleyscott
- Field of Glory 2

- Posts: 28429
- Joined: Sun Dec 04, 2005 6:25 pm
Re: Sixth Battle Report
It can be either. This will be clarified in the next update.bddbrown wrote:A quick question before I play a game tonight - Early Germans versus Phil's Early Imperial Romans - a game of quality versus quantity and therefore deserving of a full report as this is an examination of core mechanics (or at least I hope it will be).
* Under the movement rules you can turn 90 degrees and advance. Can you do the 90 degrees turn at the end of the advance or must it be at the start?
Battle Report
Pre-Setup
I was worried about the straight Roman / German foot fight. The legionaries were going to win hands down (more about this below). Thus if I had the figures I would have fielded all the infantry as Medium Foot and skulked in terrain. However I didn't and Phil wanted an infantry fight. I decided to take a Frisian ally to see how it went and get the heavy foot as well as taking the Batavian Revolt because a) it was interesting and b) gave me another unit of cavalry. I also wanted to use four generals to see how it compared - to offset the average status of many of the troops and increase movement to allow a more aggressive sweeping on both flanks.
Here is my army list.
1 FC General 50 Cavalry,,,Protected,,Light Spear,Swordsmen
1 FC General 50 Cavalry,,,Protected,,Light Spear,Swordsmen
1 TC General 30 Cavalry,,,Protected,,Light Spear,Swordsmen
1 TC Ally General (Frisians) 20 Cavalry,,,Protected,,Light Spear,Swordsmen
8 Warriors (Batavians) 56 1 Medium Foot,Average,Undrilled,Protected,,Impact Foot,Swordsmen
6 Archers (Batavians) 30 1 Light Foot,Average,Undrilled,Unprotected,Bow,,
6 Archers (Batavians) 30 1 Light Foot,Average,Undrilled,Unprotected,Bow,,
6 Javelinmen (Batavians) 24 1 Light Foot,Average,Undrilled,Unprotected,Javelins,Light Spear,
6 Batavian Auxiliary Deserter Foot 54 2 Medium Foot,Average,Drilled,Armoured,,Light Spear,Swordsmen
4 Batavian Auxiliary Deserter Cavalry 56 2 Cavalry,Average,Drilled,Armoured,,Light Spear,Swordsmen
4 Sarmatians (only after 25AD) 64 2 Cavalry,Superior,Undrilled,Armoured,,Lancers,Swordsmen
8 Warriors (Frisians) 56 3 Heavy Foot,Average,Undrilled,Protected,,Impact Foot,Swordsmen
8 Warriors (Frisians) 56 3 Heavy Foot,Average,Undrilled,Protected,,Impact Foot,Swordsmen
8 Warriors (Frisians) 56 3 Heavy Foot,Average,Undrilled,Protected,,Impact Foot,Swordsmen
4 Cavalry (Batavians) 56 4 Cavalry,Superior,Undrilled,Protected,,Light Spear,Swordsmen
4 Cavalry (Batavians) 56 4 Cavalry,Superior,Undrilled,Protected,,Light Spear,Swordsmen
4 Cavalry (Batavians) 56 4 Cavalry,Superior,Undrilled,Protected,,Light Spear,Swordsmen
Phil's was on a piece of paper - sorry - but you get the gist from the battle maps.
Setup
Phil wanted open terrain and I wanted as much terrain as I could put down (so I could hide behind it). The terrain rules don't seem to put much terrain in the centre of the table - which is definitely a good thing - and although it took part it did not dominate the game.
Phil's IC general made the difference in scouting and I had to deploy first which was a disadvantage. My best intentions were ruined - I physically could not put the figures down for a straight infantry fight. I nearly deployed the Frisians on the far left once the legionaries went down, but figured I needed them to at least act as a honey pot for the legionaries. I decided to hang back with the heavy foot and sweep cavalry on both flanks. I really needed to put the infantry forward just enough to keep the legionaries coming.
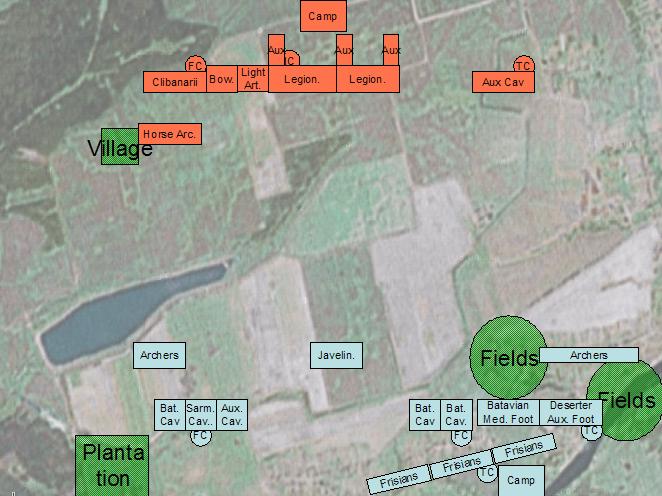
The Roman army was compact and perfectly formed. The Germans were more widely spread and hollow in the centre.
Bounds 1 and 2
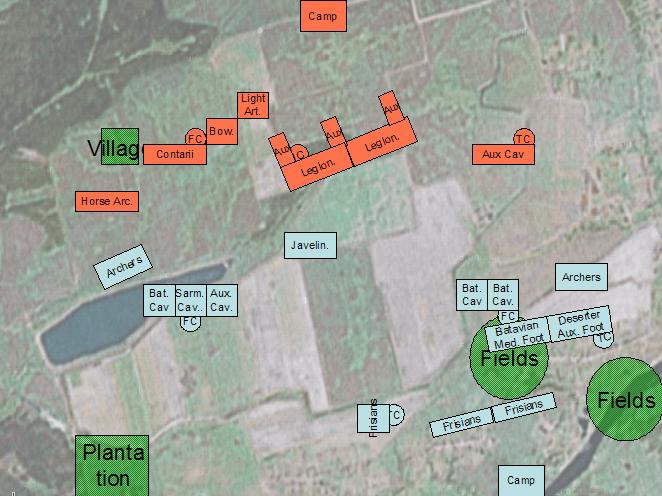
Some standard maneouvers and jostling. On the left I had a clear advantage in numbers, but I had left the infantry too far back and might get my flank turned. I threw a unit of Frisians to the left in a vain attempt to protect my cavalry's flank.
On the right I also had numbers, but needed to keep the legionaries off my cavalry. So I threw my medium infantry forward to lure the legionaries onwards and provide some sort of cover.
I also advanced the Frisians in the centre a little to try and keep the legionaries interested and used my javelinmen to try and slow down any redeployment.
Bound 3
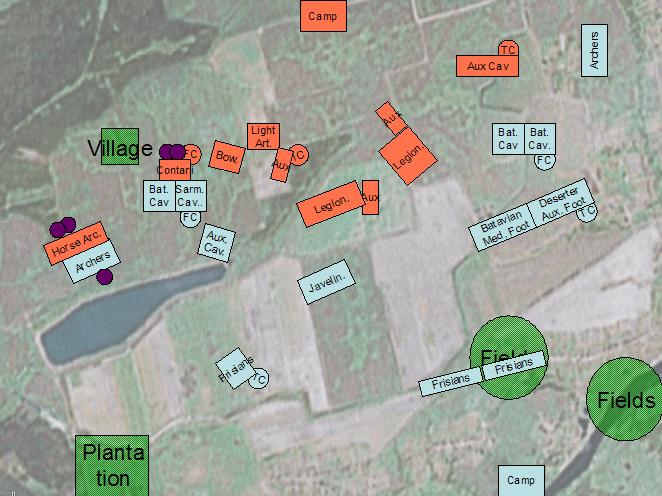
With the early maneouvers out of the way, the initial exchanges began. Early shooting saw the horse archers on the left disrupted (the purple dot denotes a level of cohesion lost) and the Deserter Auxilary Cavalry disrupted from combined bowmen and artillery shooting.

Bound 4
The Contarii could not resist charging, and Phil also decided that the horse archers could not resist a prolonged exchange of bow fire so he charged them as well. The horse archers did well, disrupting the light infantry - it was a straight numbers versus PoA fight. The Contarii did not fair so well, becoming disrupted in impact and losing a base - which freed up the deserter auxilary cavalry to charge the bowmen. In melee the Contarii lost again and another base - the plan to sweep the left flank was going well. The deserter cavalry and bowmen fight went nowhere - so they break-off with no losses.
This was a god-send because it meant I could rally them and their flank was no longer exposed to the lurking auxilary.
Bound 5
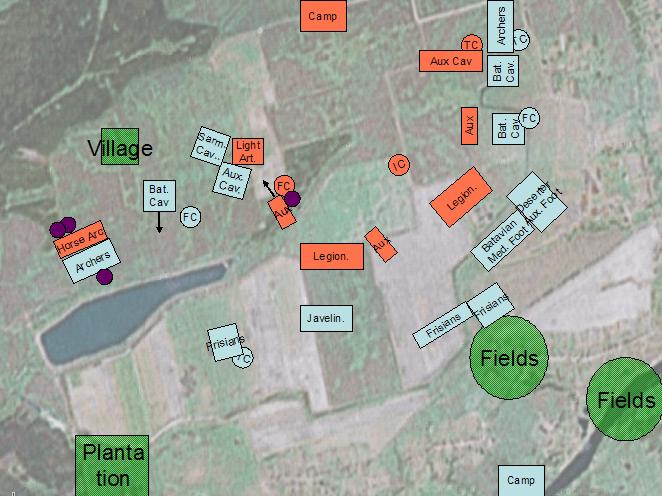
Things were going well on the left, if the Contarii would break then three units of cavalry could overwhelm the bow and artillery and move onto the auxilary. On the right things were begining to look bad. The Frisians were too far away and the legionaries had turned to face the cavalry attack. My cavalry were stretched too thin and the medium foot support looked a little flimsy. But I hoped that the archers and cavalry would overwhelm the roman cavalry and I could stay out of contact with the legionaries.
The Contarii lost another base in melee and vapourised (1 base BG). The general with them ran to the bowmen. My deserter cavalry charged into the bowmen, and in one bound they lost a base at impact, lost a base at melee, routed and lost a base due to enemy contact - they also vapourised. My cavalry pursued into the artillery. The general fled to the auxilaries.
Bound 6
The artillery broke in the melee phase, and the auxilaries failed a CT - but the general had now bounced from the Contarii across to them, so rallying was a possability. On the far left the horse archers finally broke and fled from the light infantry archers. On the right the legionaries were getting close to contact. I needed one more unit to break but the right was beginning to look unwell.
Bound 7
This was crunch point. I foolishly left the deserter auxilary in charge range of the legionaries. This allowed them to step forward into contact with the Batavian Medium Foot - disaster! This precipated a general fight on the right with cavalry versus cavalry and auxilia versus cavalry as well.
As luck would have it I was able to outrageously outroll the legionaries at impact and they failed their CT to become fragmented (even after rerolls). Even worse they lost a base. Things were looking up.
Melee saw a total reverse, with the legionaries overcoming their fragmentation with a double PoA. My Batavian foot lost the combat and took a CT - falling to fragmented. Also my cavalry were outclassed against the Roman cavalry - their better armour telling. My cavalry fell to disrupted.
On the left I surrounded the auxilary unit with 2 units of cavalry and the advancing Frisians who had managed to swing round and join the fight - yay for the Frisians and their long march!
On my bound, my Batavian Medium Foot routed, the Deserter Auxilaries next to them failed a CT (and became disrupted), the Frisians who charged to support them also failed and fragmented. Yikes, three failed CTs and the whole flank was crumbling on me due to one lost combat!
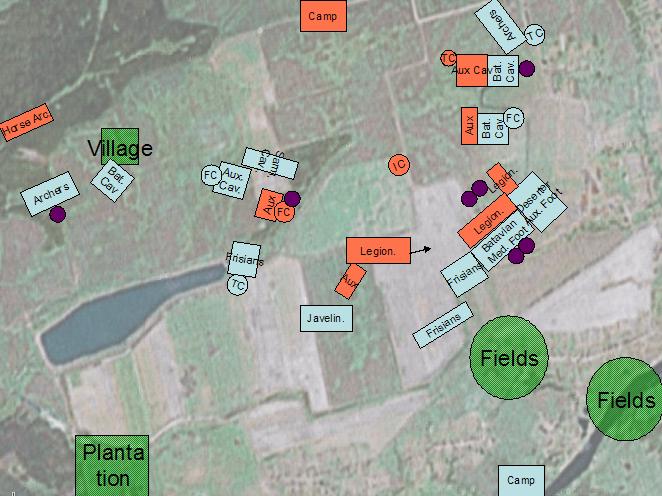
Bound 8
This saw my cavalry fighting the cavalry rout, the light archers supporting them disrupt due to failing a CT because of the rout. The Batavian Cavalry fighting the Auxilary Foot also failed a CT and fragmented. The whole flank was collapsing, which was scary. The speed at which is was going was truly frightening and more than a little frustrating. In the space of two bounds I had lost two BGs, two were fragmented and two were disrupted.
Fortunately I was able to charge the surrounded auxilary unit on the left and fragment it - thus breaking the Roman army. Phew! Another bound or two and my entire right flank would have collapsed.
I was worried about the straight Roman / German foot fight. The legionaries were going to win hands down (more about this below). Thus if I had the figures I would have fielded all the infantry as Medium Foot and skulked in terrain. However I didn't and Phil wanted an infantry fight. I decided to take a Frisian ally to see how it went and get the heavy foot as well as taking the Batavian Revolt because a) it was interesting and b) gave me another unit of cavalry. I also wanted to use four generals to see how it compared - to offset the average status of many of the troops and increase movement to allow a more aggressive sweeping on both flanks.
Here is my army list.
1 FC General 50 Cavalry,,,Protected,,Light Spear,Swordsmen
1 FC General 50 Cavalry,,,Protected,,Light Spear,Swordsmen
1 TC General 30 Cavalry,,,Protected,,Light Spear,Swordsmen
1 TC Ally General (Frisians) 20 Cavalry,,,Protected,,Light Spear,Swordsmen
8 Warriors (Batavians) 56 1 Medium Foot,Average,Undrilled,Protected,,Impact Foot,Swordsmen
6 Archers (Batavians) 30 1 Light Foot,Average,Undrilled,Unprotected,Bow,,
6 Archers (Batavians) 30 1 Light Foot,Average,Undrilled,Unprotected,Bow,,
6 Javelinmen (Batavians) 24 1 Light Foot,Average,Undrilled,Unprotected,Javelins,Light Spear,
6 Batavian Auxiliary Deserter Foot 54 2 Medium Foot,Average,Drilled,Armoured,,Light Spear,Swordsmen
4 Batavian Auxiliary Deserter Cavalry 56 2 Cavalry,Average,Drilled,Armoured,,Light Spear,Swordsmen
4 Sarmatians (only after 25AD) 64 2 Cavalry,Superior,Undrilled,Armoured,,Lancers,Swordsmen
8 Warriors (Frisians) 56 3 Heavy Foot,Average,Undrilled,Protected,,Impact Foot,Swordsmen
8 Warriors (Frisians) 56 3 Heavy Foot,Average,Undrilled,Protected,,Impact Foot,Swordsmen
8 Warriors (Frisians) 56 3 Heavy Foot,Average,Undrilled,Protected,,Impact Foot,Swordsmen
4 Cavalry (Batavians) 56 4 Cavalry,Superior,Undrilled,Protected,,Light Spear,Swordsmen
4 Cavalry (Batavians) 56 4 Cavalry,Superior,Undrilled,Protected,,Light Spear,Swordsmen
4 Cavalry (Batavians) 56 4 Cavalry,Superior,Undrilled,Protected,,Light Spear,Swordsmen
Phil's was on a piece of paper - sorry - but you get the gist from the battle maps.
Setup
Phil wanted open terrain and I wanted as much terrain as I could put down (so I could hide behind it). The terrain rules don't seem to put much terrain in the centre of the table - which is definitely a good thing - and although it took part it did not dominate the game.
Phil's IC general made the difference in scouting and I had to deploy first which was a disadvantage. My best intentions were ruined - I physically could not put the figures down for a straight infantry fight. I nearly deployed the Frisians on the far left once the legionaries went down, but figured I needed them to at least act as a honey pot for the legionaries. I decided to hang back with the heavy foot and sweep cavalry on both flanks. I really needed to put the infantry forward just enough to keep the legionaries coming.
The Roman army was compact and perfectly formed. The Germans were more widely spread and hollow in the centre.
Bounds 1 and 2
Some standard maneouvers and jostling. On the left I had a clear advantage in numbers, but I had left the infantry too far back and might get my flank turned. I threw a unit of Frisians to the left in a vain attempt to protect my cavalry's flank.
On the right I also had numbers, but needed to keep the legionaries off my cavalry. So I threw my medium infantry forward to lure the legionaries onwards and provide some sort of cover.
I also advanced the Frisians in the centre a little to try and keep the legionaries interested and used my javelinmen to try and slow down any redeployment.
Bound 3
With the early maneouvers out of the way, the initial exchanges began. Early shooting saw the horse archers on the left disrupted (the purple dot denotes a level of cohesion lost) and the Deserter Auxilary Cavalry disrupted from combined bowmen and artillery shooting.
Bound 4
The Contarii could not resist charging, and Phil also decided that the horse archers could not resist a prolonged exchange of bow fire so he charged them as well. The horse archers did well, disrupting the light infantry - it was a straight numbers versus PoA fight. The Contarii did not fair so well, becoming disrupted in impact and losing a base - which freed up the deserter auxilary cavalry to charge the bowmen. In melee the Contarii lost again and another base - the plan to sweep the left flank was going well. The deserter cavalry and bowmen fight went nowhere - so they break-off with no losses.
This was a god-send because it meant I could rally them and their flank was no longer exposed to the lurking auxilary.
Bound 5
Things were going well on the left, if the Contarii would break then three units of cavalry could overwhelm the bow and artillery and move onto the auxilary. On the right things were begining to look bad. The Frisians were too far away and the legionaries had turned to face the cavalry attack. My cavalry were stretched too thin and the medium foot support looked a little flimsy. But I hoped that the archers and cavalry would overwhelm the roman cavalry and I could stay out of contact with the legionaries.
The Contarii lost another base in melee and vapourised (1 base BG). The general with them ran to the bowmen. My deserter cavalry charged into the bowmen, and in one bound they lost a base at impact, lost a base at melee, routed and lost a base due to enemy contact - they also vapourised. My cavalry pursued into the artillery. The general fled to the auxilaries.
Bound 6
The artillery broke in the melee phase, and the auxilaries failed a CT - but the general had now bounced from the Contarii across to them, so rallying was a possability. On the far left the horse archers finally broke and fled from the light infantry archers. On the right the legionaries were getting close to contact. I needed one more unit to break but the right was beginning to look unwell.
Bound 7
This was crunch point. I foolishly left the deserter auxilary in charge range of the legionaries. This allowed them to step forward into contact with the Batavian Medium Foot - disaster! This precipated a general fight on the right with cavalry versus cavalry and auxilia versus cavalry as well.
As luck would have it I was able to outrageously outroll the legionaries at impact and they failed their CT to become fragmented (even after rerolls). Even worse they lost a base. Things were looking up.
Melee saw a total reverse, with the legionaries overcoming their fragmentation with a double PoA. My Batavian foot lost the combat and took a CT - falling to fragmented. Also my cavalry were outclassed against the Roman cavalry - their better armour telling. My cavalry fell to disrupted.
On the left I surrounded the auxilary unit with 2 units of cavalry and the advancing Frisians who had managed to swing round and join the fight - yay for the Frisians and their long march!
On my bound, my Batavian Medium Foot routed, the Deserter Auxilaries next to them failed a CT (and became disrupted), the Frisians who charged to support them also failed and fragmented. Yikes, three failed CTs and the whole flank was crumbling on me due to one lost combat!
Bound 8
This saw my cavalry fighting the cavalry rout, the light archers supporting them disrupt due to failing a CT because of the rout. The Batavian Cavalry fighting the Auxilary Foot also failed a CT and fragmented. The whole flank was collapsing, which was scary. The speed at which is was going was truly frightening and more than a little frustrating. In the space of two bounds I had lost two BGs, two were fragmented and two were disrupted.
Fortunately I was able to charge the surrounded auxilary unit on the left and fragment it - thus breaking the Roman army. Phew! Another bound or two and my entire right flank would have collapsed.
Questions Arising From The Game
Not too many questions from the game - must be getting better with the rules - or just too familar with them.
* If a general moves into contact with a BG in the movement phase, can that BG then make two moves? i.e. the general would end up making three moves.
* If a general moves into contact with a BG in the movement phase, can that BG then make two moves? i.e. the general would end up making three moves.
General Thoughts
Some random thoughts and notes from the discussion afterwards.
* On the one hand Phil and I were both happy with the flow of the game and the way the mechanics worked - it gave a good fun game with a result. However, looking at the battle it did not flow like we imagined a real battle between Romans and Germans would have - no clash of legionaries versus foot warriors in the middle for example.
This is really down to the legionaries so outclassing the german foot that it makes any contest between them over before it starts. I've written a quick program to calculate the odds and although it is not finished yet its suggests that the odds of a win for the germans in a straight fight are somewhere around 1-3%. So as a german don't fight the legionaries - the germans in real life may have done it all the time - and they may have lost all the time. But we're not going to see it on table.
Not sure if this is a problem really, just something that we have to accept. If we wanted to change that, then we need to probably throw out a little accuracy and give the warbands a chance - say at impact - maybe then german players will be tempted.
Phil and I came up with an idea. Small BGs are also a little too good - its seems there is little disadvantage to having lots of small BGs over a couple big ones. How about bigger BGs get a bonus at impact to simulate their greater momentum? This would allow for example a 12 base BG to charge in 4 deep against a 6 man legion and get some advantage at impact - say a PoA. It would encourage bigger units and encourage the german player to have a go. It would also get round the "what ferocious charge at impact" question for hairy celtic types.
A lot of wording and thought needs to go into this, but as a concept it might be worth looking at - I'll leave that up to the writers.
* The armoured nature of the Romans really made a huge difference in the game. Everywhere they got a PoA in melee, which essentially negated the German PoA or just increased advantages. The Roman legionaries for example against the German foot wariors have ++ PoA which is the same as hitting them in the flank! This seems way too harsh - was it really this bad for the Germans?
Even cavalry fighting auxilaries in the open are evens - the armour cancelling the mounted versus medium foot - and the auxilaries are a lot cheaper, can operate in terrain and not terribly slower than the cavalry.

Hi Bruce
I guess one of the issues is that by making the rules as realistic as possible we encourage people to play having read the rule book. I guess the typical German warlord didn't read the rule book before he had a go!! It's the same in DBM where I would always hide my Wb(F) from enemy mounted. A challenging one to sort and we'll give it some thought. I am trying Ancient Britons vs Warband on Thursday with Terry so I can offer some first hand views then. Having read the rule book it seems you won as the Germans doing sensible things.
But of course it isn't want the Germans used to do...but by the same measuer do we want to force a situation where either....the Germans behave in character from a command point of view and go forth to their doom or....the Romans are out of character and make a point of losing such battles? A difficult call for sure. We have tended to err towards historical accuracy throughout so far, rightly or wrongly.
Raising the odds is fine but would you heve done it any differently if you had a 20% chance of winning I wonder?? It will be a hot topic of author conversation later this week/next week.
More after Terry's Romans crush me on Thursday. Certainly a hot topic on the balancing front. Keep the thoughts/debate going as its very helpful.
2 General must be with them at the start. Needs clarifying.* If a general moves into contact with a BG in the movement phase, can that BG then make two moves? i.e. the general would end up making three moves.
* On the one hand Phil and I were both happy with the flow of the game and the way the mechanics worked - it gave a good fun game with a result. However, looking at the battle it did not flow like we imagined a real battle between Romans and Germans would have - no clash of legionaries versus foot warriors in the middle for example.
I guess one of the issues is that by making the rules as realistic as possible we encourage people to play having read the rule book. I guess the typical German warlord didn't read the rule book before he had a go!! It's the same in DBM where I would always hide my Wb(F) from enemy mounted. A challenging one to sort and we'll give it some thought. I am trying Ancient Britons vs Warband on Thursday with Terry so I can offer some first hand views then. Having read the rule book it seems you won as the Germans doing sensible things.
But of course it isn't want the Germans used to do...but by the same measuer do we want to force a situation where either....the Germans behave in character from a command point of view and go forth to their doom or....the Romans are out of character and make a point of losing such battles? A difficult call for sure. We have tended to err towards historical accuracy throughout so far, rightly or wrongly.
Agreed. I guess this comes from the removal of the impulsive troops type which - while it did have unrealistic problems and therefore needed changing - did force the Germans forward into the open a bit. I guess there are 2 ways to go - raise the odds, or make it harder for the Germans to competely avoid them.This is really down to the legionaries so outclassing the german foot that it makes any contest between them over before it starts. I've written a quick program to calculate the odds and although it is not finished yet its suggests that the odds of a win for the germans in a straight fight are somewhere around 1-3%. So as a german don't fight the legionaries - the germans in real life may have done it all the time - and they may have lost all the time. But we're not going to see it on table.
Not sure if this is a problem really, just something that we have to accept. If we wanted to change that, then we need to probably throw out a little accuracy and give the warbands a chance - say at impact - maybe then german players will be tempted.
Raising the odds is fine but would you heve done it any differently if you had a 20% chance of winning I wonder?? It will be a hot topic of author conversation later this week/next week.
Interesting. Another option may be instead some + for 3rd rank in melee which big BGs can achieve when small ones cannot. I'll add your idea and that and any others to the discussion forum. Having played a lot of games I am still not sure if I prefer small or big BGs...which seems to me good news.Phil and I came up with an idea. Small BGs are also a little too good - its seems there is little disadvantage to having lots of small BGs over a couple big ones. How about bigger BGs get a bonus at impact to simulate their greater momentum? This would allow for example a 12 base BG to charge in 4 deep against a 6 man legion and get some advantage at impact - say a PoA. It would encourage bigger units and encourage the german player to have a go. It would also get round the "what ferocious charge at impact" question for hairy celtic types.
Yes a ++ most of the time is a bit horrible. Just to expand on your point though....if hit in flank it is much worse as those hit are DISR as well - so ++ and a 50% dice advantage. POA is the same but not the total effect. Also good chances usually of the - for fighting in 2 directions. Horrible if its done by anything other than skirmishers.A lot of wording and thought needs to go into this, but as a concept it might be worth looking at - I'll leave that up to the writers.
* The armoured nature of the Romans really made a huge difference in the game. Everywhere they got a PoA in melee, which essentially negated the German PoA or just increased advantages. The Roman legionaries for example against the German foot wariors have ++ PoA which is the same as hitting them in the flank!
One of the challenges here is what to fix in the game mechanims and what to fix in the points system instead and what to fix in the victory conditions. Another factor is that my Britons manage 16BGs with ease so terry need to break 8 - I can lose a lot and still win. I think the Roman will be 11 BGs by comparison.This seems way too harsh - was it really this bad for the Germans?
Even cavalry fighting auxilaries in the open are evens - the armour cancelling the mounted versus medium foot - and the auxilaries are a lot cheaper, can operate in terrain and not terribly slower than the cavalry.
More after Terry's Romans crush me on Thursday. Certainly a hot topic on the balancing front. Keep the thoughts/debate going as its very helpful.
Hi Ian.jdm wrote:Bruce
What was the length of the game ?
Are you still enjoying it or was the fact that it did not play out as you think it would have in reality a bdowner?
Regards
JDM
I still enjoyed the game (it was an interesting problem solving challenge) and it lasted about 3 hours or so. I think this is a style point really. Do we want historical looking battles (lines clashing against each other) or do we want historical interactions between troops. At the moment the rules indicate a historical interaction between troops (i.e. the Romans kicked Germans in the open all the time). So this means we won't see too many lines clashing on the table, even though historically (again caveat that I don't know much) the Germans always seemed to come back for more. If we want Germans (or any other hairy celtic type) fighting Romans in the open then we need to give them a chance.
I am not personally fussed which way the game goes, I'll enjoy both as an intellectual challenge. However the game will be more accessable and interesting to those who want to re-fight historical battles or see more lines clashing in the middle of the table (which would include younger players) if the Germans have a chance - I would say you have to get to at least 33% before anybody is going to even consider having a go.
In fact the inability to fight historical battles with these opponents may be the biggest downside so far.
-
sagji
- Sergeant Major - Armoured Train

- Posts: 567
- Joined: Sun Nov 06, 2005 12:13 pm
- Location: Manchester, UK
There are already some advantages to big battle groups - they are harder to affect with shooting, they can loose more bases before hitting the -1 for 25% losses (a 4 base battle group is at -1 on all CTs after its first loss), the extra numbers may allow them to fight with over laps, and should make it harder to get the 1HP3 modifier on CTs.Interesting. Another option may be instead some + for 3rd rank in melee which big BGs can achieve when small ones cannot. I'll add your idea and that and any others to the discussion forum. Having played a lot of games I am still not sure if I prefer small or big BGs...which seems to me good news.Phil and I came up with an idea. Small BGs are also a little too good - its seems there is little disadvantage to having lots of small BGs over a couple big ones. How about bigger BGs get a bonus at impact to simulate their greater momentum? This would allow for example a 12 base BG to charge in 4 deep against a 6 man legion and get some advantage at impact - say a PoA. It would encourage bigger units and encourage the german player to have a go. It would also get round the "what ferocious charge at impact" question for hairy celtic types.
I suspect the problem is that (large) BGs are too easy to affect with a minor combat - you only have to beat them in melee so fighting on a one base front is enough - one possible solution is to say that to need a CT you have loose AND take 1HP3.
Currently if Lancers wan't to charge a big BG of defensive spear they want to fight on a 1 base frontage as this give them the highest chance of winning, and minimises the risks, of loosing by 2, and of taking 1HP3.

The spears at impact will be on a + POA, and are equally unlikely to lose by 2 and can never lose 1HP3 (assuming the spears are 8 or more bases). In the melee phase the lancers can only expand by 1, giving the spears at least a 6:4 advantage in numbers, are no worse than equal POA's even if their armour is less.Currently if Lancers wan't to charge a big BG of defensive spear they want to fight on a 1 base frontage as this give them the highest chance of winning, and minimises the risks, of loosing by 2, and of taking 1HP3.
You would actually have a much less chance of winning.
The lancers need to maximise their chance causing a DISR on impact. The best chance of doing this is by hitting them with as many bases as possible.

Since I can't quite master quoting, I haven't. One thought on the large v small BG issue. Say you have 3BGs of 4 elements fighting one of 12 (identical troops). Unless I have misunderstood it, the trigger of having lost a combat will apply 3 times to the larger BG (1 opportunity per smallBG it is facing), so it is far more likely to take a cohesion test, which ultimately makes it more vulnerable to becoming disrupted than if it were facing a BG of 12 elements. Not sure that this should be happening.
Phil
Phil
Actually its even worse for the lancers as its 1HP3Bases in the first 3 ranks. So 1 hit causes the first minus on the lancers but not on the spears. A 2-0 loss would be a test on -2 and you get swamped in the melee phase. Good chance of getting the lancers broken. Overall IMPACT troops want to spread out as much as possible to get maximum clout if they win. If they lose...oh well.Quote:
Currently if Lancers wan't to charge a big BG of defensive spear they want to fight on a 1 base frontage as this give them the highest chance of winning, and minimises the risks, of loosing by 2, and of taking 1HP3.
The spears at impact will be on a + POA, and are equally unlikely to lose by 2 and can never lose 1HP3 (assuming the spears are 8 or more bases). In the melee phase the lancers can only expand by 1, giving the spears at least a 6:4 advantage in numbers, are no worse than equal POA's even if their armour is less.
You would actually have a much less chance of winning.
The lancers need to maximise their chance causing a DISR on impact. The best chance of doing this is by hitting them with as many bases as possible.
Phil,Since I can't quite master quoting, I haven't. One thought on the large v small BG issue. Say you have 3BGs of 4 elements fighting one of 12 (identical troops). Unless I have misunderstood it, the trigger of having lost a combat will apply 3 times to the larger BG (1 opportunity per smallBG it is facing), so it is far more likely to take a cohesion test, which ultimately makes it more vulnerable to becoming disrupted than if it were facing a BG of 12 elements. Not sure that this should be happening.
Phil
Its a great topic this....
in terms of your question either you have mis-read or we have mis-written.......to clarify
You look at each BG once to see if its won, drawn or lost. If it suffered more hits than it caused it has lost. So you can only take 1 test as a result of melee as BG. So 3 small BGs has 3 chances of losing small, and a big one 1 chance of losing big.
I did ask someone to try a few like this and see what he preferred.....I find it a hard one to call....which is perhaps a good thing. See what you think with that clarified. Answers on a postcard and all that.
Si
The larger BG is likely to deploy 3 ranks deep. (I don't think any of the lists allow a variation of 4-12 for BG size). It will therefore be harder to cause the 1HP3.Since I can't quite master quoting, I haven't. One thought on the large v small BG issue. Say you have 3BGs of 4 elements fighting one of 12 (identical troops). Unless I have misunderstood it, the trigger of having lost a combat will apply 3 times to the larger BG (1 opportunity per smallBG it is facing), so it is far more likely to take a cohesion test, which ultimately makes it more vulnerable to becoming disrupted than if it were facing a BG of 12 elements. Not sure that this should be happening.
Phil
To trigger the test, you add all of the casualties caused by the larger BG and compare them to all of the casualties received. So, in fact, there is only 1 trigger to make the larger BG test, but 1 each for it's opponents. On even factors, there's a 40% chance that the larger unit will lose, but a 40% chance for EACH of the smaller units to lose. I know which I prefer.
Also......
If it was fighting in 2 ranks, it would almost certainly have a general in the front rank - which would improve it against ALL of its' opponents.... Who are unlikely to have 3 generals in their own front ranks.
There is a quote button on the top right of every post. Click that and you automatically get a reply screen with the posts contents already wrapped in quote tags.wakeful11 wrote:Since I can't quite master quoting, I haven't. One thought on the large v small BG issue. Say you have 3BGs of 4 elements fighting one of 12 (identical troops). Unless I have misunderstood it, the trigger of having lost a combat will apply 3 times to the larger BG (1 opportunity per smallBG it is facing), so it is far more likely to take a cohesion test, which ultimately makes it more vulnerable to becoming disrupted than if it were facing a BG of 12 elements. Not sure that this should be happening.
Phil
The large BG only takes a single CT if it loses the combat. You add up all of the hits it has taken and all of the hits it has inficted. If it recieved more hits than it inflicted then it is deemed tohave lost the combat and takes a single CT. You do this for each BG involved in the combat to determine if they have "lost" or not and whether they need to take a CT or not (and whether they get a +2 or not on the Death Roll for winning the combat).
shall wrote:Phil,Since I can't quite master quoting, I haven't. One thought on the large v small BG issue. Say you have 3BGs of 4 elements fighting one of 12 (identical troops). Unless I have misunderstood it, the trigger of having lost a combat will apply 3 times to the larger BG (1 opportunity per smallBG it is facing), so it is far more likely to take a cohesion test, which ultimately makes it more vulnerable to becoming disrupted than if it were facing a BG of 12 elements. Not sure that this should be happening.
Phil
Its a great topic this....
in terms of your question either you have mis-read or we have mis-written.......to clarify
You look at each BG once to see if its won, drawn or lost. If it suffered more hits than it caused it has lost. So you can only take 1 test as a result of melee as BG. So 3 small BGs has 3 chances of losing small, and a big one 1 chance of losing big.
I did ask someone to try a few like this and see what he preferred.....I find it a hard one to call....which is perhaps a good thing. See what you think with that clarified. Answers on a postcard and all that.
Si
You asked me Simon as I also asked the same question.
I still think smaller BGs are better... To take Terry's comment about which he would prefer - there is a smaller chance that the 3 smaller BGs will all fail there CTs. In fact using the 40% figures he quotes there is a 78% that a single BG of the three smaller ones will pass a CT whereas there is only a 60% chance that the bigger BG will pass it's CT.
I am working on a probability program at the moment. It cannot cope with multiple units (yet), but when it does I will be able to answer this question a little more accurately. But I am not sure my preference is down to pure number crunching. I also like the flexability this gives you - you could take two of the smaller BGs into frontal contact and work the 3rd into a flanking position. Context also has its say in the matter.
But heh, this will all come out in the wash at Usk!
Yes I remember now........I shall look forward to the final cyber-crunch...and will keep my eyes peeled for smoke in the vicinity of High Wycombe  Terry did some pretty serious simulation too.
FWIW my answer so far is...it depends on the troops I am using, on the enemy I am facing and on the terrain....a feeling that makes me pretty happy.
If there is a strong view just in 1 direction then we need to be a bit careful and perhaps deal with it somehow. Keen for views. Another one that might be worth a poll in the run up to Christmas.
Si
-
sagji
- Sergeant Major - Armoured Train
- Posts: 567
- Joined: Sun Nov 06, 2005 12:13 pm
- Location: Manchester, UK
I have done some carefull sums and was surprised at how close the number were.terrys wrote:The spears at impact will be on a + POA, and are equally unlikely to lose by 2 and can never lose 1HP3 (assuming the spears are 8 or more bases). In the melee phase the lancers can only expand by 1, giving the spears at least a 6:4 advantage in numbers, are no worse than equal POA's even if their armour is less.Currently if Lancers wan't to charge a big BG of defensive spear they want to fight on a 1 base frontage as this give them the highest chance of winning, and minimises the risks, of loosing by 2, and of taking 1HP3.
You would actually have a much less chance of winning.
The lancers need to maximise their chance causing a DISR on impact. The best chance of doing this is by hitting them with as many bases as possible.
Asumptions: All BGs are average, the lancers are 2 wide if hitting on a single base and 4 if not, the spear are 8 bases two deep.
Outcomes
The chances of the lancers winning is quite close - slightly higher in the 1 base case (just under 20%) but the 4 wide case has a higher change of winning by 2 or 3+ with a corresponding worse CT for the spearmen.
However the downside in the 4 wide case is a massively higher risk.
From memory the figures for 1 base are Draw just over 36%, Loose by 1 33%, loose by 2 11%
For 4 bases IIRC Win 18% Draw 16% Loose by 1 16% Loose by 2+ 60%
Conclusion
The Lancers are better charging in to contact only a single base, not becasue this gives them a better chance of winning the combat but because it gives them a much better chance of surviving to try again if they fail.