DAW - Der andere Weg - The other way

A forum to discuss custom scenarios, campaigns and modding in general.

Moderators: Slitherine Core, Panzer Corps Moderators, Panzer Corps Design

Sonja89_1
Sergeant - 7.5 cm FK 16 nA
Posts: 228
Joined: Sun Jul 04, 2021 4:27 pm
Location: Holstein, Germany

Re: DAW - Der andere Weg - The other way

Post by Sonja89_1 »

‘Podolia’ (Podolien) is a somewhat unusual mission. It is not just about the defence or conquest of cities, but about the timely liberation of friendly troops from a cauldron. You receive a DV by holding all primary objectives and if there are at least 20 Hungarian ground units on the map at the end. Possession of all primary objectives is sufficient for an MV.

Podolien-3.jpg
Podolien-3.jpg (950.23 KiB) Viewed 1608 times

The first picture shows the situation at the beginning of the 3rd turn. The Soviets have broken through the section of the Hungarian 2nd Army and have trapped significant parts of these friendly troops between the Slutsch and Bug rivers north of Proskurov (1). The Hungarian supply depot on the southern edge has already come under enemy fire (2). If the depot fails, 1 strength point is deducted from each unit in the cauldron at the end of each turn. This makes the situation even more difficult. At least the location between the two rivers offers a certain advantage. However, the narrowness also limits manoeuvrability. The large number of dense forests is also a defensive advantage for the infantry, but on the other hand it hinders manoeuvrability. As a result, I disband some battered units in the cauldron to make room for the troops still south of the Bug. A Soviet infantry unit is already trying to cross the Slutsch River (3). Unfortunately, the pressure from all sides does not allow any evasion to other regions. Gradually, the western part of the cauldron is lost to the Soviets and Proskurov also falls to the enemy. This at least leads to a reduction in Soviet pressure.

Podolien-18.jpg
Podolien-18.jpg (976.41 KiB) Viewed 1608 times

Jumping to the beginning of turn 18, I have now advanced from the south with my core troops and have successfully broken open the cauldron (4). The rescued Hungarians have been routed further south via Proskurov to get them out of the front line (5). This was by no means too early, as very strong Soviet forces were attacking from the north-east in the direction of Proskurov (6). However, the enemy did not succeed in retaking the town until the end of the scenario. At the same time, Soviet paratroopers attack south of Vinnitsa (7). Will these transport planes get far in the face of my fighters and flak? Even their superior strength won't save them.

Strategic map: A massive Soviet breakthrough had taken place between Vinnitsa and Mogilev-Podolsky (8) and led to the loss of Stanislau and Tarnopol (9), which were captured by the enemy in a coup d'état. This was followed by encirclement north of Proskurov (10). My core troops started with a smaller group from Jassy to recapture Chernivtsi (Tschernowitz) and Stanislau (11) and with the main group (12) from Kishinev to unseat the Hungarians in the encirclement. After overcoming the Dniester, the encircled Hungarians were successfully liberated (13). This was immediately followed by strong Soviet attacks on Proskurov, but these were repulsed (14). At least 15 Hungarian ground units were rescued (15). This was not enough for a DV, but an MV is completely satisfactory for this mission with the increased level of difficulty. By the way, if you still want to achieve a DV despite the lack of Hungarian units, you can deploy Hungarian ground units from the reserve if available. However, the sacrifice of 5 Aux units for a DV was too high for me, which is why I decided against it.

Podolien-35.jpg
Podolien-35.jpg (1015.69 KiB) Viewed 1608 times
Sonja89_1
Sergeant - 7.5 cm FK 16 nA
Posts: 228
Joined: Sun Jul 04, 2021 4:27 pm
Location: Holstein, Germany

Re: DAW - Der andere Weg - The other way

Post by Sonja89_1 »

The attack on Kiev strikes at the heart of Ukraine. This mission is particularly challenging due to the strong enemy defences. We are currently witnessing how difficult it can be to conquer this city, as the ‘nice gentleman’ in the Kremlin has not yet managed to achieve this in his very special operation. In this scenario, a DV is achieved by conquering all primary objectives and an MV by conquering all flag fields, i.e. the classic victory conditions.

Kiew-17.jpg
Kiew-17.jpg (964.09 KiB) Viewed 1394 times

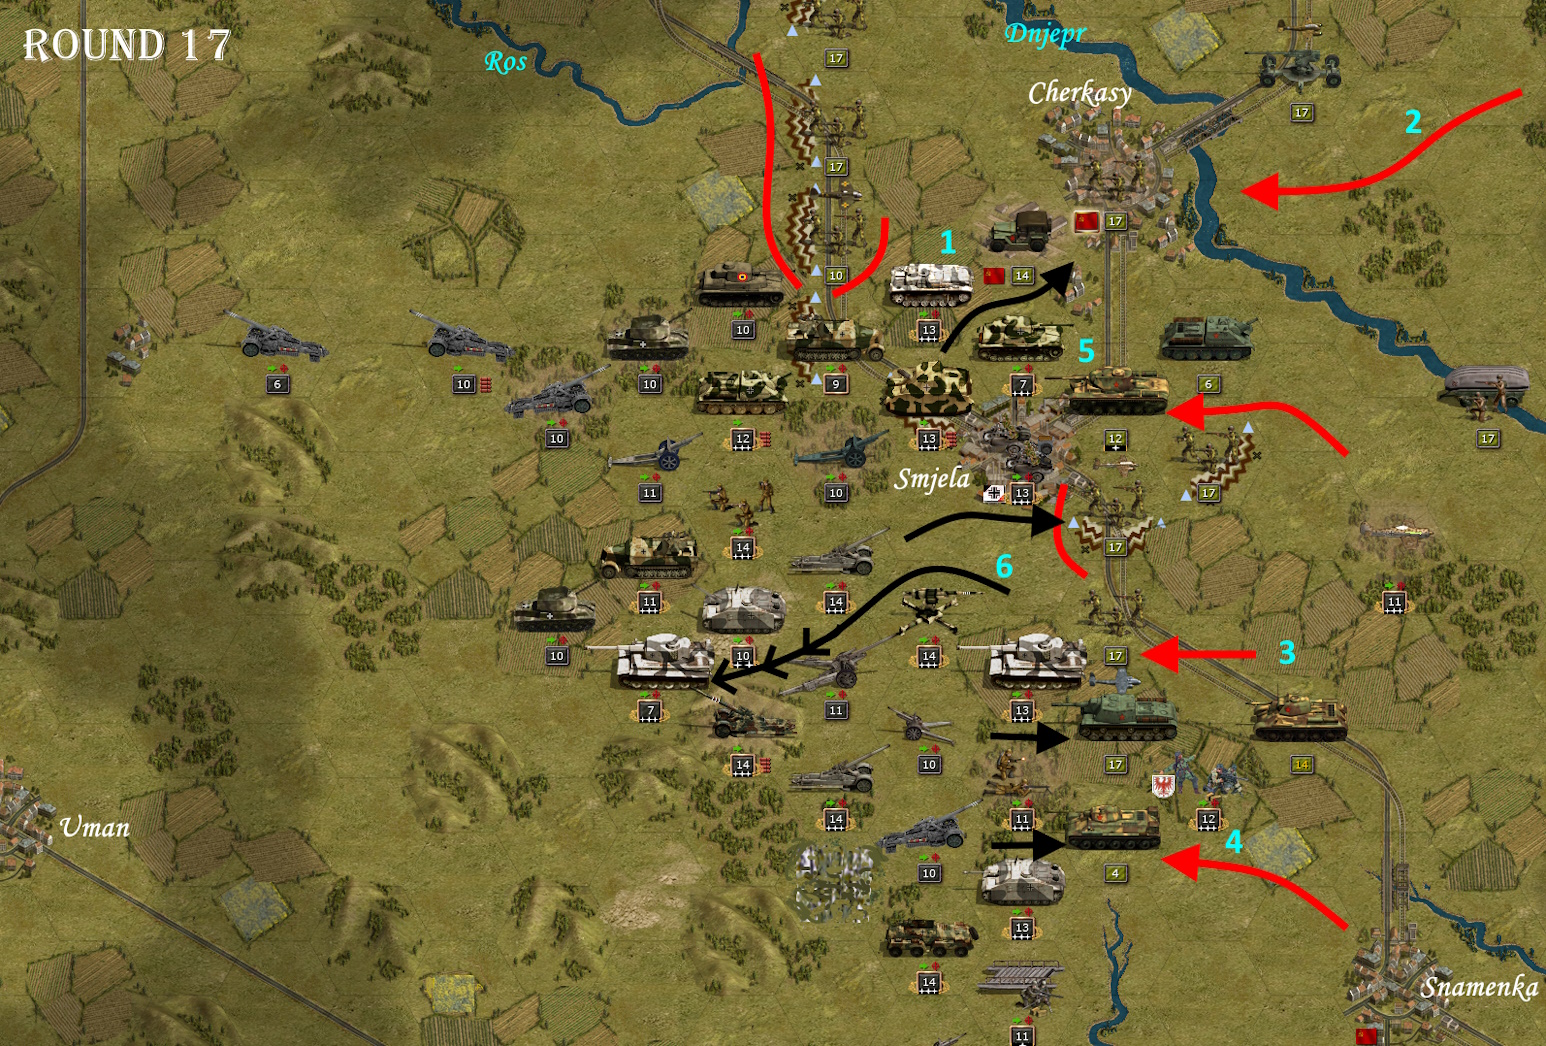
In the southern sector, my main forces are advancing towards Cherkasy. The defensive ring has already been broken in the centre (1). My tank spearheads are still two squares away from Cherkasy. My offensive efforts are repeatedly met with counterattacks by the Soviets from the eastern edge (2). A few rounds before this picture was taken, I carried out a flanking manoeuvre just north of Snamenka (3) and was subsequently surprised by such a strong counterattack from the eastern edge zone (who would set something so stupid up? – oh, yes, myself). Several units in transport mode were completely wiped out. In this case, I decided to revert to a previous data set. So I repeated the previous turn and prepared for the flank attack. Subsequently, for future versions, I moved the entry point for Soviet counterattacks from the south-eastern area of the map to the north-eastern area, thereby avoiding such extreme incidents. For the time being, I can only recommend that players of this scenario avoid this south-eastern edge area until shortly before the 20th turn. If you do encounter extreme surprises in this mission or in other scenarios, feel free to revert to a previous data state, reload and try again. As you can see, I am not without ‘sin’ either. In the 51 scenarios played so far in this run, this is the second time I have resorted to this, which I normally always avoid, even if good core units are lost. However, with so many missions, it is impossible to avoid all weaknesses in the creation of a scenario. I have always limited the influx of new enemy units to the edge of the map, which is also controlled by the respective enemy force. The principle also applies in the ‘Kiev’ scenario. Here, however, it is particularly unfortunate because the southwestern Dnieper side gives the impression that the area east of the map edge is already free of enemies. In this way, I fell into my own unintentional trap. At least the right person took the beating. :)
Incidentally, the Brandenburgers (4) are no guarantee that an advancing enemy will automatically be stopped and repelled. This unit has the special feature that it does not have a control zone. This means that enemy units can simply rush past it. This should always be taken into account, otherwise things can get very unpleasant. In this case, however, it led to the Soviet tank unit advancing further and running into a camouflaged Sturmgeschütz with the corresponding result. The situation is somewhat different with an enemy tank unit further north (5). This is an SE-KV 85 with 440 experience points, a hero (+6 attack, +4 defence), which went into action here with 18 strength points. If you like a good scare, this is the unit for you. This Soviet unit has just taken 6 strength points from my very strong Elite Panzer IV unit, leaving it battered and bruised. In the previous round, this tough enemy force had already attacked one of my ‘normal’ Tiger units and also reduced it by 6 strength points, which is why I initially withdrew it (6). In both battles, the Soviet unit itself had only lost a total of 6 strength points. What a tough nut to crack. I then bombard this enemy force with heavy artillery fire and push my 88 mm unit forward to finish the job. The 88 mm can take down even the most formidable opponents.

Kiew-28.jpg
Kiew-28.jpg (1009.12 KiB) Viewed 1394 times

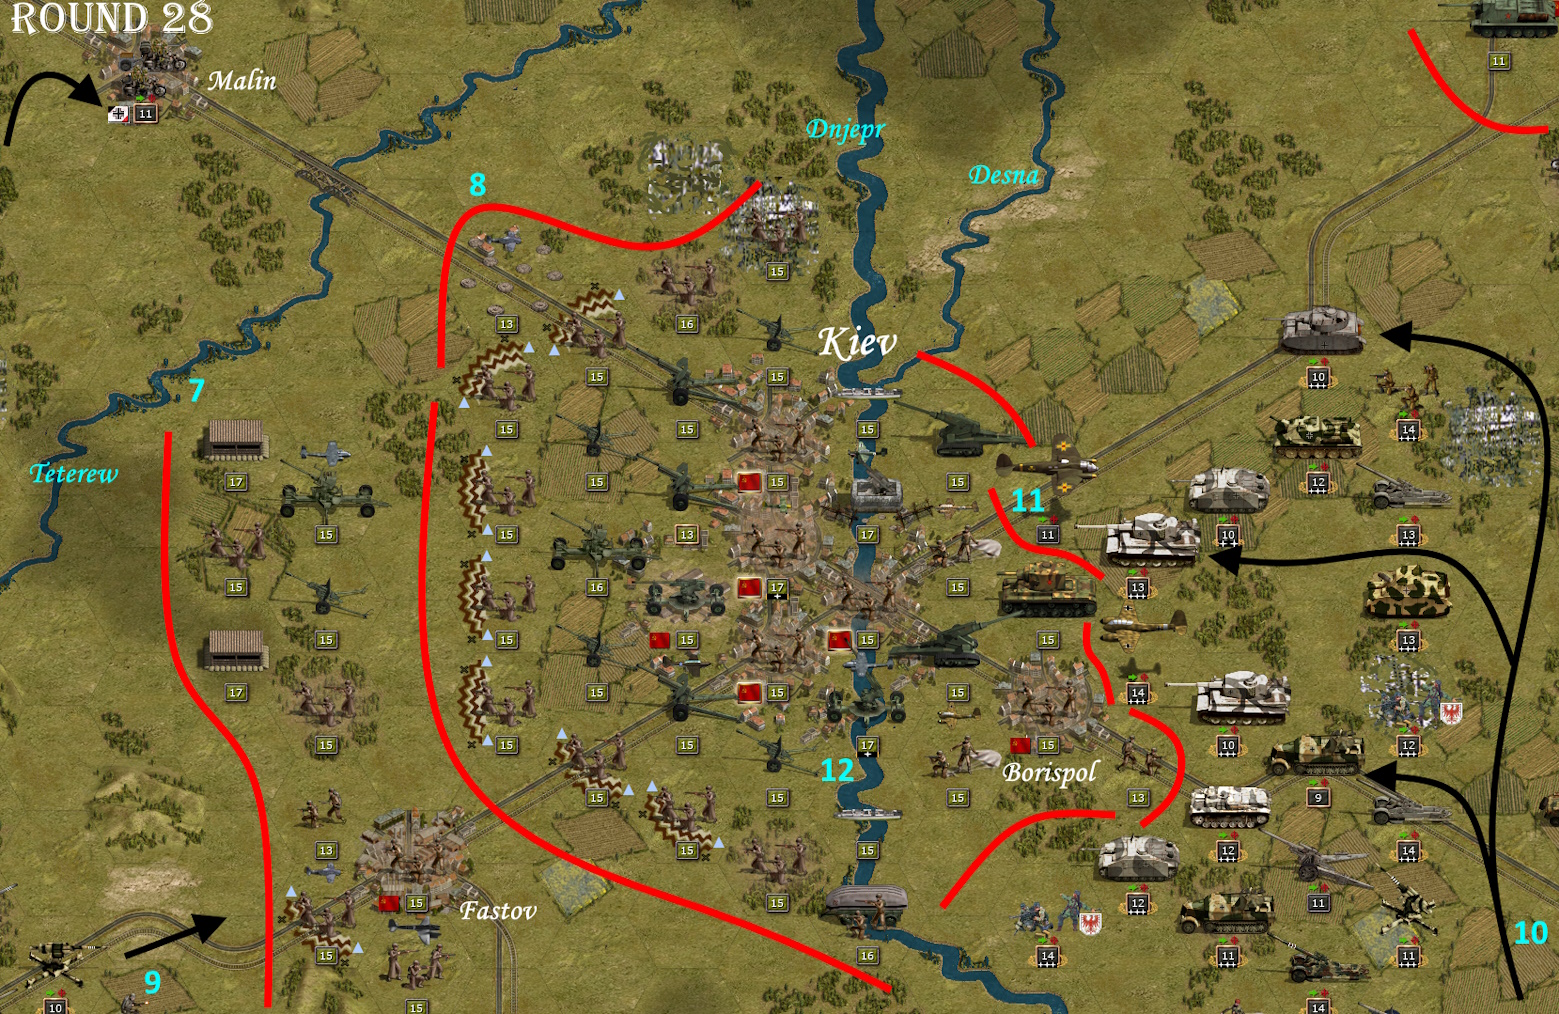
11 rounds later in the central section of the map. Kiev is surrounded by several lines of defence (7) (8). From the west, I slowly approach with rather defensive forces (9). The main attack comes from the south via Cherkasy, which keeps me busy for a long time due to the ongoing counterattacks. This brings me to the significantly weaker side east of the Dnieper (10). However, an unnoticed approach is hardly possible, as the Soviet headquarters is located east of Kiev. This HQ already has a view of 5 fields. In addition, Marshal Budyonny adds 3 additional fields. This means that this unit has a view radius of 8 fields. The enemy can therefore see everything that is happening around Kiev from a great distance. Eliminating this unit is therefore a top priority. In fact, I have already succeeded in doing so with a few artillery strikes and a double tank attack (Tiger) in the preliminary rounds (11). In addition, the loss of the HQ causes the Soviet units to suffer a loss of morale (all units lose 2 strength points). The next task is to eliminate the enemy anti-aircraft units, which number 5. The unit with an additional hero and a range of 5 squares (12) is particularly nasty. At least it is located on a river square, which makes it easier to destroy.

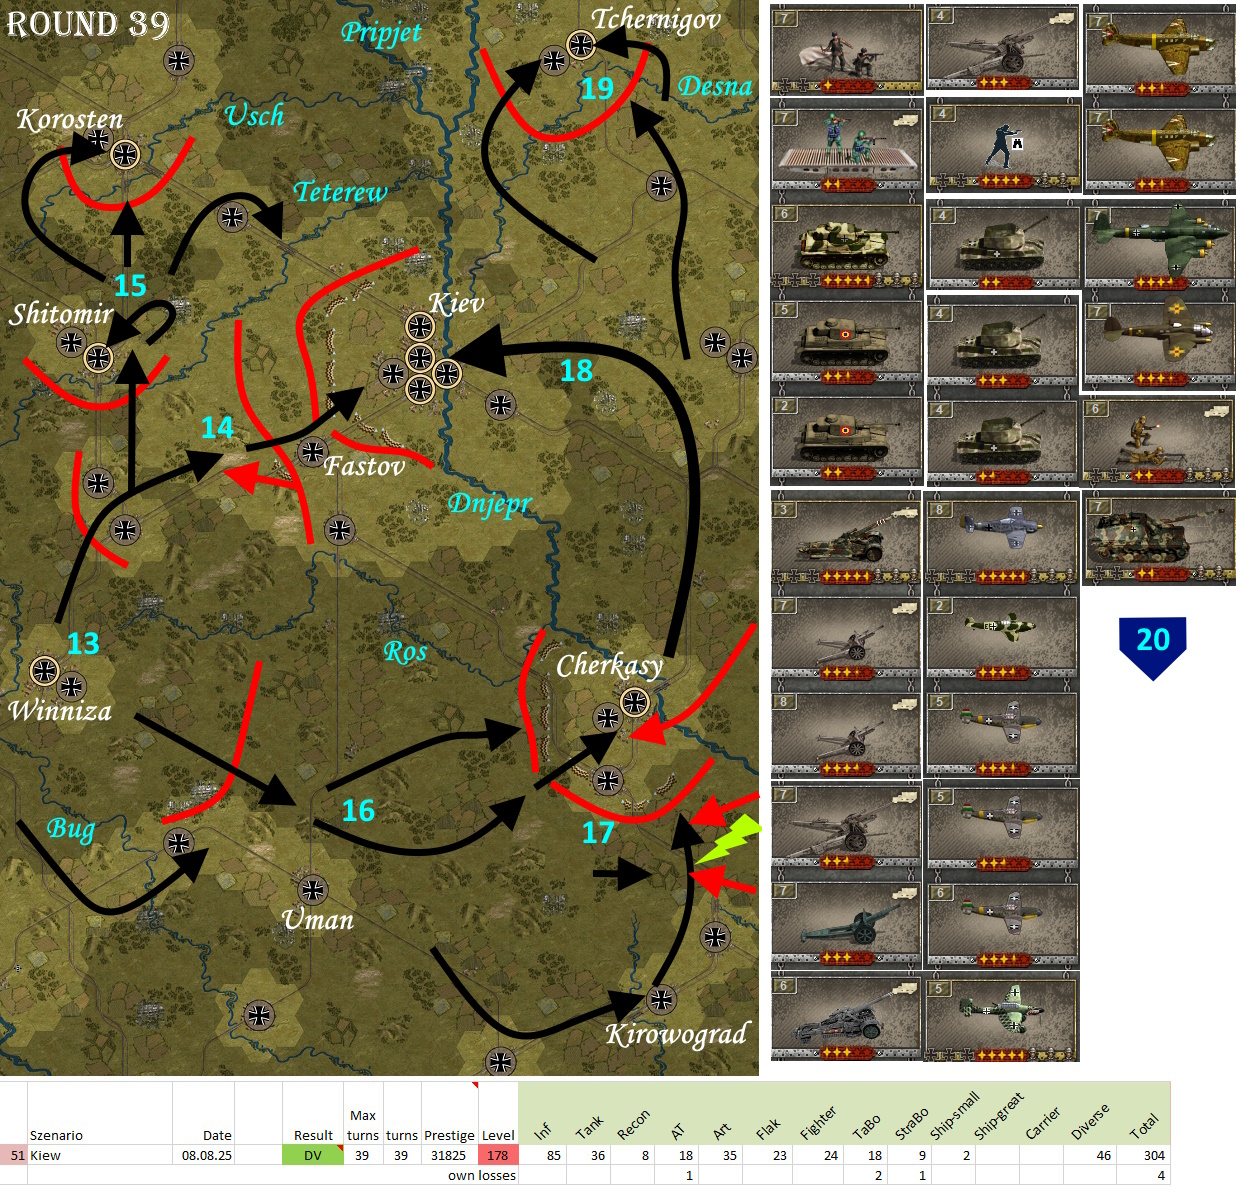
Strategic map: The starting point is in the vicinity of Winniza (13). With a smaller and slower group, I advance to the western Soviet defence line outside Kiev (14) and take up a more defensive position there. Then, with the more mobile units, I push this northern group first to Shitomir and then to Korosten (15). At the same time, the main group attacks in a south-westerly direction via Uman towards Cherkasy (16). Before reaching Cherkasy, there are ongoing Soviet counterattacks until shortly before the 20th round, which put me in serious trouble (17). Only after the enemy has exhausted its resources do I manage to cross the Dnieper and get behind Kiev (18). The siege is fierce but short. This is followed by the capture of Chernigov by a pincer attack after crossing the Desna (19). Looking at the total losses of ‘only’ 4 units, one might get the impression that it was an easy mission. However, looking at the damaged core and auxiliary units (20), one gets the idea that it was no walk in the park.

Kiew-39.jpg
Kiew-39.jpg (894.73 KiB) Viewed 1394 times
Sonja89_1
Sergeant - 7.5 cm FK 16 nA
Posts: 228
Joined: Sun Jul 04, 2021 4:27 pm
Location: Holstein, Germany

Re: DAW - Der andere Weg - The other way

Post by Sonja89_1 »

The main objective of the ‘Zaporozhye’ (Saporoschje) scenario is to capture two industrial plants intact: a steelworks near Krivoy Rog and a power plant next to the dam near Zaporozhye. A DV is awarded if both structures are captured intact and all primary objectives are also captured. If you only capture the primary objectives, you will still achieve an MV. This mission therefore focuses on the theme of the war economy.

Saporoschje-4.jpg
Saporoschje-4.jpg (967.86 KiB) Viewed 1192 times

Within the first three rounds, the defensive lines at Ingul and between Ingul and Ingulez have been completely broken through (1). My tank spearheads have surrounded a Soviet KV2 unit with depleted ammunition in front of Ingulez (2). The unit will not escape. Between the Ingulez and the Dnieper, another tank group encounters a Soviet bridgehead and blocks it (3). At the same time, an attack begins on the defensive line between the rivers. In addition, my air forces attack the enemy anti-aircraft guns (4) and two Soviet tank units east of the Dnieper.

Saporoschje-8.jpg
Saporoschje-8.jpg (972.51 KiB) Viewed 1192 times

Four rounds later, numerous air units are already located above Krivoy Rog (5). The enemy has been completely wiped out in the vicinity of this city. South of Nikopol, air battles ensue after Soviet bombers attack my tanks south of the Dnieper (6). A paratrooper unit with 8 strength points located a little further south subsequently becomes my only total loss after 2 (evil) Soviet tank units attack it. With the help of bridge engineers (7), a lively exchange can take place across the Dnieper. The enemy forces in Krivoi-Rog have been overcome by an encirclement (8). At the same time, the attack on the front lines near Zaporozhye begins (9). This close timing is also due to the fact that the player has only a limited amount of time to reach and secure both industrial plants. Once the player's troops have entered Krivoi-Rog and secured the plant there (10), the player has only 6 turns left to capture the power plant (11) at the Dnieper dam before it is blown up. In addition, there are the enemy troops, who are not just standing around passively, but are actively striking back.

Strategic map: The first Soviet line of defence runs south along the Ingul, then jumps to the Ingulez until it joins the Dnieper (12). In the far south, I can advance relatively quickly to just west of Melitopol (13). But there is a very strong enemy force there that cannot be overcome in a surprise attack. Since I have to get to Krivoi-Rog relatively quickly, I cross the Ingulez and attack the forward line of defence (14). Then I encircle Krivoi-Rog and delay the capture of the city and the industrial plant a little (15) in order to have more time for the power plant near Zaporizhzhia. I bypass the defences there to the north and roll up the defences from the flank (16). At the same time, there is a heavy Soviet counterattack, which puts me in serious trouble (17). Since I have concentrated too many troops north of the Dnieper and the bottleneck west of Zaporizhia does not allow for deployment, I use the bridge engineers to move considerable forces across the river to the south side and successfully attack both Zaporizhia (18) and Melitopol (19). My coordination error made the mission exciting in the end.

Saporoschje-17.jpg
Saporoschje-17.jpg (837.39 KiB) Viewed 1192 times
Sonja89_1
Sergeant - 7.5 cm FK 16 nA
Posts: 228
Joined: Sun Jul 04, 2021 4:27 pm
Location: Holstein, Germany

Re: DAW - Der andere Weg - The other way

Post by Sonja89_1 »

The Taganrog mission also involves completing a special assignment to earn a DV. In addition to capturing all primary targets, you must find and eliminate five undercover agents belonging to a spy ring. You will receive an MV for capturing all primary targets and earning at least 16,000 prestige points. The scenario is set in the far south-east of Ukraine between Donetsk, Mariupol and Taganrog.

Taganrog-10.jpg
Taganrog-10.jpg (951.1 KiB) Viewed 1033 times

North of Zaporizhzhia, you can see two of my weakened auxiliary units that have confronted a spy unit. From this corner position, it has no chance of escape and is doomed (1). By the 10th round, the entire length of the front Soviet defence line has been broken and my attack spearheads are standing in front of Mariupol and Donetsk (2). However, the Donetsk defence area is occupied by strong forces and cannot be taken by surprise (3). In this mission, the player has only a very limited number of core troops at his/her disposal. So I have to rely heavily on my auxiliary units, which cannot hold out for long against the superior Soviet forces. Unfortunately, I had been very sparing in deploying my core armoured units and limited myself to two. I should have deployed at least three. Between the 10th and 15th rounds, I was therefore in serious trouble. Instead of the missing tanks, I had to repeatedly fall back on the Hungarian anti-aircraft tanks in ground combat mode or my ‘Emil’ tank destroyers (4). This defiant-looking SE unit was to fall victim to a strong Soviet counterattack in the next round. In total, I lost 2 SE units and another 8 Aux units in this scenario.

Taganrog-12.jpg
Taganrog-12.jpg (954.47 KiB) Viewed 1033 times

The following image shows the situation two rounds later. On the southern edge, I succeeded in capturing Mariupol, while in the north I am still stuck in front of Donetsk. Here, an overpowered SE-KV 85 with a hero figure appeared (5) and, together with an air strike, destroyed my SE tank destroyer. It then encountered my Tiger unit and damaged it somewhat (6). Only a fierce Stuka attack weakened this little devil considerably. In an act of desperation, it finally drove the tank unit with 3 strength points in front of my front line. The Soviets also sent such a monster unit (SE-KV 1C) towards Mariupol. However, this unit advanced alone (7) and can be relatively easily isolated and enclosed by me (8). Then all I need to do is place a strong level bomber above it, greatly reduce the enemy unit's ammunition, lure out the last of its ammunition with the Brandenburgers, who have little effect on this colossus, and weaken the strong enemy unit piece by piece in several rounds until it surrenders. While I am wrestling with this monster east of Mariupol, I have completely eliminated the air defence near Donetsk and am slowly but steadily weakening the Soviet defences (9). Finally, Donetsk falls into my hands like ripe fruit.

Strategic map: The first line of defence at Pologi and Berdyansk (10) is still relatively easy to break through. It consists of simple infantry, field fortifications and small-calibre artillery. The advance into the centre also goes fairly smoothly (11). It is only when the main targets are reached that the Soviets put up really tough resistance. After I take Mariupol (12), there is a high-quality counterattack, but it is not very numerous (13). Nevertheless, the subsequent conquest of Donetsk takes several rounds (14). In the end, however, there is still enough time to take Taganrog (15). Only the search for and destruction of the last spy is a task that is made difficult by bad weather and lasts until the last round. Due to the relatively small map, it is not easy for the opposing side to remain hidden. On the other hand, you first have to find a camouflaged unit that is not moving without a control zone of its own. You can pass right by them without noticing and only discover them when you come to a stop next to them.

Taganrog-24.jpg
Taganrog-24.jpg (901.41 KiB) Viewed 1033 times
eskuche
Sergeant - 7.5 cm FK 16 nA
Posts: 243
Joined: Fri Mar 24, 2017 3:32 am

Re: DAW - Der andere Weg - The other way

Post by eskuche »

Sonja, mind sharing the difficulty excel file?
Sonja89_1
Sergeant - 7.5 cm FK 16 nA
Posts: 228
Joined: Sun Jul 04, 2021 4:27 pm
Location: Holstein, Germany

Re: DAW - Der andere Weg - The other way

Post by Sonja89_1 »

Hello Eskuche, please find the file attached. However, it does not contain any more information than the image on the previous pages, nor does it contain any inserted formulas.

PaCo-Levels.zip
(10.21 KiB) Downloaded 10 times
Sonja89_1
Sergeant - 7.5 cm FK 16 nA
Posts: 228
Joined: Sun Jul 04, 2021 4:27 pm
Location: Holstein, Germany

Re: DAW - Der andere Weg - The other way

Post by Sonja89_1 »

Unsurprisingly, the ‘Crimea’ scenario involves the conquest of Crimea. An MV is achieved by conquering Perekop, Simferopol and Sevastopol. For a DV, all primary objectives must be conquered and a riverboat must be steered to a special shallow sea field on the north-east coast of Crimea. This is not so easy, as it requires circumnavigating the entire peninsula, which means clearing the waters of enemy ships.

Krim-10.jpg
Krim-10.jpg (977.62 KiB) Viewed 833 times

In round 10, I fought my way through the Perekop Isthmus and advanced towards Simferopol with my attack forces (1). I used my air forces to combat the troop concentrations around Eupatoria (2). I supported the operations on land with my powerful light cruiser (3). However, my ship comes within sight of a Soviet submarine, which I do not spot in time and which attacks my cruiser (4). In addition, the sighting attracts other heavy enemy ships, which open heavy fire on my cruiser (5). As a result, I am forced to retreat with my heavily damaged light cruiser. But at least the important ship does not sink. Later, there is another similar incident off Sevastopol in which two of my destroyers are sunk. Among them is an Italian ship, part of my core forces. The Soviet Black Sea Fleet is a dangerous opponent here. However, the greatest danger comes from the Soviet fortress belt around Sevastopol (6). All four fortresses and forts are of the difficult-to-conquer ‘Maxim Gorki’ and ‘Brest’ types. They have to be weakened piece by piece, which is very laborious. Since the counterfire is very effective, especially due to the excessive strength, you should try to minimise the ammunition again and again with level bomber attacks. But even so, there will be heavy losses in any case. The city therefore only falls shortly before the end of the scenario.

Krim-21.jpg
Krim-21.jpg (1012.61 KiB) Viewed 833 times

At the beginning of the 21st round in the eastern part of Crimea. I advance on Sudak and Feodosia (7). North of Feodosia, I advance with my tanks towards the Soviet Parpach position (8). My air forces weaken the enemy south of Feodosia (9). However, there are repeated counterattacks by Soviet aircraft (10). A very strong enemy fighter group (11) attacks one of my best fighter groups and decimates it considerably. Subsequently, however, the Soviet air fleet can be completely wiped out with anti-aircraft support. At the same time, my Stuka attacks a mobile Soviet anti-aircraft battery. In the following rounds, I manage to capture Feodosia and overcome the Parpach position. However, there is not enough time to take Kerch as well.

Strategic map: North of Perekop, there are still two extensive Soviet bridgeheads in fortified positions (12). It takes me several rounds to overcome the bottleneck at Perekop. From the west, I send my core troops ships, as well as some light Romanian ships, southwards (13). They have to go around the entire peninsula to finally reach the Sea of Azov. As mentioned before, this does not happen without losses on my side as well. After crushing the concentration of forces at Dzhanki, I continue relatively quickly to Simferopol (14). This city can also be conquered fairly quickly. The attack on the fortified belt of Sevastopol, on the other hand, is a long, hard fight (15). I manage to take Feodosia (16) and break through the Parpach position. However, there is not enough time to capture Kerch. The special objective – to occupy a special field with a river boat – also remains unachieved (17). The reduced number of rounds had a decisive impact on this mission. I would certainly have been able to capture Kerch with 5 additional rounds. However, it remains unclear whether I would have reached the special field with my boat in the additional rounds.

Krim-27.jpg
Krim-27.jpg (789.09 KiB) Viewed 833 times
Sonja89_1
Sergeant - 7.5 cm FK 16 nA
Posts: 228
Joined: Sun Jul 04, 2021 4:27 pm
Location: Holstein, Germany

Re: DAW - Der andere Weg - The other way

Post by Sonja89_1 »

We come to the final scenario of the third campaign, ‘Poltava’. Once again, we face the Soviet forces at Kharkiv, Belgorod and Kursk before Comrade Stalin is finally overthrown and the war against the Soviet Union comes to an end in December 1943. In this mission, an MV is achieved by capturing Poltava, Sumy and Kharkiv. A DV is achieved by capturing all primary objectives and placing two Russian units of the Volunteer Army in Kursk, as well as placing four Hungarian ground units on four specific fields west of Kursk.

Poltawa-1.jpg
Poltawa-1.jpg (896.79 KiB) Viewed 589 times

The first image shows the initial phase, in which I advance directly towards Poltava (1). South of the city, I decide to send my assault engineers across the Vorskla River in order to maximise the pressure (2). I am still confident that I can deal with any countermeasures that may be taken. East of the river, I send an anti-aircraft unit in ground combat mode far forward to suppress the enemy's air defence with its increased range (3). Shortly afterwards, I discover a total of 6 Soviet T34 units northeast of my anti-aircraft unit in concealed terrain. Since I can only position one Tiger unit on the flank of my anti-aircraft unit without achieving complete coverage, I know that my unit is lost. The Soviet tanks then strike mercilessly. First, my anti-aircraft unit is destroyed by two attacks (4), then a second anti-aircraft unit is hit hard and subsequently taken out of the mission by me (5), and finally, the enemy makes a surprise move across the river with a tank unit and attacks my assault engineers in their unfavourable position (6). They are thrown back and immediately destroyed by the enemy's anti-tank guns. So I lost two good core units in the first round due to avoidable mistakes. A fine example of how not to do it. This is what happens when your self-confidence and trust in your own troops becomes too great. An effect that could also be observed in General Lee on the third day of the Battle of Gettysburg, when he ordered the attack by Pickett's division, which was almost certain to fail. There, too, confidence in his own troops was so great that even Lee was led to believe in miracles.

Poltawa-7.jpg
Poltawa-7.jpg (1021.48 KiB) Viewed 589 times

After the conquest of Poltava, the troops west of the Vorskla continue their advance towards Sumy (7). Further east, I slowly work my way through the defensive lines outside Kharkiv (8). During the 7th round, it is raining. Soviet armoured units appear from the north (9), forcing me into a defensive position. There are three strong armoured units at the north-eastern corner of my front (10). However, an attack is now launched by an overpowered Soviet IS-1 armoured unit with a strong hero figure (11 in the small picture). My Panzer IV H unit is almost destroyed, thrown forward and then destroyed by another Soviet unit. The enemy tank force loses only 2 strength points in the process, so it is no consolation that this monster unit will not survive the next round.

Strategic map: From Kremenchug and Dnipropetrovsk, I advance northwards in three groups and capture Poltava relatively quickly and with heavy losses (12). Between Poltava and Kharkiv, there are fierce Soviet tank attacks (13), which do not always go well. Nevertheless, Kharkiv and subsequently Belgorod (14) fall. The eastern attack group succeeds in flanking the enemy, which also leads to success at Obojan (15). At the same time, Sumy is taken in the west (16). I withdraw the Hungarian auxiliary units from their western position to the south and deploy them to support Sumy (17). After the capture of Kursk (18), Soviet resistance collapses and I manage to achieve the secondary objectives and position the Hungarians correctly (19).

Poltawa-28.jpg
Poltawa-28.jpg (1 MiB) Viewed 589 times
Sonja89_1
Sergeant - 7.5 cm FK 16 nA
Posts: 228
Joined: Sun Jul 04, 2021 4:27 pm
Location: Holstein, Germany

Re: DAW - Der andere Weg - The other way

Post by Sonja89_1 »

At the end of the third campaign, here is a list of the core troops still available at the end, with their respective values. The majority of this multi-faceted force is already very experienced. However, due to the strength of the enemy and individual mistakes, there are repeated casualties, which means that units have to start from scratch again. To be continued...

DAW-Cam3-Units.jpg
DAW-Cam3-Units.jpg (1.35 MiB) Viewed 587 times
rubyjuno
Sergeant First Class - Elite Panzer IIIL
Posts: 434
Joined: Mon Sep 21, 2015 1:18 pm
Location: Northumberland

Re: DAW - Der andere Weg - The other way

Post by rubyjuno »

Well done; fascinating and varied campaign, Sonja. Thank you for sharing your progress with us. Also interesting to see the unit statistics at the end.
Sonja89_1
Sergeant - 7.5 cm FK 16 nA
Posts: 228
Joined: Sun Jul 04, 2021 4:27 pm
Location: Holstein, Germany

Re: DAW - Der andere Weg - The other way

Post by Sonja89_1 »

rubyjuno wrote: Mon Oct 06, 2025 6:45 am Well done; fascinating and varied campaign, Sonja. Thank you for sharing your progress with us. Also interesting to see the unit statistics at the end.
I'm glad you find the material useful. I hope you'll enjoy the fourth campaign as well.
Sonja89_1
Sergeant - 7.5 cm FK 16 nA
Posts: 228
Joined: Sun Jul 04, 2021 4:27 pm
Location: Holstein, Germany

Re: DAW - Der andere Weg - The other way

Post by Sonja89_1 »

The fourth and final campaign takes us into a conflict between continental Europeans and an Anglo-American adversary. A battle that erupts over economic interests and resources. As a result, many of the battles also take place in North Africa, the Middle East and the border region with Europe. In this alternative historical scenario, the battle begins in Syria in March 1944. In the first scenario, ‘Syria’, the British and their Arab allies attack the French mandate territory of Syria. The player's task is to evacuate French ground units from this area by air or sea transport. An MV is achieved when 20 French Aux ground units are removed from the map via the evacuation field. To achieve a DV, at least one primary objective must also be held.

Syrien-4.jpg
Syrien-4.jpg (869.53 KiB) Viewed 310 times

The first image shows the situation at the start of the fourth round. My French troops have established a tight defensive ring around Beirut and Damascus (1). Off the coast, a British submarine is advancing towards Beirut to intercept the transporters leaving from there (2). My bombers will soon be hunting down the little rascal. British ground forces from Transjordan and Palestine are advancing on Beirut and Damascus from the entire southern area (3). My air units are keeping them at bay and noticeably weakening the enemy (4). However, the enemy cannot be stopped from the air alone. This only causes delays.

Syrien-7.jpg
Syrien-7.jpg (993.19 KiB) Viewed 310 times

Three turns later at the northern end of the scenario. I have landed four core units near Aleppo, which are supposed to hold this location and its airfield until the end, while the last French troops are able to leave the area (5). The first Arab troops advance on the city and suffer heavy losses (6). An attack is also launched against Hama (7), but it can be held until the end, even though the pressure is increased considerably. Here, too, our own air forces provide significant relief, despite the enemy's disruptive anti-aircraft units.

Strategic map: On the left-hand side is the crucial evacuation zone in the eastern Mediterranean (8). The bulk of French troops are being transported from three ports to this zone. The defensive zone around Beirut and Damascus ensures that the ports remain open long enough (9). It is important to continue the evacuation on an ongoing basis. Due to the increased difficulty level, only 10 rounds are available for the entire scenario. However, the more units leave the area with the transporters, the fewer defenders are available to resist the British onslaught (10). In the north, I land some of my strong core units near Aleppo to defend the city until the end (11). A British naval advance can be repelled mainly with my aircraft (12). An Arab attack from the south-east (13) comes close to Aleppo, but can no longer seriously threaten the city (14).

Syrien-10.jpg
Syrien-10.jpg (839.6 KiB) Viewed 310 times
Sonja89_1
Sergeant - 7.5 cm FK 16 nA
Posts: 228
Joined: Sun Jul 04, 2021 4:27 pm
Location: Holstein, Germany

Re: DAW - Der andere Weg - The other way

Post by Sonja89_1 »

The second scenario of the fourth and final campaign takes place in the Egyptian-Libyan border region, which was also a fiercely contested area during the historical Second World War. In this alternative history, the background is different and the time period is not 1941-42, but later in the spring of 1944, players can still expect a tough and gruelling battle. Since I still have the difficulty level set to a level comparable to ‘Ultimate’, the battle is even more gruelling. The mission objectives are relatively simple. An MV is achieved by capturing all primary objectives, and a DV by capturing all flag fields. The first move is made by the attacking British, who initially encounter the defending Italian Aux troops. Since the enemy has a bonus of +5 strength points, the Italians' chances of surviving a battle are correspondingly low. The best option is to evade them and avoid combat. At least the more mobile Italian troops can be saved and removed from the battlefield this way.

Sollum-4.jpg
Sollum-4.jpg (918.23 KiB) Viewed 123 times

After four rounds, the British attackers have bypassed Tobruk to the west and surrounded it (1). Extensive forces are also blocking the port of Tobruk from the sea (2). These include a British aircraft carrier with superior strength and a hero figure that allows a range of vision of five squares. This will prove to be very disadvantageous later on. My own core ground forces (3) are coming from the vicinity of Derna (4) via only 4 deployment fields (+2 deployment fields at sea). Therefore, it takes some time before I have gathered a sufficient number of them east of Gazala. At least I can take offensive action against the enemy navy with my air forces (5). But at the bottom of the screen, a nasty ‘spoilsport’ appears in the form of very strong anti-aircraft guns (6), which are capable of completely destroying an auxiliary aircraft unit with a single salvo. Therefore, it is necessary to keep a safe distance at first, which severely limits the areas of operation for my aircraft. In the meantime, I withdraw the Italian troops that are still to be rescued to the west (7).

Sollum-7.jpg
Sollum-7.jpg (894.64 KiB) Viewed 123 times

Three rounds later, I finally have enough core troops gathered around Gazala (8). I can deploy a closed front east of the town. The British have now completely taken Tobruk and are advancing rapidly westwards (9). With great speed, the British Sherman Firefly unit (18 strength points) then unexpectedly attacks my waiting tank destroyer (14 strength points). I then manage to destroy the badly damaged British tank unit (10). The same fate befalls the highly dangerous British anti-aircraft unit, which has driven directly in front of a Jagdpanther troop (11). This allows me to eliminate two of the worst enemy units without suffering serious damage. On the coast, one of my strong fighter groups intercepts three groups of Spitfire fighters (12). Unfortunately, this unit will later be completely destroyed.

Strategic map: At the beginning, Italian troops form a defensive ring around Tobruk (13). This front is partially broken through or bypassed to the west by the British attackers (14). I evacuate the remnants of the Italian forces from the playing field (15). This allows me to generate a number of prestige points later on. In the vicinity of Derna, I can gradually lead my core ground troops onto the field and then gather them at Gazala (16). In the coastal area east of Derna, my naval units encounter numerous British ships, which, however, have already been severely damaged by my aircraft (17). Thanks to the British aircraft carrier's long range of vision, they spot my already damaged light cruiser and concentrate all their fire on it, sinking it. At the same time, I go on the offensive with my ground forces and fight my way towards Tobruk (18). An airborne operation northwest of Capuzzo fails when several strong British air units locate and attack my group (19). Thanks to the excellent escort, no transport aircraft are lost, but one of my very good fighter groups is destroyed during the defence. I manage to break through to Tobruk and eliminate the bulk of the enemy ground forces (20). However, there is ultimately not enough time to attack the last primary targets. The five missing rounds due to the high difficulty level finally become noticeable at this point. It will probably not be the last scenario in which I fail. It was certainly not due to a lack of effort. It was the most costly scenario so far. Among them were two strong core troops, which I will bring back into play with “reform units” in the next mission, but with an experience level of 0 instead of 490.

Sollum-16.jpg
Sollum-16.jpg (742.37 KiB) Viewed 123 times
Post Reply

Return to “Panzer Corps : Scenario Design”