Imphal 44, a well designed large scenario
Posted: Sun May 06, 2018 3:45 pm
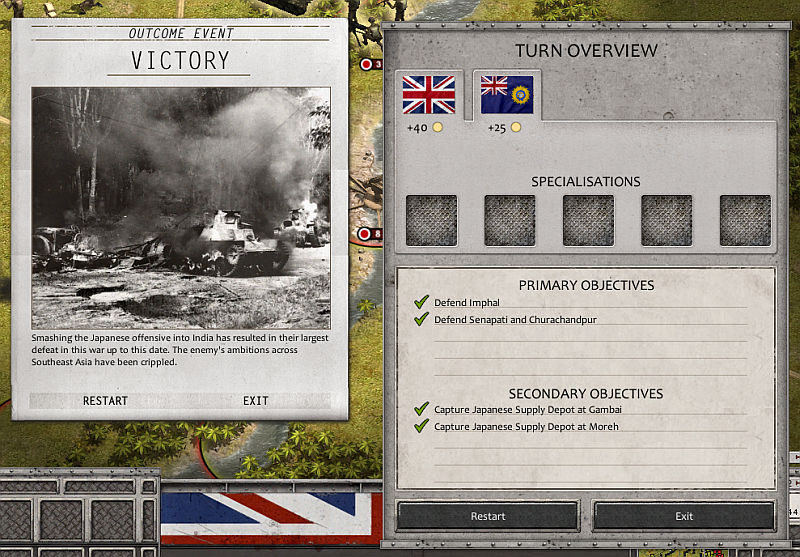
I just completed the Imphal 44 scenario (Burma Road), and this was one of the best scenarios I've experienced in OOB.
Here I attempt to summarize why I liked it so much. Be aware that there might be some "spoilers" for those who still haven't played Burma Road!
Size
It is large but not too large, meaning it's intimidating at first, but the player can quickly get a grasp on the situation and the geography of the terrain.
Balance
The scenario is reasonably well-balanced between the Allies and the Japanese, even if I have the feeling that the player is favored a bit (mainly due to surprisingly many artillery units). It's also a defense scenario, and it's common knowledge that it's easier to defend than to attack, especially if your army is about the same size as the enemy army. Nevertheless, the Japanese have a LOT of units, including a powerful air force.
Unit allocation
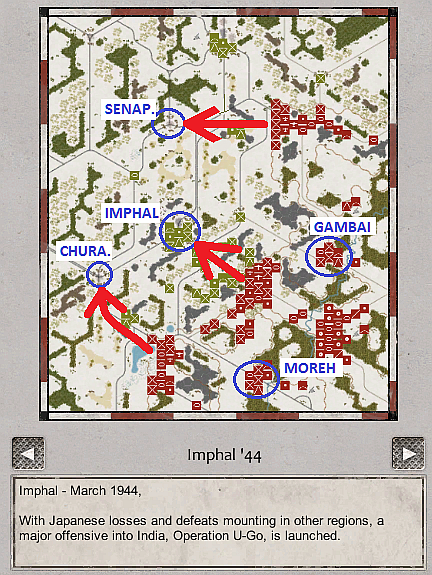
The scenario really gives this feeling of fighting on multiple fronts, and forces the player into allocating units to the different fronts (the Northern one, the center one (Imphal itself) and the Southern one). Reconaissance is important in this scenario in order to deploy the right type of unit to counter the Japanese units. As stated above, the Japanese have a great many units, so the player must chose wisely how many units (and which type of units) to deploy on each location. Having too many units at one place means this place is secure, but it can leave another location less well-defended. But locations do not feel so distant from each others that you can't send some units from one front to the other. It's a matter of 3-4 turns.
Advance and retreat
Then there are multiple advance-and-retreat situations during these 30 turns of play. This scenario feels alive and dynamic.
At first the player must hold their ground as long as possible. After a few turn, if they feel confident, they can start to push back the enemy and can start planning the capture of the two secondary objectives. Then the Japanese second wave is released, and the player must chose to keep pushing, or to stop to prepare their troops to weather this new assault.
Right from the beginning, there are many locations where smaller skirmishes occur. Later on, successfully defended locations can be used as a trempboard from where to launch counterattacks, meaning the more success the player has during the defending phase, the more rewarded they will be later on if they decide to push through.
Supply lines
This scenario uses the supply system of OOB to its fullest. The secondary objectives, when taken, cripple the enemy enough to significantly slow down its offensive, so even if they were not "official" objectives set by the designers, there would still be strategic value in taking these hexes.
If in a precarious situation, the player can also chose to cut the enemy supplies by simply encircling the secondary objectives, or cutting them from the main Japanese force.
The fact that counterattacks can be launched from different locations also leads to thinking on how to cut the enemy lines the most effectively. Should you focus your artillery on the enemy main force, or should you divert some of it to support the attack of such or such flank or secondary objectives?
Place in the larger campaign
And finally, this scenario also fits extremely well at this point in the Burma Road campaign. Until this moment, the campaign follows the British and Indians painfully defending or slowly advancing against superior Japanese forces. This scenario feels like the moment where the Japanese tide is weathered at last, and it wouldn't be possible without all the previous scenarios.
To conclude, I feel like this scenario has everything a scenario of this size should have. It's not just a clash of two great blocks of units, it's a miriad of smaller interconnected skirmishes that themselves form a bigger scenario, with different advances and setback that make for a very dynamic level.
I acknowledge that Burma Road is not a perfect campaign, but it definitely has great moments.
Here I attempt to summarize why I liked it so much. Be aware that there might be some "spoilers" for those who still haven't played Burma Road!
Size
It is large but not too large, meaning it's intimidating at first, but the player can quickly get a grasp on the situation and the geography of the terrain.
Balance
The scenario is reasonably well-balanced between the Allies and the Japanese, even if I have the feeling that the player is favored a bit (mainly due to surprisingly many artillery units). It's also a defense scenario, and it's common knowledge that it's easier to defend than to attack, especially if your army is about the same size as the enemy army. Nevertheless, the Japanese have a LOT of units, including a powerful air force.
Unit allocation
The scenario really gives this feeling of fighting on multiple fronts, and forces the player into allocating units to the different fronts (the Northern one, the center one (Imphal itself) and the Southern one). Reconaissance is important in this scenario in order to deploy the right type of unit to counter the Japanese units. As stated above, the Japanese have a great many units, so the player must chose wisely how many units (and which type of units) to deploy on each location. Having too many units at one place means this place is secure, but it can leave another location less well-defended. But locations do not feel so distant from each others that you can't send some units from one front to the other. It's a matter of 3-4 turns.
Advance and retreat
Then there are multiple advance-and-retreat situations during these 30 turns of play. This scenario feels alive and dynamic.
At first the player must hold their ground as long as possible. After a few turn, if they feel confident, they can start to push back the enemy and can start planning the capture of the two secondary objectives. Then the Japanese second wave is released, and the player must chose to keep pushing, or to stop to prepare their troops to weather this new assault.
Right from the beginning, there are many locations where smaller skirmishes occur. Later on, successfully defended locations can be used as a trempboard from where to launch counterattacks, meaning the more success the player has during the defending phase, the more rewarded they will be later on if they decide to push through.
Supply lines
This scenario uses the supply system of OOB to its fullest. The secondary objectives, when taken, cripple the enemy enough to significantly slow down its offensive, so even if they were not "official" objectives set by the designers, there would still be strategic value in taking these hexes.
If in a precarious situation, the player can also chose to cut the enemy supplies by simply encircling the secondary objectives, or cutting them from the main Japanese force.
The fact that counterattacks can be launched from different locations also leads to thinking on how to cut the enemy lines the most effectively. Should you focus your artillery on the enemy main force, or should you divert some of it to support the attack of such or such flank or secondary objectives?
Place in the larger campaign
And finally, this scenario also fits extremely well at this point in the Burma Road campaign. Until this moment, the campaign follows the British and Indians painfully defending or slowly advancing against superior Japanese forces. This scenario feels like the moment where the Japanese tide is weathered at last, and it wouldn't be possible without all the previous scenarios.
To conclude, I feel like this scenario has everything a scenario of this size should have. It's not just a clash of two great blocks of units, it's a miriad of smaller interconnected skirmishes that themselves form a bigger scenario, with different advances and setback that make for a very dynamic level.
I acknowledge that Burma Road is not a perfect campaign, but it definitely has great moments.