Pre-Setup
I was worried about the straight Roman / German foot fight. The legionaries were going to win hands down (more about this below). Thus if I had the figures I would have fielded all the infantry as Medium Foot and skulked in terrain. However I didn't and Phil wanted an infantry fight. I decided to take a Frisian ally to see how it went and get the heavy foot as well as taking the Batavian Revolt because a) it was interesting and b) gave me another unit of cavalry. I also wanted to use four generals to see how it compared - to offset the average status of many of the troops and increase movement to allow a more aggressive sweeping on both flanks.
Here is my army list.
1 FC General 50 Cavalry,,,Protected,,Light Spear,Swordsmen
1 FC General 50 Cavalry,,,Protected,,Light Spear,Swordsmen
1 TC General 30 Cavalry,,,Protected,,Light Spear,Swordsmen
1 TC Ally General (Frisians) 20 Cavalry,,,Protected,,Light Spear,Swordsmen
8 Warriors (Batavians) 56 1 Medium Foot,Average,Undrilled,Protected,,Impact Foot,Swordsmen
6 Archers (Batavians) 30 1 Light Foot,Average,Undrilled,Unprotected,Bow,,
6 Archers (Batavians) 30 1 Light Foot,Average,Undrilled,Unprotected,Bow,,
6 Javelinmen (Batavians) 24 1 Light Foot,Average,Undrilled,Unprotected,Javelins,Light Spear,
6 Batavian Auxiliary Deserter Foot 54 2 Medium Foot,Average,Drilled,Armoured,,Light Spear,Swordsmen
4 Batavian Auxiliary Deserter Cavalry 56 2 Cavalry,Average,Drilled,Armoured,,Light Spear,Swordsmen
4 Sarmatians (only after 25AD) 64 2 Cavalry,Superior,Undrilled,Armoured,,Lancers,Swordsmen
8 Warriors (Frisians) 56 3 Heavy Foot,Average,Undrilled,Protected,,Impact Foot,Swordsmen
8 Warriors (Frisians) 56 3 Heavy Foot,Average,Undrilled,Protected,,Impact Foot,Swordsmen
8 Warriors (Frisians) 56 3 Heavy Foot,Average,Undrilled,Protected,,Impact Foot,Swordsmen
4 Cavalry (Batavians) 56 4 Cavalry,Superior,Undrilled,Protected,,Light Spear,Swordsmen
4 Cavalry (Batavians) 56 4 Cavalry,Superior,Undrilled,Protected,,Light Spear,Swordsmen
4 Cavalry (Batavians) 56 4 Cavalry,Superior,Undrilled,Protected,,Light Spear,Swordsmen
Phil's was on a piece of paper - sorry - but you get the gist from the battle maps.
Setup
Phil wanted open terrain and I wanted as much terrain as I could put down (so I could hide behind it). The terrain rules don't seem to put much terrain in the centre of the table - which is definitely a good thing - and although it took part it did not dominate the game.
Phil's IC general made the difference in scouting and I had to deploy first which was a disadvantage. My best intentions were ruined - I physically could not put the figures down for a straight infantry fight. I nearly deployed the Frisians on the far left once the legionaries went down, but figured I needed them to at least act as a honey pot for the legionaries. I decided to hang back with the heavy foot and sweep cavalry on both flanks. I really needed to put the infantry forward just enough to keep the legionaries coming.
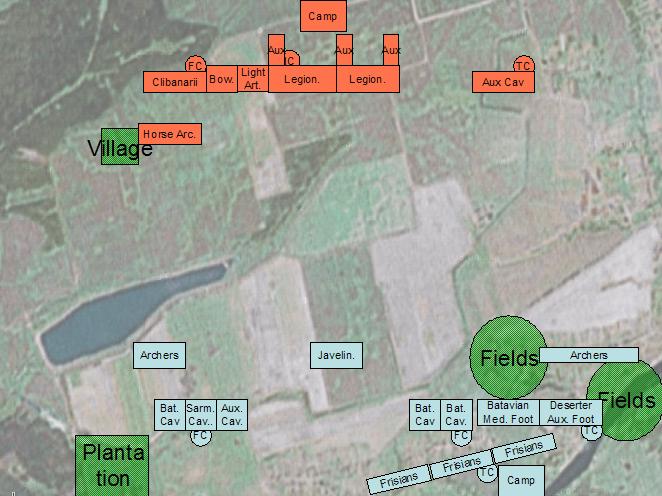
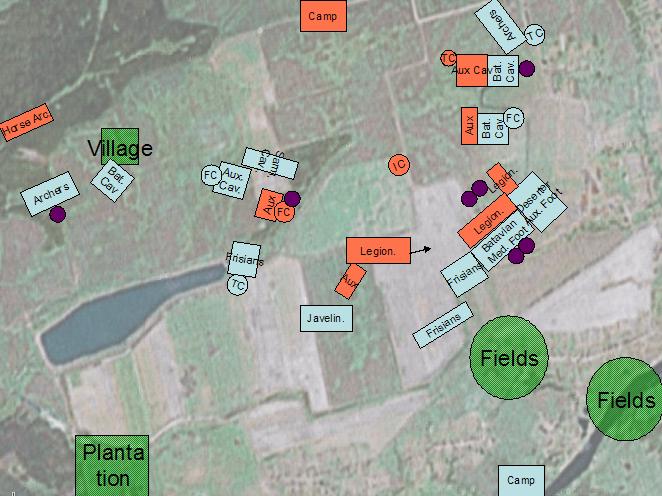
The Roman army was compact and perfectly formed. The Germans were more widely spread and hollow in the centre.
Bounds 1 and 2
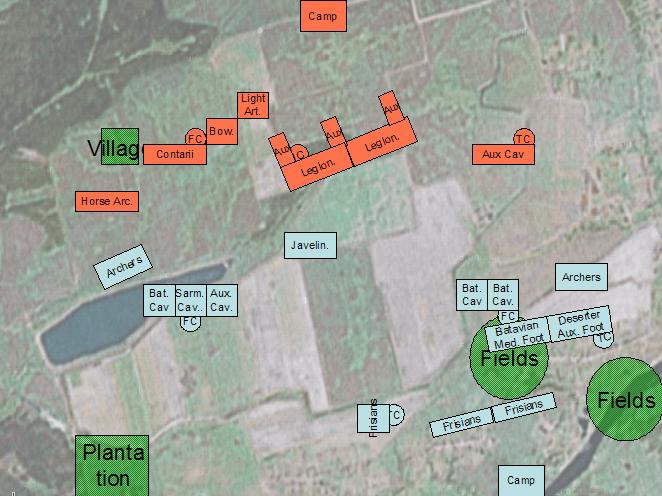
Some standard maneouvers and jostling. On the left I had a clear advantage in numbers, but I had left the infantry too far back and might get my flank turned. I threw a unit of Frisians to the left in a vain attempt to protect my cavalry's flank.
On the right I also had numbers, but needed to keep the legionaries off my cavalry. So I threw my medium infantry forward to lure the legionaries onwards and provide some sort of cover.
I also advanced the Frisians in the centre a little to try and keep the legionaries interested and used my javelinmen to try and slow down any redeployment.
 Bound 3
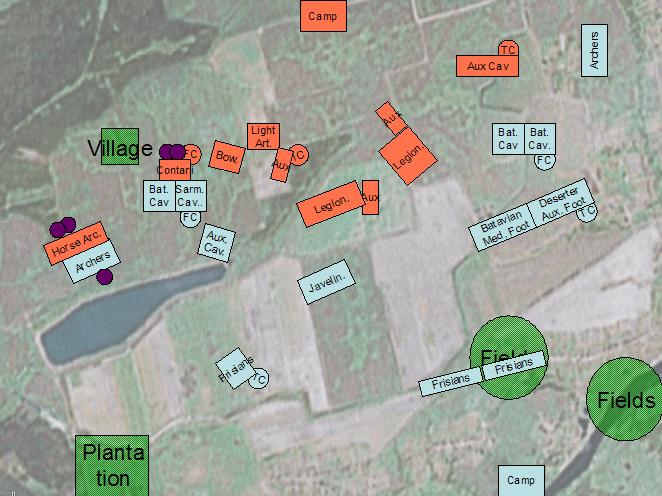
With the early maneouvers out of the way, the initial exchanges began. Early shooting saw the horse archers on the left disrupted (the purple dot denotes a level of cohesion lost) and the Deserter Auxilary Cavalry disrupted from combined bowmen and artillery shooting.
 Bound 4
The Contarii could not resist charging, and Phil also decided that the horse archers could not resist a prolonged exchange of bow fire so he charged them as well. The horse archers did well, disrupting the light infantry - it was a straight numbers versus PoA fight. The Contarii did not fair so well, becoming disrupted in impact and losing a base - which freed up the deserter auxilary cavalry to charge the bowmen. In melee the Contarii lost again and another base - the plan to sweep the left flank was going well. The deserter cavalry and bowmen fight went nowhere - so they break-off with no losses.
This was a god-send because it meant I could rally them and their flank was no longer exposed to the lurking auxilary.
 Bound 5
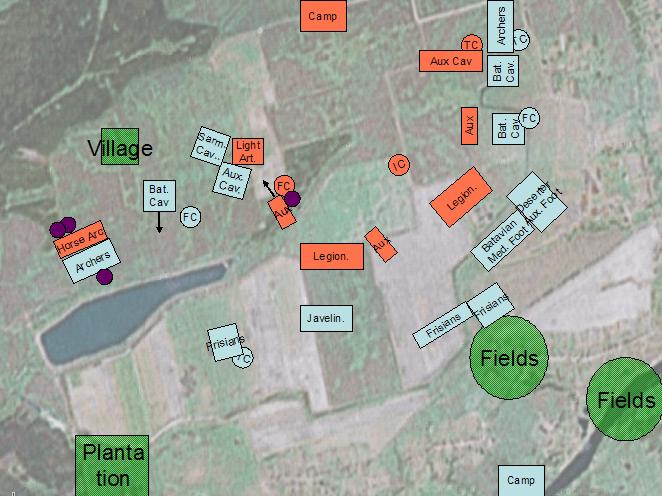
Things were going well on the left, if the Contarii would break then three units of cavalry could overwhelm the bow and artillery and move onto the auxilary. On the right things were begining to look bad. The Frisians were too far away and the legionaries had turned to face the cavalry attack. My cavalry were stretched too thin and the medium foot support looked a little flimsy. But I hoped that the archers and cavalry would overwhelm the roman cavalry and I could stay out of contact with the legionaries.
The Contarii lost another base in melee and vapourised (1 base BG). The general with them ran to the bowmen. My deserter cavalry charged into the bowmen, and in one bound they lost a base at impact, lost a base at melee, routed and lost a base due to enemy contact - they also vapourised. My cavalry pursued into the artillery. The general fled to the auxilaries.
Bound 6
The artillery broke in the melee phase, and the auxilaries failed a CT - but the general had now bounced from the Contarii across to them, so rallying was a possability. On the far left the horse archers finally broke and fled from the light infantry archers. On the right the legionaries were getting close to contact. I needed one more unit to break but the right was beginning to look unwell.
 Bound 7
This was crunch point. I foolishly left the deserter auxilary in charge range of the legionaries. This allowed them to step forward into contact with the Batavian Medium Foot - disaster! This precipated a general fight on the right with cavalry versus cavalry and auxilia versus cavalry as well.
As luck would have it I was able to outrageously outroll the legionaries at impact and they failed their CT to become fragmented (even after rerolls). Even worse they lost a base. Things were looking up.
Melee saw a total reverse, with the legionaries overcoming their fragmentation with a double PoA. My Batavian foot lost the combat and took a CT - falling to fragmented. Also my cavalry were outclassed against the Roman cavalry - their better armour telling. My cavalry fell to disrupted.
On the left I surrounded the auxilary unit with 2 units of cavalry and the advancing Frisians who had managed to swing round and join the fight - yay for the Frisians and their long march!
On my bound, my Batavian Medium Foot routed, the Deserter Auxilaries next to them failed a CT (and became disrupted), the Frisians who charged to support them also failed and fragmented. Yikes, three failed CTs and the whole flank was crumbling on me due to one lost combat!
 Bound 8
This saw my cavalry fighting the cavalry rout, the light archers supporting them disrupt due to failing a CT because of the rout. The Batavian Cavalry fighting the Auxilary Foot also failed a CT and fragmented. The whole flank was collapsing, which was scary. The speed at which is was going was truly frightening and more than a little frustrating. In the space of two bounds I had lost two BGs, two were fragmented and two were disrupted.
Fortunately I was able to charge the surrounded auxilary unit on the left and fragment it - thus breaking the Roman army. Phew! Another bound or two and my entire right flank would have collapsed.