I returned to one of my previous tries...
EIGHT COLOURS OF RAINBOW AKA THE ARMY OF LIGHT
(Hard)
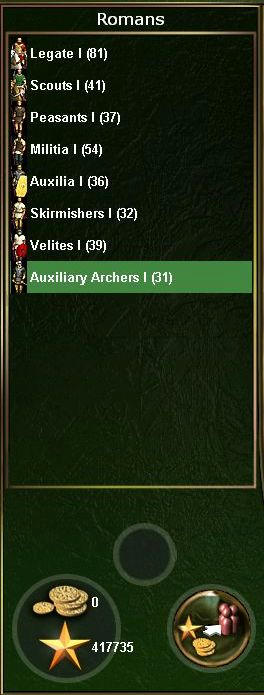 Legate 81
Scouts 41
Peasants 37 
Militia 54
Auxilia 36
Skirmishers 32
Velites 39
Auxiliary Archers 31
Denarii: 0 
Fame: 417 735
First Loss: can't really tell...
So, as you might see I bought only the light troops, and only one of each, and (except for the Scouts) only in the order of appearance. There's a reason why I bought the Scouts for the very first mission, a reason other than the usual "I want my horsemen to be first in a row". In fact I was able to get through the second scenario with only the Peasants and Militiamen, but honestly - it's totally random. You may just as well end wiped out by the level 4 light infantry. If only one could purchase the Auxilia here, but some 25 gold pieces are missing.
I also must remind anyone still viewing this thread of the (in)famous Men in Black scenario, where the Scouts and their high Trample is very useful.
As you may notice, I finished without a single Denari and I'm quite glad of it. As long as I'm not using the pin cushions (I haven't even used a temporary units, even though that I had enough money to purchase a tempo Militia or two), I need every penny to be spent on a survival tools. When it comes to fial score, I value Fame over Gold, or better said - this run can't be compared to my previous ones, so I don't care of money left, mainly when I need my eight men to have a solid punch. The only thing I skipped was some needless elite stuff for the leader (Falx). Otherwise my guys had nearly everything possible, including a level 8 swords, Ajax Banner and lots of other paraphernalia.
I can't remember some extremely hard scenarios, but well, with a force of mine, every time limit battle was a run for a life.
On squads:
Legate: Truly extremely high level of Exp. Either the hard difficulty gives much more, or maybe the reason is other - he takes away some of the Exp from the rest of the army, and my army made lots of Exp, as I was using very inferior squads, Paesants anyone? I can't really judge his overall effectiveness, but this guy ain't meant to fight... most of the times.
Scouts: Amazing unit. See the * below.
Peasants: Well, needless to say, but these were purchased just because I must have done so. At least they made a good decoy.
Militia: Check the final level. Of course that they are not the best unit ever, but if you keep them in harsh terrain, they may withstand a lot. Once they got past a level 20 or so, they became really dangerous.
Auxilia: Best h-2-h light infantry. Need to evaluate?
Skirmishers: These guys are Peasants of the missile troops. Keep them out of harm and they're good, but well, when you have just eight units, it's not that easy. I think that they were routed quite often. But I don't remember that they annoyed me anyhow, so maybe they weren't that soft.
Velites: Although I dislike both skirmishers units because they're neither real swordsman nor real shooters, the Velites indisputedly seem to be useful. I gave them some h-2-h gear pretty fast, so that they may offer some resistence.
Auxiliary Archers: Best shooter. Need to evaluate?
Maybe it's a bit strange, but even when playing with just eight units (well, maybe BECAUSE of playing with just eight units), I had very little time to watch the battles and gain some idea of each troop's effectiveness. It's not that hard to notice the Archers, as they start to make a noise before anybody else. And I also understood that Scouts are powerful unit, at least if the heaps of horseshoes indicate anything. But other than that, I had not much spare time, as playing with so little units and moreover withut any support is quite arduous.
I liked this, although I bit of a ran through it and haven't really played it with my usual patience and enjoyment. Looks like I was too anxious of the final result. Btw, I realized that on my previous runs (that weren't meant as a Peasants' joke!) I finished at 422 345 (LA) and lately 404 595 (GBoR), so my today's result (417 735) is by no means bad. But yeah, I wasted a loads of Denarii.

Note:
*) Over the months (well, years maybe?) I designed a very powerful horsemen tactic, one that I had much success with. Unless the map dictates otherwise, I run the cavalry into the nearest/most dangerous enemy and then Trample-Disengage-Trample until the squad is either crippled or routed. The initial clash carries away nearby enemy squads, of course. This way I may lead an enemy cluster right before my shooters and once they engage with guards (optimal situation is enemy heavies vs. my lights in swamp/rough), I encircle the cluster and trample over routed enemy, gaining precious amount of horrid experiences... or vice versa? Once the cluster starts to melt, I ran the horsemen into the fray, destroying the opposition and overrunning both the initialy routed and the guys leaving the cluster. By this time rest of the enemy troops starts to pester me, so you just can't always use this tactic, but well, horsemen are fast enough to run away if any danger pops up, and they also may either lead another units into doom, or just destroy the incoming enemy (mainly Skirms).
Maybe this looks like a needless trick or even a cheat on game design. I don't care of the latter, as there are other game features (like the disengagement-failure bug) that work against me, but I wish to evaluate on the "unnecessary waste of time" argument. First of all, there's nothing like unnecessary exp. Of course that time from time I was too greedy and instead of using my Scouts to the very best result, I moved them where they were of no use. But any scenario where you may guide the enemy units into a big cluster that you may lately encircle with your horsemen, so that the routed enemy squads automatically undergo Trample kills while they sieve through your cavalry, brings a lots of fresh new experiences to your mounted troops.
If the Trample-Disengage-Trample tactic is solid, the Encircle-and-Sieve trick is plain amazing.
One last note: yes, you need to upgrade the Trample skill, of course.
EDIT: When using this tactic, you must not forget of several very important things.
First of all, the usual possum's upgrade path remains in use, except for a few differences. Rather than maximizing Feint and Drill, take the Trample whenever possible instead.You'll need at least some Drill to use your cavalry effectivelly, and you'll also need some Feint to upgrade Swordsman and to make some damage in hand-to-hand. But whatever "excess" level you find, upgrade the Trample skill. Depending on how exactly you'll upgrade, on level 13 or 14 you'll get the Frenzy skill.
The other important thing is that you can't skip the Drill, because you need it not only because of upgrade tree, but also because you want lots of free movement, if you wish to use cavalry properly.
Third thing to know. Although setting your cavalrymen into the offensive stance should bring more Trample kills, it's not always true, especially when you're about to hit an enemy in a defensive stance: this time it's better to be also in a defensive stance, because your formation is wider and the "landing surface" is also wider, thus making far more trample kills.
Another reason for attacking in a defensive stance is the fact that this way the cavalry won't break too deep into the enemy formation and thus has very little problems with disengagement. When you use aggressive formation, your cavalry breaks so deep that it either can't disengage at all, or at least some horsemen remain trapped in enemy line where their fate is short, cruel and bittersome.
When is the best time for disengagement? Immediatelly! In fact I hit the "Disengage" button as soon as it becomes active, because before the order takes place, cavalrymen just hit the enemy. You may give them one additional second, so that their wave hits with more strength, but it's not the best idea when there are lots of enemy squads all around. Your horsemen may easily become trapped.
This tactic is a little bit dull and needs some micromanagment, but the fact that you'll get lots of free experience (and namely the fact that these come from heavies) would be enough to justify the effort. The added bonus of losing very very little of your own men is... well, it's the added bonus of losing very very little of your men.