Page 3 of 4
Posted: Thu Nov 19, 2009 2:48 pm
by batesmotel
tvknight415 wrote:Ok, sorry for needing more help, but I am having trouble with those three words that most parents fear, "some assembly required."...
I've been putting together Legio Heroica minis for the past couple of evenings, and maybe it's just big hands and crappy manual dexterity, but I'm having trouble getting shields to stay in position on the mini while the glue sets (Zap CA+). I'm ending up with lots of residue on my fingertips and some fingers stuck together. Any tips on how to get shields to stay in position while the glue sets up? I've thought of tweezers, but I worry I'll end up sticking the tweezers to the shield as well if I'm not careful.
Thanks.
I use a drop or so of gel super glue on the figure and none on the shield. Then hold shield by rim and press against figure until glue sets enough to stay (10-20 seconds), Add more glue to reinforce if this seems necessary after it sets. The super glue is not very runny and sets quickly. Using the gel allows it to fill uneven spaces between the shield and figure.
Chris
Posted: Thu Nov 19, 2009 3:14 pm
by ethan
Just take a bit of practice, a drop of glue (shield or figure depends on the exact make what is easier) then hold it there, count to 10 or so and gently set it down.
One thing to watch for is to make sure the two pieces are cleanly making contact at the spot you put the glue. Whenever I have trouble with some figure it is often because the glue isn't actually where it needs to be...
It is probably too late now...but something to watch for is to make sure you cut a very small hole in the glue tip. Big holes pour out too much glue which is a pain.
Posted: Thu Nov 19, 2009 4:05 pm
by spikemesq
Where the area being glued will be obscured post-assembly (e.g., behind the shield), I have had pretty good luck with this trick.
Brush on just a tiny amount of white/PVA glue at the contact point. Then place a similarly tiny amount of super-glue.
The benefit of this mixture is that the glue tacks up immediately. You want to use very small amounts though, because it dries into a white crust that you don't want exposed (because it looks like shit).
For attaching riders to horses and/or shields to arms, keeping the glue to a minimum limits any residue to behind the shield or beneath the rider's ass, etc.
This also helps with mounting figures that have really minimal base molds (I am looking at you Essex). In that case, the crust doesn't matter, since the base dressing/flocking will cover it up nicely.
Helpful Spike is helpful
Posted: Thu Nov 19, 2009 6:16 pm
by lawrenceg
tvknight415 wrote:Ok, sorry for needing more help, but I am having trouble with those three words that most parents fear, "some assembly required."...
I've been putting together Legio Heroica minis for the past couple of evenings, and maybe it's just big hands and crappy manual dexterity, but I'm having trouble getting shields to stay in position on the mini while the glue sets (Zap CA+). I'm ending up with lots of residue on my fingertips and some fingers stuck together. Any tips on how to get shields to stay in position while the glue sets up? I've thought of tweezers, but I worry I'll end up sticking the tweezers to the shield as well if I'm not careful.
Thanks.
If you get glue on your fingers then maybe superglue (cyanoacrylate) is not for you.
Various possiblities, all of which I've used at some time or other:
Use a small blob of epoxy putty instead of superglue. Sticks at once (but takes time to set).
Use an epoxy glue and lie the figure on its back so gravity holds the shield in place.
Use an epoxy glue and temporarily hold the shield in place with blue-tak.
Posted: Fri Nov 20, 2009 3:37 am
by deadtorius
if you go to a model shop you can get the super glue in different thicknesses, thin medium and gap filling. You might want to try the thickest stuff for now since it wont run as much on you a drop of that will stay as a drop the thin stuff tends to run. I personally buy the medium stuff and have few problems with sticky fingers.
If you dont have a model shop nearby you can try online hobby supplies, I am not sure if Squadron is still around but if they are they would most likely carry all the different thicknesses.
Posted: Fri Nov 20, 2009 11:53 am
by pcelella
I've been experimenting a bit lately with 2 part epoxy glue. The connections seem to be rock solid once the glue sets. The problem though is that it takes so long for the epoxy to set that I can only work on a single connection at a time before the rest of the glue I mixed sets up - that's because I spend so much time holding the parts together compared to something like Zap-A-Gap. Anyone else using epoxy, and if so, any tips on how to do it more efficiently?
Peter C
Posted: Sun Nov 22, 2009 2:51 am
by deadtorius
Problem I have found with epoxy is that after many years, maybe 10+ the glue tends to lose its hold and stuff falls apart. Has happened with a lot of my older figs that were done in the epoxy days, sanding the contact point might help but not sure about it. Don't think there is a way to speed the setting time. Perhaps you can somehow prop the fig while the epoxy sets so the attached piece is balanced where you want it.
Posted: Sun Nov 22, 2009 8:05 pm
by lawrenceg
pcelella wrote:I've been experimenting a bit lately with 2 part epoxy glue. The connections seem to be rock solid once the glue sets. The problem though is that it takes so long for the epoxy to set that I can only work on a single connection at a time before the rest of the glue I mixed sets up - that's because I spend so much time holding the parts together compared to something like Zap-A-Gap. Anyone else using epoxy, and if so, any tips on how to do it more efficiently?
Peter C
Use epoxy with a long setting time, e.g. 24 hours, which should give you a few hours working time before it gels.
Use something else to hold the parts together, such as a blob of blue-tack or plasticine. It just needs to be held in place, you don't need to keep the joint under pressure.
You could also consider using a sticky epoxy putty or filler which should hold the part in place at once and form a proper joint when it cures (i.e. sets).
Posted: Fri Nov 27, 2009 1:55 am
by tvknight415
Thanks for the replies. I think I've gotten the method for shield assembly down now. Shield on fingertip, dot on shield, mini in dominant hand to apply pressure seems to be yielding much better results.

Posted: Wed Dec 02, 2009 7:21 pm
by tvknight415
Hello again. I'm back with more lovely questions.
First, inks. I picked up some Reaper black ink over the weekend, and got my first base painted all up (Legio's King Baldwin & crew). This was the first time I've ever used an ink - previously, all my black washing was done with watered down black paint. Well, I went to use the ink, thinking it was ready to paint right on the mini. Big mistake. It still has to be watered down, just like if I was using black paint, doesn't it (I'm thinking yes, but it was late last night and I didn't have the patience to go back and do any further experimenting)? Or, did I just get a bad jar (the ink seemed thin enough, until it hit the mini)?
(note to self - next time you're trying something new, try it on a junker mini, not on the highly-detailed general you just spent two hours painting)
Secondly, mixing minis from different manufacturers... I have about a dozen bases of Legio Heroica minis to start, and I love the detail (perhaps too much, as I'm going into I-want-to-detail-everything mode). But, due to both cost and need for assembly, I'm thinking of bulking out the rest of my army with a starter army from Old Glory. Will combining high-end sculpts like Legio Heroica in the same battle groups as more average detailed minis like Old Glory look okay, or look like the stuff that comes out the south end of a north facing horse? Is it okay to mix them in the same base and/or battle group?
Thanks for your continued help.
Posted: Wed Dec 02, 2009 7:52 pm
by ethan
When using inks for washing I usually thinned them down a bit, no hard and fast rule and it depends on the effect you are going for.
Radical size differences, rather than radical detail differences are the main issue mixing figure lines.
Posted: Wed Dec 02, 2009 9:20 pm
by MarkE
Having just finished painting my first army of any gaming variety, I was advised to try Games Workshop's Citadel Washes.
FWIW I used their 'Devlin Mud' as an overall wash on virtually all of the figures and found it did an amazing job of bringing up the highlighting and shadows and making an huge difference to the final look of the figures. The pot just needed a good shake and stir beforehand, but didn't seem to need any thinning, so it was simple for me to use as a first time painter.
Posted: Thu Dec 03, 2009 12:02 am
by spikemesq
Inks are OK for washes, but most really need to be watered down. Even then, they work better as an early wash for deepening base coat colors, not as a late stage wash to bring out detail. For that, use the Future Wash discussed above.
Inks are also good to mix with paint (e.g., red ink with red paint) to give the colors more depth and/or to use for detail work.
Spike
Posted: Thu Dec 17, 2009 9:51 pm
by tvknight415
Ok, I have some bases painted up, and I'd like to get some feedback on how I've done so far and what I can improve on. I should have the rest of the army minis in maybe this weekend or early next week to keep going on painting, and I'd like to correct any bad things I'm doing early, and not after I have the whole army painted.
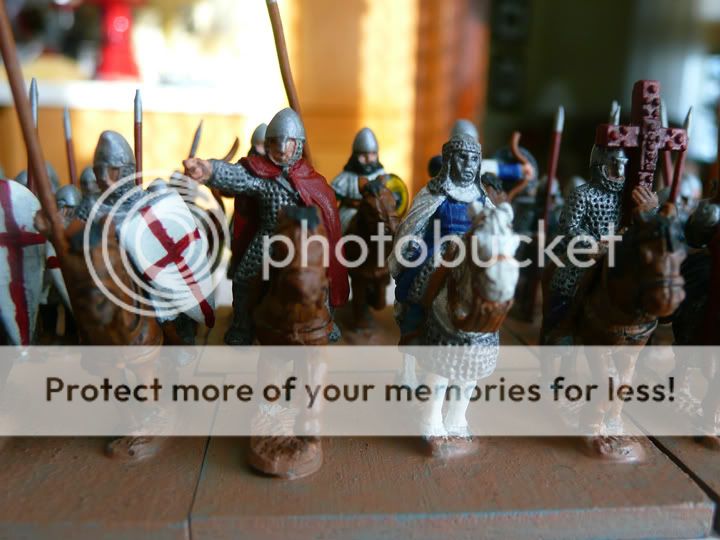
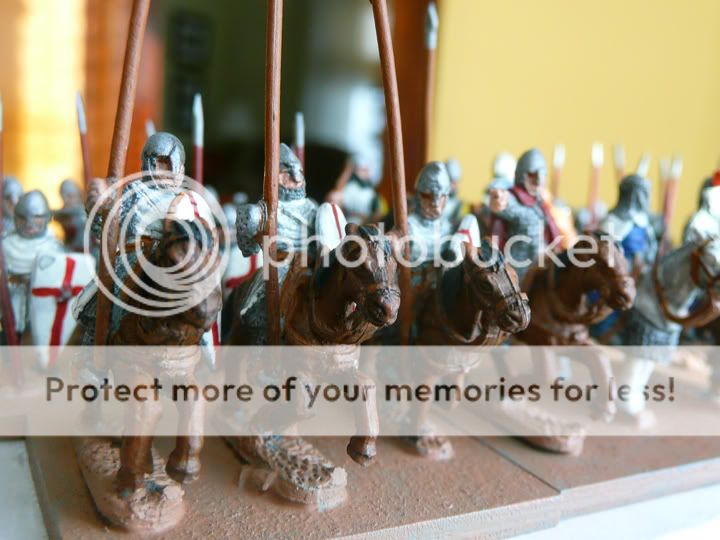
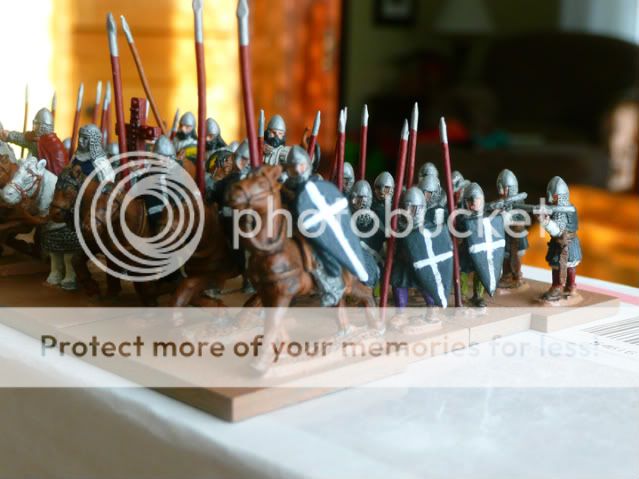
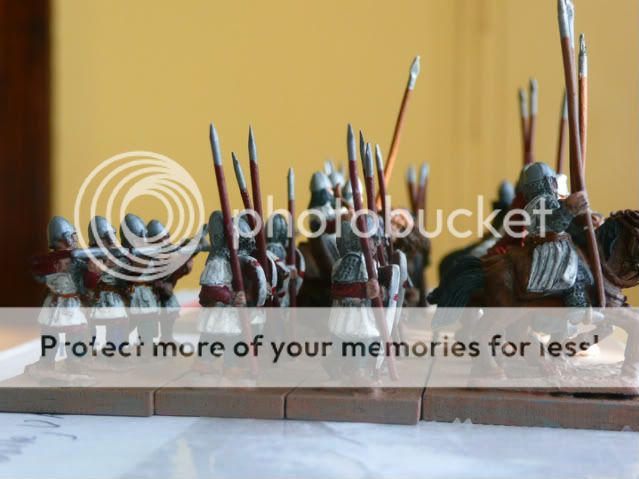
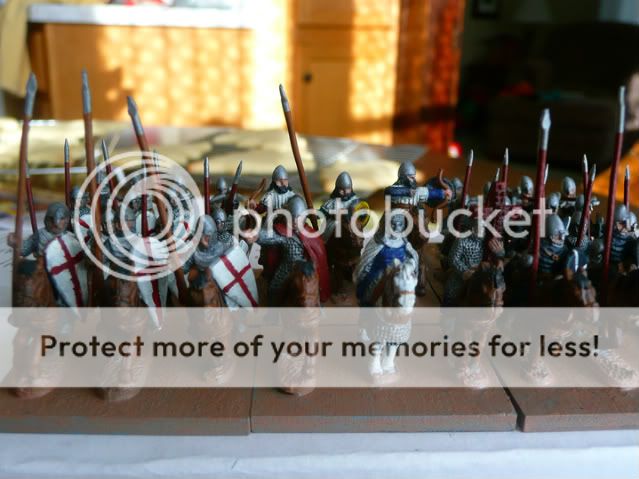
The bases were painted sloppily in the expectation of flocking - just some color so it wasn't grey underneath. I also realize I missed the templar knights' shield straps.
Also, what color grass would you recommend for flocking for the bases?
Thanks for the continued advice
Posted: Fri Dec 18, 2009 1:19 am
by Skullzgrinda
Very nice start! You might look at a more aggressive use of glazes, such as inks or paint diluted in medium.
An example from the ever helpful madaxeman site:
http://madaxemandotcom.blogspot.com/200 ... photo.html
As for flocking, there are even more - and more bizarre - approaches to this than there are to painting. First, consider who your troops are, and where they were deployed. If there are seasonal extremes in that theater, do you wish to depict this or go generic? If you are putting them in a specific locale, is the soil brown, gray or red or largely covered with vegetation? Is it rocky, sandy or soft? Uneven or flat?
With Templars, a really lush field depicted with static grass would certainly work and would finish the stand, but it would fail to convey the same look as a rougher, more sterile and arid type of terrain. Personally I would opt for a coarse, grainy cover such as sand, model railroad ballast, crushed kitty litter or coffee grounds (yes, I am serious) mixed into a paste with white glue and pushed into place with a brush. If the color is wrong, and it probably will be, let the glue dry then paint and dry brush the look you want. Perhaps sparingly sprinkle some synthetic "coarse turf" from the model railroad section of the hobby shop, or some of the lighter, duller pieces of lichen here and there.
No two people flock bases the same way, and most feel their own technique is the best. Experiment away, and again check out varying techniques in terrain building books and articles, even youtube. Don't overlook the model railroad books and hobbyists as sources. They do some of the most spectacular terrain work out there.
Posted: Fri Dec 18, 2009 5:00 pm
by Strategos69
Wonderful start. You can leave them that way or try to go for some advanced techniques. Those have already been mentioned and basicaly they are:
1) Lights and shades: as you are using a "big" scale, you can put some effort into marking the details of the miniature. For example, for the horses, you can use a dark brown ink (or just very diluted dark brown painture), very diluted all over the model. This will create the shades. Once it is dry, you should paint on with the original colour, but not all over the model but in the places where light would concentrate. Finally, you add some white to the original colour, and also with a diluted painture, you put the accent in the places where light would concentrate. White stripes also look great on horses, specially on the legs and on the front.
Regarding the chainmail, add black ink and, after that, a dry brush of the original chainmail colour. Te results are impressive. The same for the mask.
Clothing: some pure white lights in some parts of them.
2) Bases: first glue some sand on the bases. Then paint them with drak brown very liquid so that the painture expands when you touch it with the brush. That way you will have a dark brown sand but with some mix of colours. Add the flock as you have been told. I would use some light green with a mixture of some dry looking flock, to give the impression of a semi desertic area.
3) Shields: painting shields is very difficult at the beggining. i would recommend you to use transfers to save time and get good results.
Anyway, my congratulations as it is not easy to start with such a level. Go for more and post them!
Posted: Fri Dec 18, 2009 6:05 pm
by madaxeman
Posted: Fri Dec 18, 2009 6:35 pm
by tvknight415
Thanks for the advice and feedback so far. The minis have taken a single diluted black ink coating over most of the surfaces I could reach, but they have not had any dry brushing (I've only dry brushed two minis ever, with mixed results - a Reaper owl turned out nice, but a ral partha wolf didn't, so it's not a technique I use much if at all).
Madaxeman: what shades of browns do you use to get that effect in the video? Also, how coarse was the grass (fine, coarse, medium)?
For the dry brushing - I've already applied matte sealer to the first 10 bases (my little girl keeps wanting to look at the bases, and I wanted them protected from little hands chipping paint off). Will dry-brushing over a sealed mini help improve it, or is it pretty much now a done deal once sealer is applied? I can add the dry brushing for the next 40-some bases once the minis arrive and are put together.
After I flock the base (and remove loose grass), should I run another coat of sealer over the entire thing? Or, is the bond between base and grass sufficient to not need additional sealing if it is still there after a stiff brushing?
Posted: Fri Dec 18, 2009 6:55 pm
by madaxeman
tvknight415 wrote: I'm having trouble getting shields to stay in position on the mini while the glue sets
The other trick with shields is to be sure to anchor them to the figure at two points, not just with the "hand behind the shield boss".
If you can angle the shield so you also glue the rim of the shield to the figure's leg, or cloak etc they stay on a lot better
Posted: Fri Dec 18, 2009 7:02 pm
by madaxeman
tvknight415 wrote:Thanks for the advice and feedback so far. The minis have taken a single diluted black ink coating over most of the surfaces I could reach, but they have not had any dry brushing (I've only dry brushed two minis ever, with mixed results - a Reaper owl turned out nice, but a ral partha wolf didn't, so it's not a technique I use much if at all).
I rarely drybrush the minis - my attempts have been a bit rubbish too (apart from on tanks), and inks works well enough for me alone. Hopefully, as Ive proved, any idiot can drybrush a base though!
tvknight415 wrote:Madaxeman: what shades of browns do you use to get that effect in the video? Also, how coarse was the grass (fine, coarse, medium)?
On a sandy base I used first a fairly rich miniature paints chestnut brown, and then a lighter colour - maybe GWs Graveyard Earth, or a Humbrol natural wood. Its no science, just what I had hanging around at the time ! Having a more toned-down 2nd colour is the key thing though I've found. On darker bases I use a brown and then a sand colour. Likewise I'm not sure what the grass was either - I just bought it off ebay in bulk as it was cheaper than GW stuff !
tvknight415 wrote:For the dry brushing - I've already applied matte sealer to the first 10 bases (my little girl keeps wanting to look at the bases, and I wanted them protected from little hands chipping paint off). Will dry-brushing over a sealed mini help improve it, or is it pretty much now a done deal once sealer is applied? I can add the dry brushing for the next 40-some bases once the minis arrive and are put together. After I flock the base (and remove loose grass), should I run another coat of sealer over the entire thing? Or, is the bond between base and grass sufficient to not need additional sealing if it is still there after a stiff brushing
I'm sure it wont be a problem either way, although I'm not convinced that a mix of drybrushing and inking really works that well, sealant or not. The big extra-value that sealant seems to have for me is it does help the grass/flock stick on longer term, so you want to try to do the sealant as the last coat (after you have brushed off all the loose grass and stones, or they end up stuck to the figures!)