Page 2 of 7
Curtiss P-40 Warhawk
Posted: Fri Jun 27, 2014 2:18 pm
by Halibutt
It's outside of the scope of my mod, but I was looking at some PZL.62 look-alikes and found a great 2D render of Curtiss P-40 Warhawk. I know it's in vanilla files already, but perhaps someone might be willing to use it somewhere. BTW, the plane is quite a notable one - it's one of the two planes of 47th Pursuit Squadron to scramble from Haleiwa airfield during the Pearl Harbour attack.
Cheers
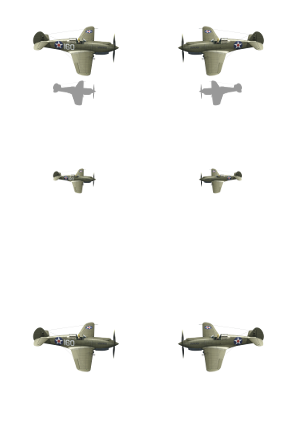
- Curtiss P-40B Warhawk
- P-40B_Pearl_Harbor_Halibutt.png (32.4 KiB) Viewed 6596 times
Re: Halibutt and his toys
Posted: Mon Jun 30, 2014 1:39 am
by Halibutt
With lots of help by Bebro I finally managed to render the C7P artillery tractor. Let me know what you think. Are the shadows ok?
Cheers
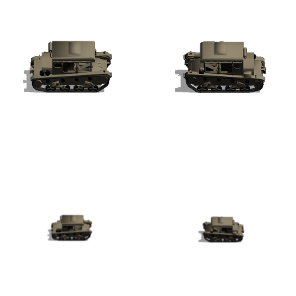
- C7P - plain version
- C7P-halibutt-plain.png (22.75 KiB) Viewed 6550 times
Re: Halibutt and his toys
Posted: Mon Jun 30, 2014 2:00 am
by Halibutt
Oh, and the wz. 29 armoured car (basic version). I appreciate any comments. If you think the rendering is ok, I'll go ahead and prepare a camo sprayshop version.
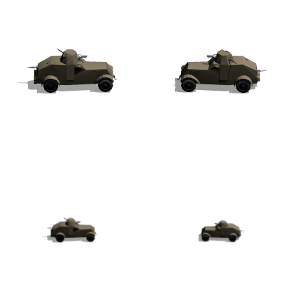
- wz29_kompozytowy.png (20.05 KiB) Viewed 6547 times
Re: Halibutt and his toys
Posted: Mon Jun 30, 2014 4:20 pm
by Halibutt
Just a quick update - I finished my first infantry icons - the 15th KuK Infantry Regiment and the 6th Russian Rifle Regiment. They're available through the
WWI mod forum topic. Hope you like it.
Re: Halibutt and his toys
Posted: Wed Jul 02, 2014 4:38 pm
by bebro
Nice to see it worked for you. IMO shadows etc are right

Re: Halibutt and his toys
Posted: Sat Jul 05, 2014 11:33 am
by Halibutt
Per Akkula's request I converted a MTB from BF1942. It's called T38 Schnelboot in-game, but I'm not sure it represents any particular type of vessel, at least I'm not sure. Is it ok or should it be made smaller?
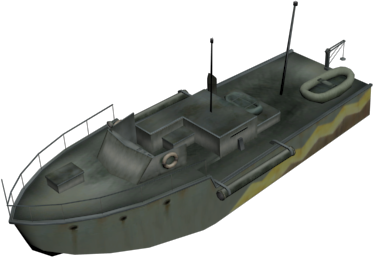
- T38 Schnelboot render.png (73.58 KiB) Viewed 6398 times
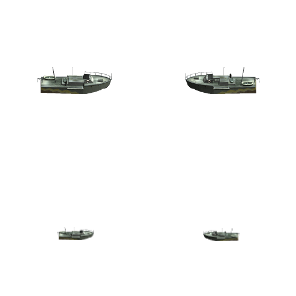
- T38
- T38 Schnellboot halibutt.png (13.97 KiB) Viewed 6398 times
Re: Halibutt and his toys
Posted: Sat Jul 05, 2014 6:26 pm
by Ballermann
First many thx for your nice units.

A request, is it possible, to make (from the same Game BF1942):
the "Flettner Fl 282 Panzerschreck"
http://fhsw.wikia.com/wiki/File:Flettne ... chreck.jpg
and/or
the "Panzerselbstfahrlafette Ic"
http://fhsw.wikia.com/wiki/Pz.Sfl._Ic
and/or
40,6 cm Schnelladekanone
http://fhsw.wikia.com/wiki/40.6_cm_Schnelladekanone
???
Re: Halibutt and his toys
Posted: Sat Jul 05, 2014 7:34 pm
by Halibutt
Ok, I'm putting them on my to-do list once I'm done with the WWI stuff (all the models I'm converting and posting in the WWI armoury
from this post on).
Re: Halibutt and his toys
Posted: Sat Jul 05, 2014 10:43 pm
by ThvN
Halibutt wrote:Per Akkula's request I converted a MTB from BF1942. It's called T38 Schnelboot in-game, but I'm not sure it represents any particular type of vessel, at least I'm not sure. Is it ok or should it be made smaller?
Ah, memories. It was a nightmare getting the AI to use these properly in BF1942. It's actually supposed to be a Japanese PT boat, there was a real T-38 class (Type 38?), so that would be it I guess:
http://www.ptboatworld.com/PT_Boat_Info ... seMTBs.htm
Nice icons BTW, well done. If you don't mind me asking, what 3D software do you use and how difficult is it to set up the lighting? Just curious. I remember adjusting the collision meshes in 3DSmax7 (long time ago) and that took me so much time already. I never got used to working with 3D, and I haven't touched it for a long time, but I doubt things like UV mapping have become easier.

Re: Halibutt and his toys
Posted: Sun Jul 06, 2014 1:36 pm
by Ballermann
Halibutt wrote:Ok, I'm putting them on my to-do list once I'm done with the WWI stuff ...
Yeah, thank you

Re: Halibutt and his toys
Posted: Sun Jul 06, 2014 8:59 pm
by Halibutt
Thanks for the info. And it was a nightmare to force the AI to do anything in BF1942. But the game was absolutely great way back in the days of full servers...
ThvN wrote:Nice icons BTW, well done. If you don't mind me asking, what 3D software do you use and how difficult is it to set up the lighting? Just curious. I remember adjusting the collision meshes in 3DSmax7 (long time ago) and that took me so much time already. I never got used to working with 3D, and I haven't touched it for a long time, but I doubt things like UV mapping have become easier.
Actually, I'm not skilled at 3D at all. And it's waaaay easier with models we already have (like free models from SketchUp or exported models from Bf1942 or any other game (I bet the same works with IL-2, I'll have to try some time later as they have plenty of experimental planes there). The process I use is pretty much straightforward. It's time-consuming at first, but once I did the first couple of icons, I got the hang of it. Here it is:
Part 1 - getting the models out of Bf1942 (or any of its' mods)
- Download and install Battlefield Game Archive tool (BGA) to open Battlefield 1942 rfa files
- Download and install both 3DS Max and Cinema 4D trials, plus GIMP or any other 2D gfx editing software.
- Download Battlefield Mod Development Toolkit (BMDT) to be able to load Bf1942 models into 3DS Max
- Extract the model you want with BGA to a directory of your choosing
Part 2 - setting the model right in 3DS Max
- Import the .rs/.sm files into 3DS Max (using BMDT)
- check if everything is ok, put the pieces together and such. Usually MGs, ailerons, flaps and other details get imported to the very middle of the scene, so you need to move them to correct places. This might seem intimidating at first, but it's actually fairly easy. In most cases the core of the model (fuselage and wings or the body of a land vehicle) are already in place. Just select the part that is imported to the centre of the model instead of the proper location from the list, click the "move" icon (four-pointed arrow) and move it to the correct location. More often than not this is really easy. You already know that the gun has to fit in the turret, so you just move it there. Also, usually you already have the landing gear in place, you only have to move the wheels to where they should be. And so on. Five minutes of trial and error is more than enought to learn it.
- Once that is done, in 3DS Max Open Material Editor (shortcut M) and check what textures are associated with the model. On the left you see a list of "Scene Materials", just double click them one by one. You'll see them being added to the View1 window where you can click them and check the name of the associated .dds file.
- open the textures file with BGA (..\Battlefield 1942\Mods\bf1918\Archives\texture.rfa) and export the .dds textures to the same folder you exported the model parts earlier
- You can now point 3DS to the correct textures now (in Material Editor, see two steps above) to see the full model, render it in 3DS max (it handles transparency better than Cinema4D). However, it's not obligatory.
- Export the model from 3DS to Autodesk .fbx file as you can't import .max files straight into C4D.
Part 3 - working with C4D
- now navigate to where the textures are on your disk. They are in .dds format, so you need to convert them to .png (C4D doesn't read .dds files). Any decent gfx soft would do, I open them with GIMP, hit Ctrl+E and save them as .png, though there are easier ways I believe.
- Open the .fbx file with C4D. In the lower part of the screen you see the Materials window. Just drag&drop your .png textures there. When all are there, drag and drop them to the appropriate parts of the model. Now you see it the way it should be.
- Sadly, I couldn't get the lights, and the background, and shadows right. So I asked bebro and he was kind enough to provide me with a template file with the lights already set. I just import the model I extracted earlier to his template (Ctrl-C + Ctrl-V does the trick)
- Now set the render settings. I save as multi-layered multi-pass 8-bit .psd file (GIMP can read them all right).
- Add to render queue, save the output, rotate the model 180 degrees and repeat. Be careful not to overwrite the first file you exported earlier.
Part 4 - finishing in 2D
- Now it's fairly easy. You open the .psd file with GIMP. For air units (they have different shadows in-game than land units) you need to turn the "Light_1" and "Light_main_Shadow" layers off and turn the "Backrgound" layer on. This way the unit gets slightly lighter.
- Flatten the image
- Add alpha channel (right-click the single layer in layers window)
- select all the grey background and the shadows, delete them so that only the model is there (leave the shadows if it's a land unit)
- open some vanilla unit of similar size, scale your pic similarly and place in correct places. Export as .png and you're done.
I tried to be as specific as it gets so that others might do the work as well. As long as you still have the free trials of 3DS and C4D, you can do tons of great icons in little time.
Cheers
Re: Halibutt and his toys
Posted: Sun Jul 06, 2014 11:16 pm
by Halibutt
Halibutt wrote:Oh, and the wz. 29 armoured car (basic version). I appreciate any comments. If you think the rendering is ok, I'll go ahead and prepare a camo sprayshop version.
The attachment wz29_kompozytowy.png is no longer available
I reworked the icon a bit and
posted the mask to Camo Sprayshop's thread. It works quite nicely
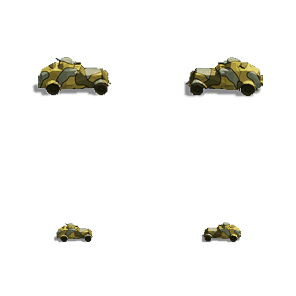
- 1931 camo
- wz29 japanese camo - halibutt.png (17.46 KiB) Viewed 6306 times
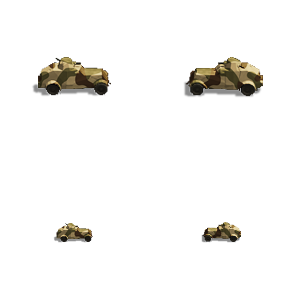
- 1936 camo
- wz29 1936 camo - halibutt.png (16.91 KiB) Viewed 6306 times
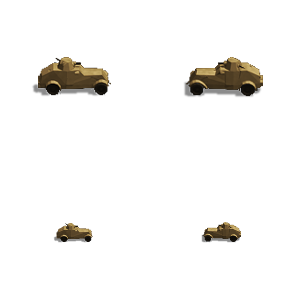
- plain camo
- wz29 plain camo - halibutt.png (14.31 KiB) Viewed 6306 times
Re: Halibutt and his toys
Posted: Mon Jul 07, 2014 8:37 am
by rezaf
Thanks for taking the time to spell out the mini-tutorial about importing units from BF42 Halibutt.
It sounds slightly intimitating - especially having to re-arrange the parts on the model manually. But I don't have 3DSM any longer and don't know if I'll bother to install the trial, maybe if I have some time off work.
The FHSW mod has a ton of rarer units that might be nice to have as PzC units, but it appears you already made a commitment to convert WW1 units, so who knows if you'll ever get around to making some WW2 stuff.
We'll see - thanks again for the tutorial in any event.
_____
rezaf
Re: Halibutt and his toys
Posted: Mon Jul 07, 2014 9:14 am
by Halibutt
rezaf wrote:Thanks for taking the time to spell out the mini-tutorial about importing units from BF42 Halibutt.
It sounds slightly intimitating - especially having to re-arrange the parts on the model manually. But I don't have 3DSM any longer and don't know if I'll bother to install the trial, maybe if I have some time off work.
The FHSW mod has a ton of rarer units that might be nice to have as PzC units, but it appears you already made a commitment to convert WW1 units, so who knows if you'll ever get around to making some WW2 stuff.
We'll see - thanks again for the tutorial in any event.
_____
rezaf
When I get back in a week or so I'll try to get back on WWII track and do some more icons. Also, writing this step-by-step instruction actually took longer than converting a unit. And rearranging parts is pretty easy once you do some trial and error. Basically you select the part from the list and move it on one of the planes. And most of the parts have their sockets, so you know where to put them. The gun should fit in the turret, the wheels should go into the tracks or onto the hubs and so on. It's not a big deal.
Re: Halibutt and his toys
Posted: Mon Jul 07, 2014 10:09 pm
by ThvN
Halibutt wrote:Sadly, I couldn't get the lights, and the background, and shadows right. So I asked bebro and he was kind enough to provide me with a template file with the lights already set. I just import the model I extracted earlier to his template (Ctrl-C + Ctrl-V does the trick)
Many thanks for the tutorial! The lighting was my 3D stumbling block as well... I never could make it look good. This template from Bebro sounds interesting, would it be possible to upload it so others may benefit? (it could even be attached it as a zip file if it's small enough)
Did you manage to re-do your TKS icon, BTW? The model looks really nice.
Re: Halibutt and his toys
Posted: Mon Jul 07, 2014 10:17 pm
by BiteNibbleChomp
rezaf wrote: but it appears you already made a commitment to convert WW1 units,
The WWI unit set is nearly finished, so I can't imagine that would be anyone's problem (he's already made 40+ icons, and I only have 19 left on the list, some of which could share icons)
- BNC
Re: Halibutt and his toys
Posted: Mon Jul 07, 2014 10:47 pm
by Halibutt
ThvN wrote:Many thanks for the tutorial! The lighting was my 3D stumbling block as well... I never could make it look good. This template from Bebro sounds interesting, would it be possible to upload it so others may benefit? (it could even be attached it as a zip file if it's small enough)
Could you ping bebro and ask him this question yourself? He uploaded it for me on some one-time-download site, but I'm not sure it would be ok to share the file without his permission as it also included one of his models for reference. Alternatively, ping me in about a week, I'll send you one of my working files when I get back home.
Did you manage to re-do your TKS icon, BTW? The model looks really nice.
No, not yet, I got lost in the trenches of the Western Front of WWI for some time
But I plan to get back to my 1939 project once I return home. Though, frankly speaking, converting 3D models to unit sprites is a more rewarding task than working on a campaign I might be able to finish in half a year - if ever. When converting units, the effect is ready in half an hour and people rejoice. When I spend two hours converting a 1933 staff map of some God-forsaken county into a playable PC map, I have little to show - plus the conscience that the hardest part is still ahead of me.
BiteNibbleChomp wrote:The WWI unit set is nearly finished, so I can't imagine that would be anyone's problem (he's already made 40+ icons, and I only have 19 left on the list, some of which could share icons)
Relax, I will still have some week left of my free trials when I get home, that's more than enough time to do some work. Also, I think I'll try to export as many units as I can to Blender or some other free 3D software. While I don't think I'll be able to recreate the lighting there, it's worth a shot. And perhaps there IS a way to import bebro's scene setup into Blender...?
Re: Halibutt and his toys
Posted: Mon Jul 07, 2014 11:08 pm
by ThvN
Thanks for the reply, I'll PM Bebro about it. And you are right, the most visible work is usually rewarding relatively quickly, but making dozens of scenarios can take so much time and effort, and it is hard to see progress sometimes.
Also, I'm amazed at how little some things are modded. Plenty of 'what-if' ultra-rare units but I had to make my own Panzer 35(t)! I really hope you can add some nice Polish units, the 'minor' nations are still underrepresented at the moment.
Re: Halibutt and his toys
Posted: Tue Jul 08, 2014 6:11 am
by captainjack
ThvN wrote:but I had to make my own Panzer 35(t)!
I'd rather like a Panzer 35(t) - is yours available for others to use?
I only do my own minor mods and can't (yet) do graphics, but as I just managed to keep a Panzer 2 and a Panzer 38t right up to the start of 1941 before upgrading them, a 35t would have been the perfect companion.
Re: Halibutt and his toys
Posted: Tue Jul 08, 2014 11:33 am
by rezaf
captainjack wrote:I'd rather like a Panzer 35(t) - is yours available for others to use?
ThvN's original version was posted
here, later guille did some further work on it which you can find
in his thread.
Have fun.
_____
rezaf