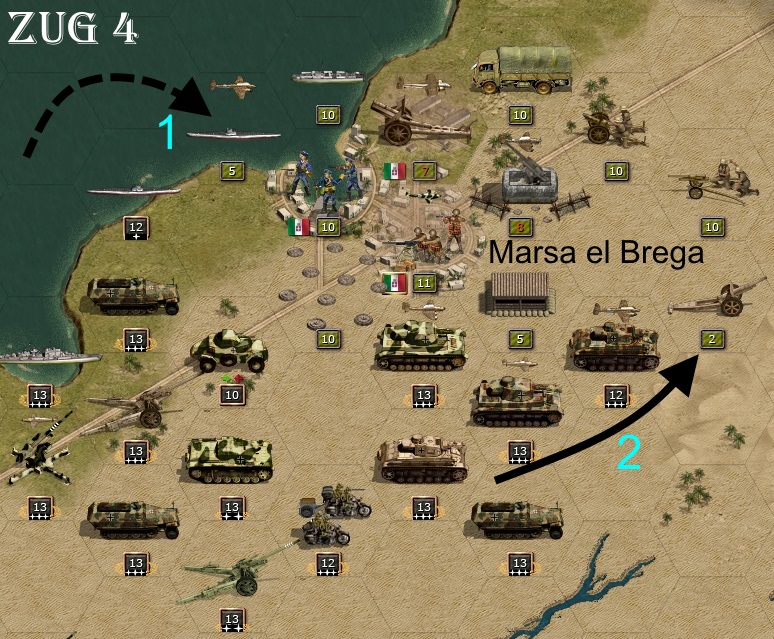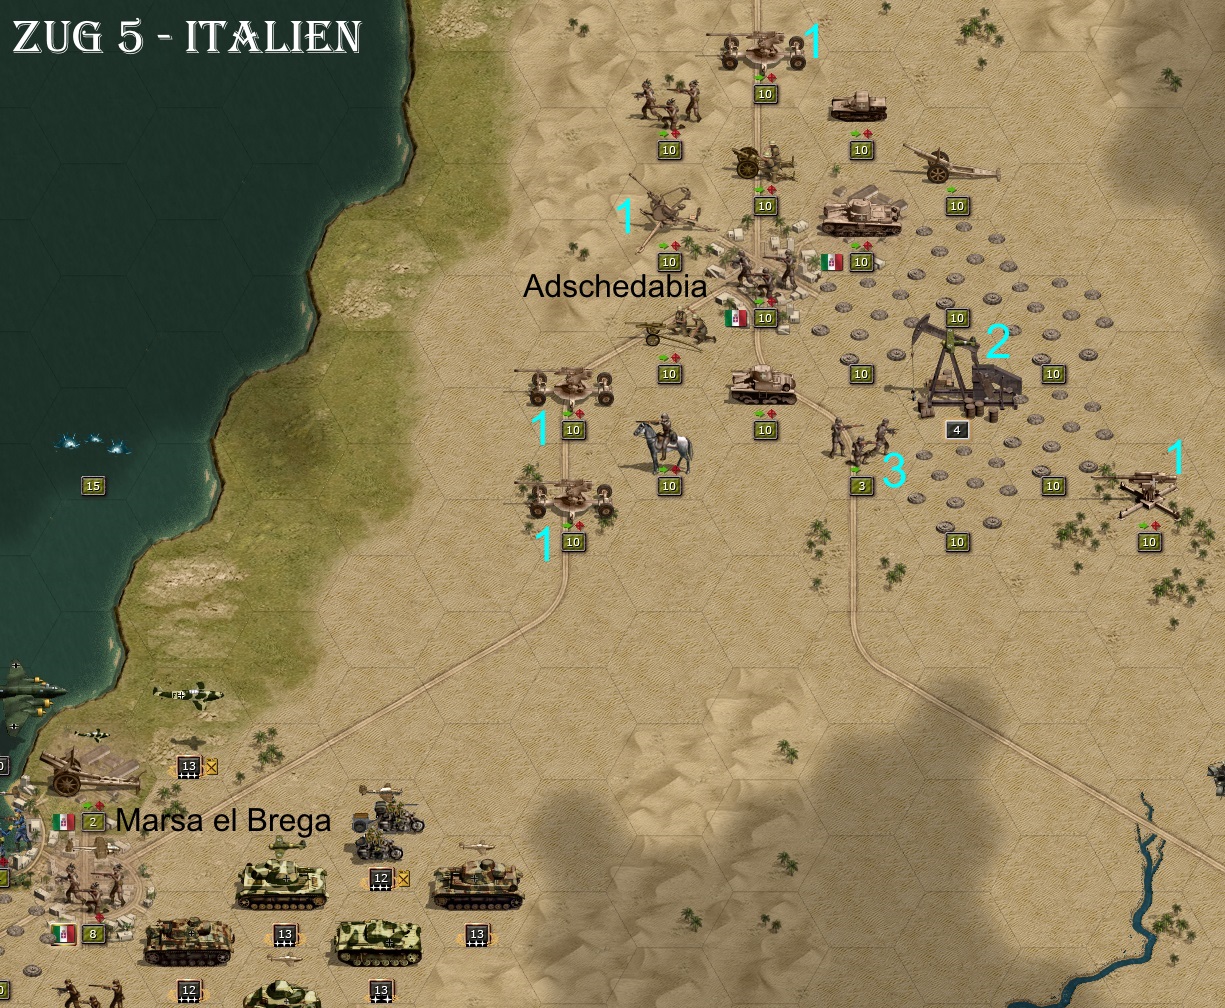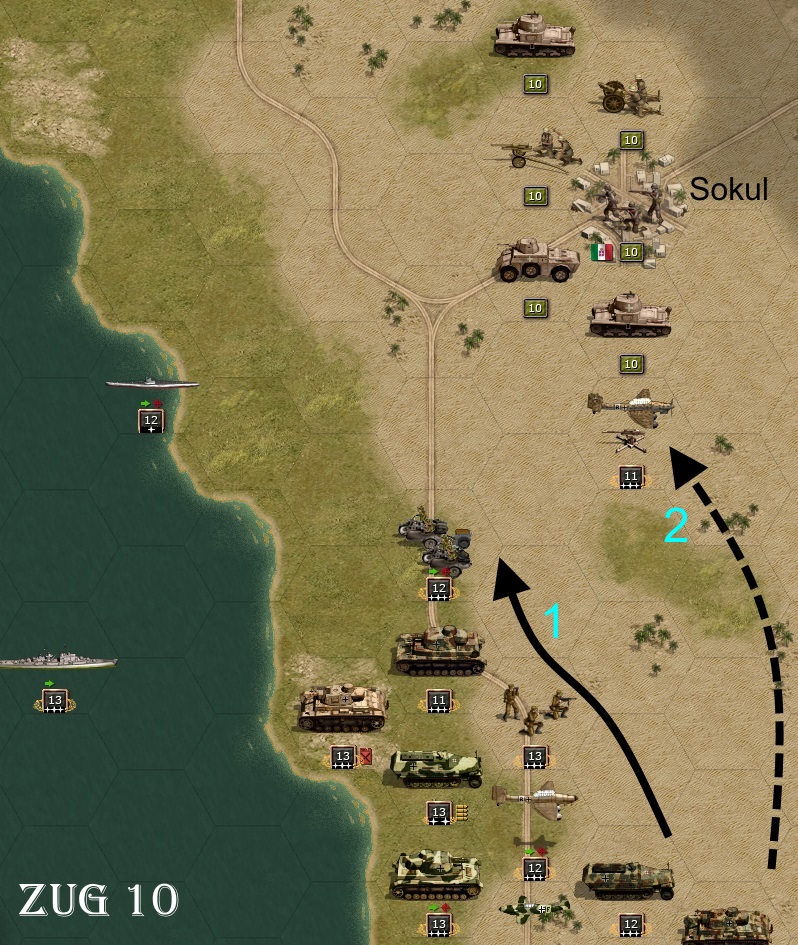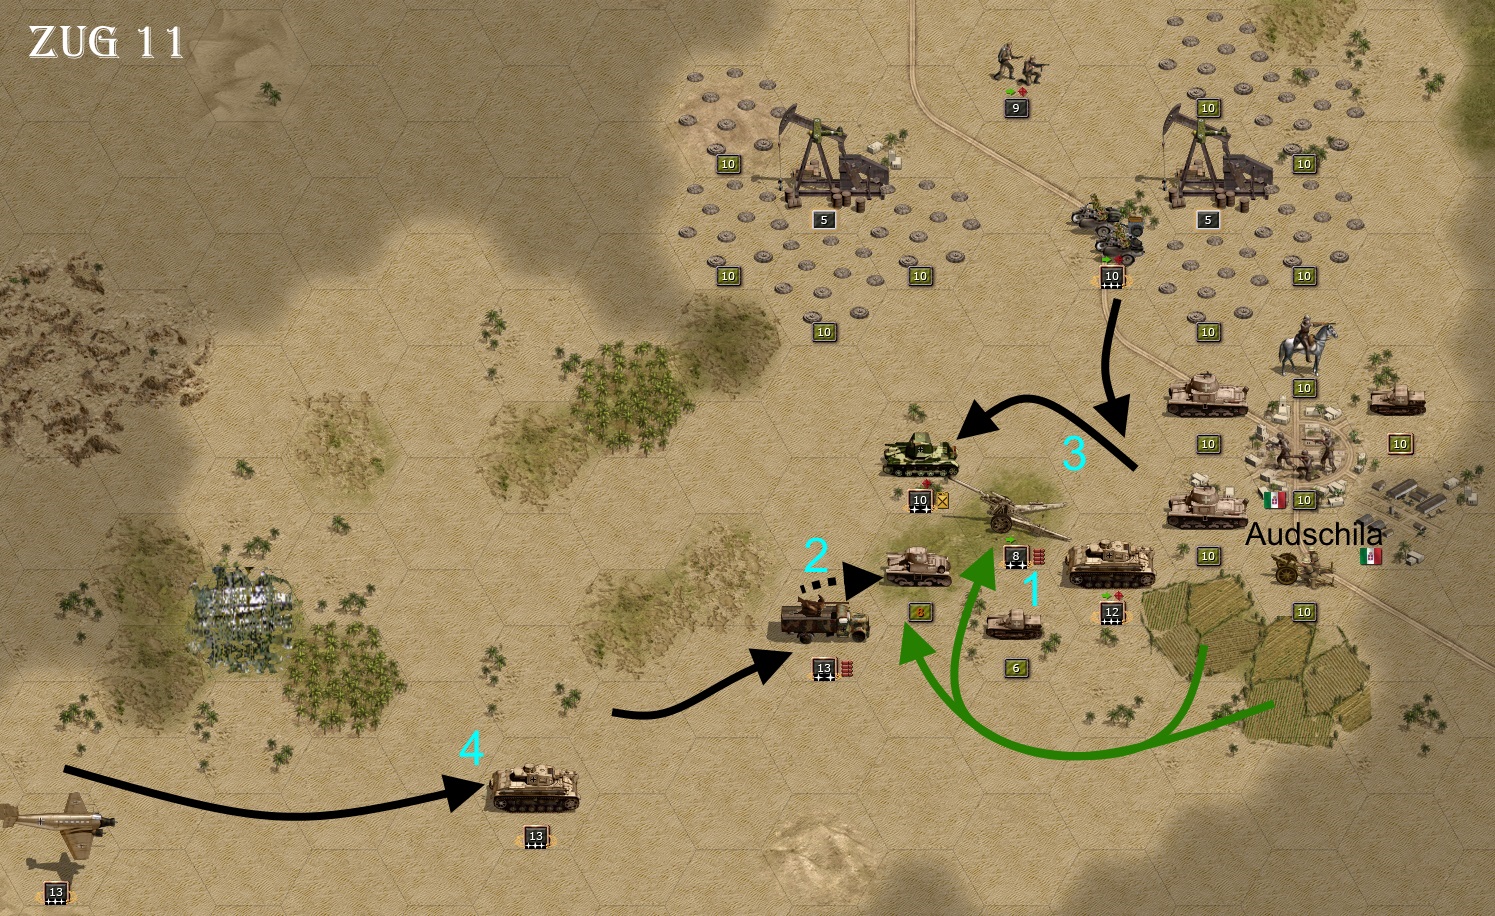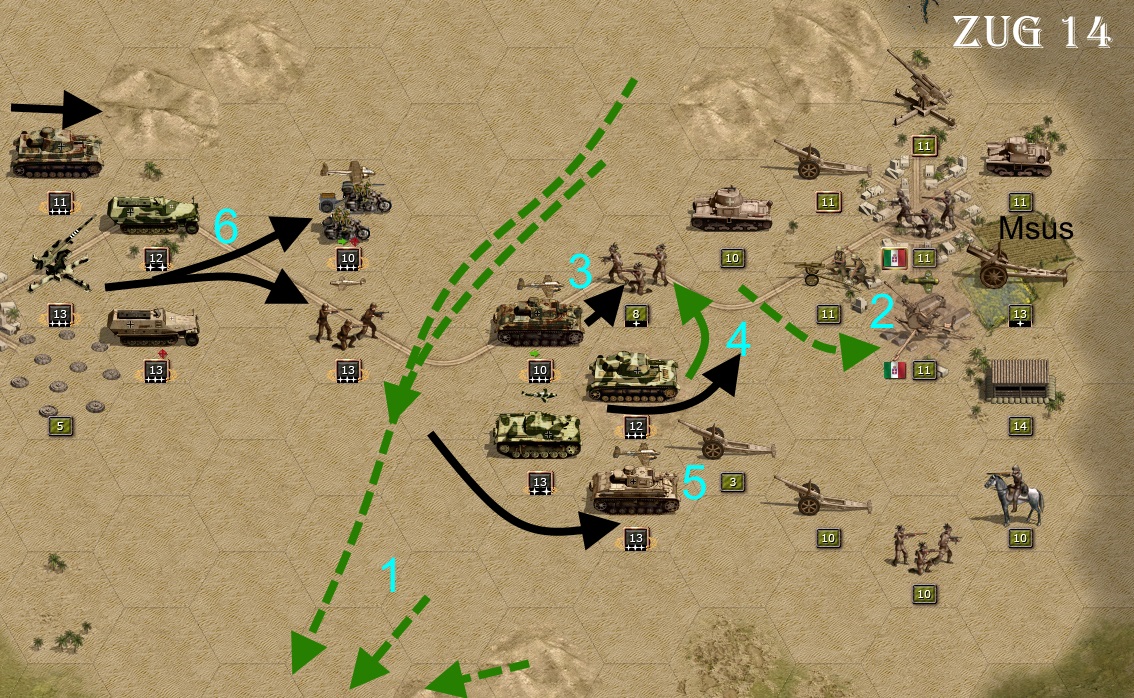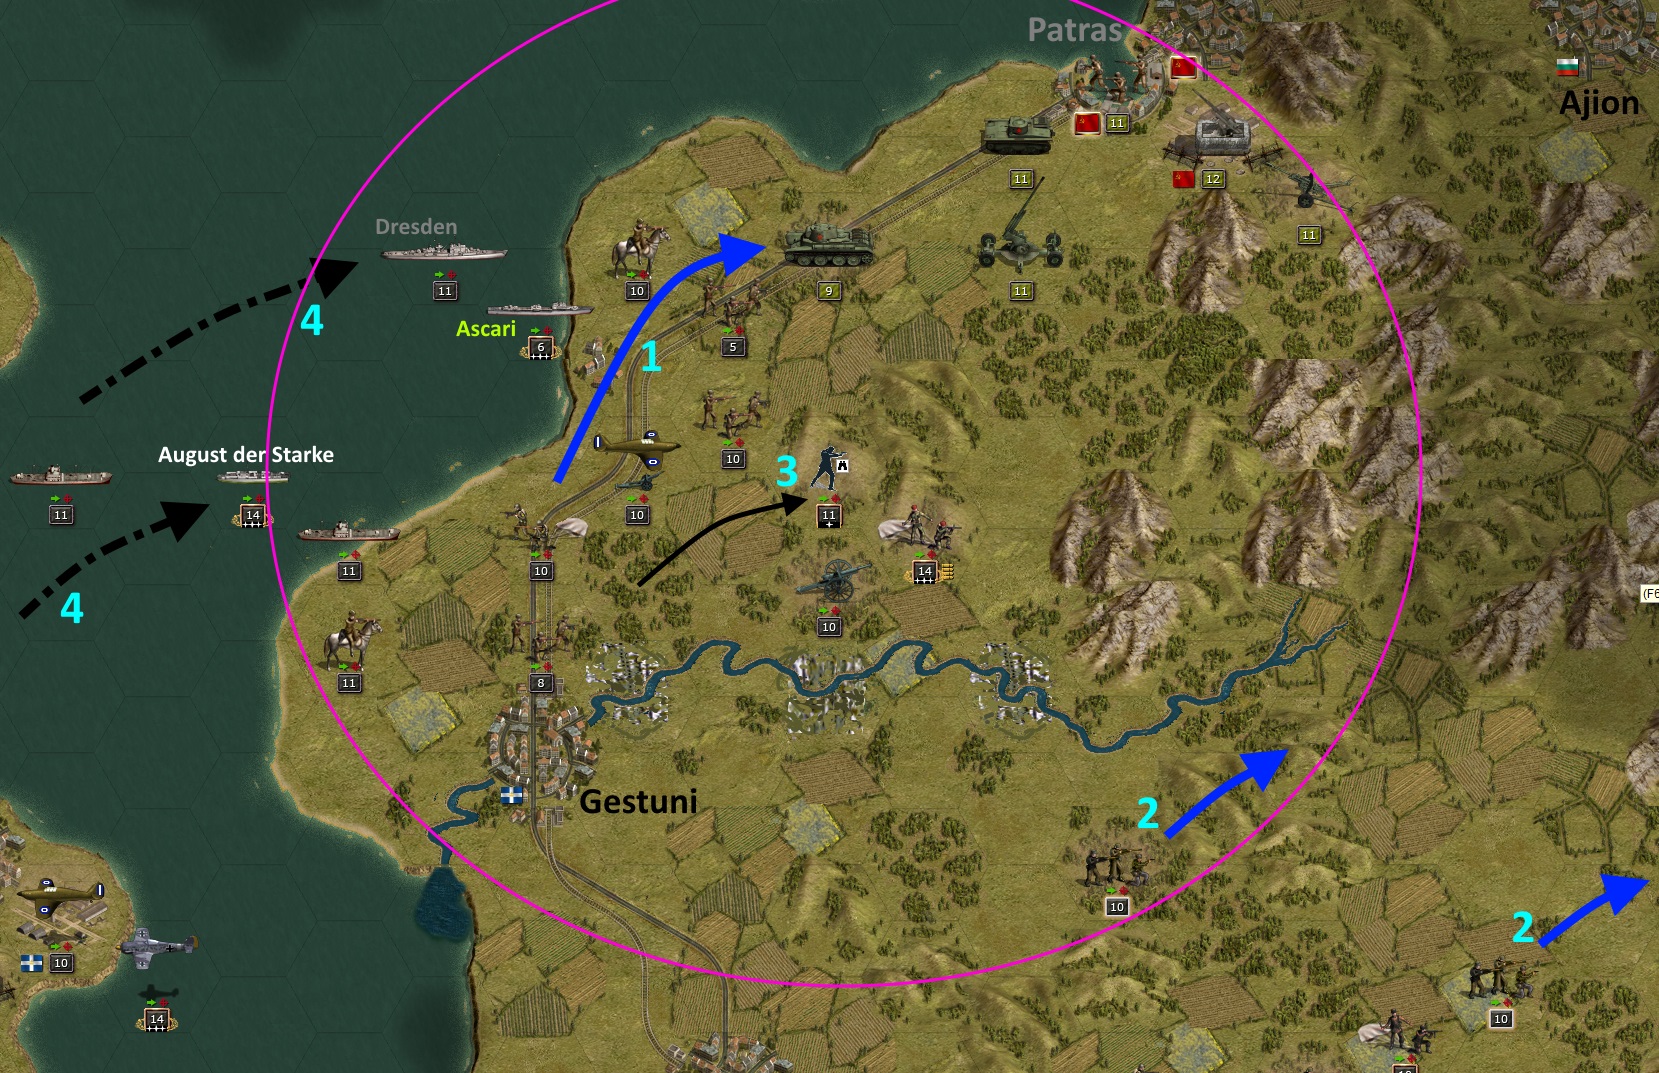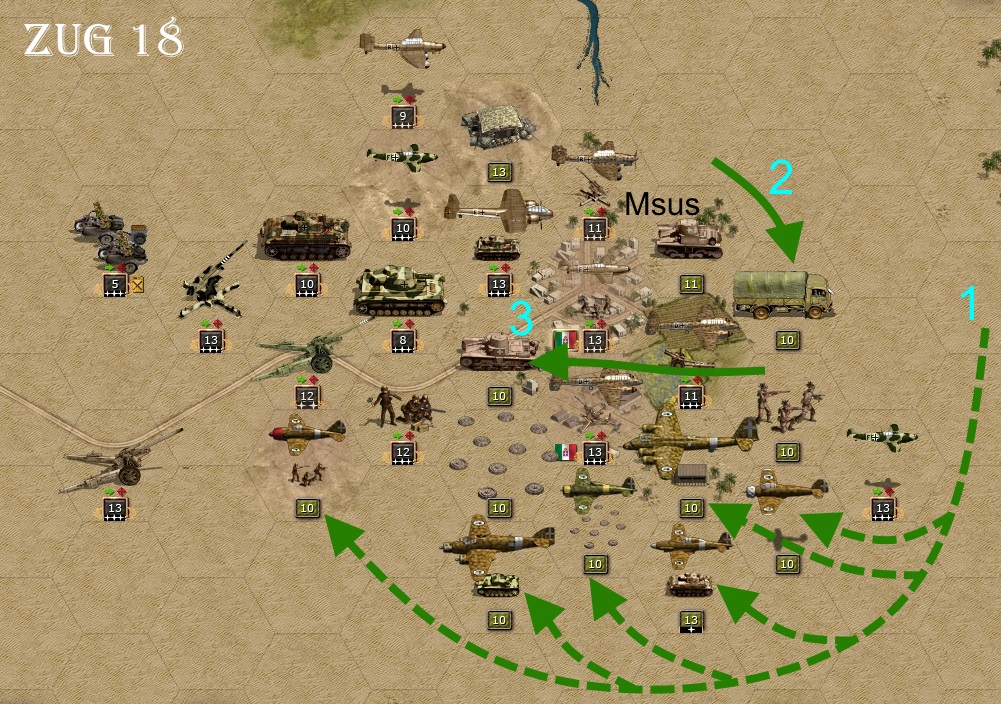
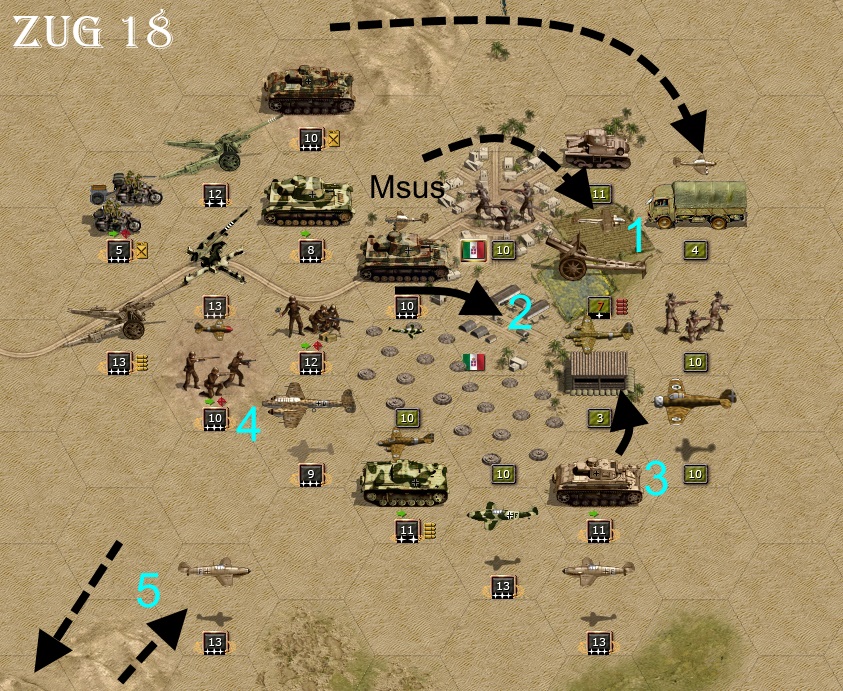
(26) Now the battle could almost be over, but the AI brings another 6 new plane groups into play (1). Among them is a hero fighter (+5 attack, +3 defence, +2 initiative). With the attacks he hits 3 ground units lightly (together 4 strength points loss). Further, he moves one artillery to the rear (2) and one of the two remaining tank units to the front (3).
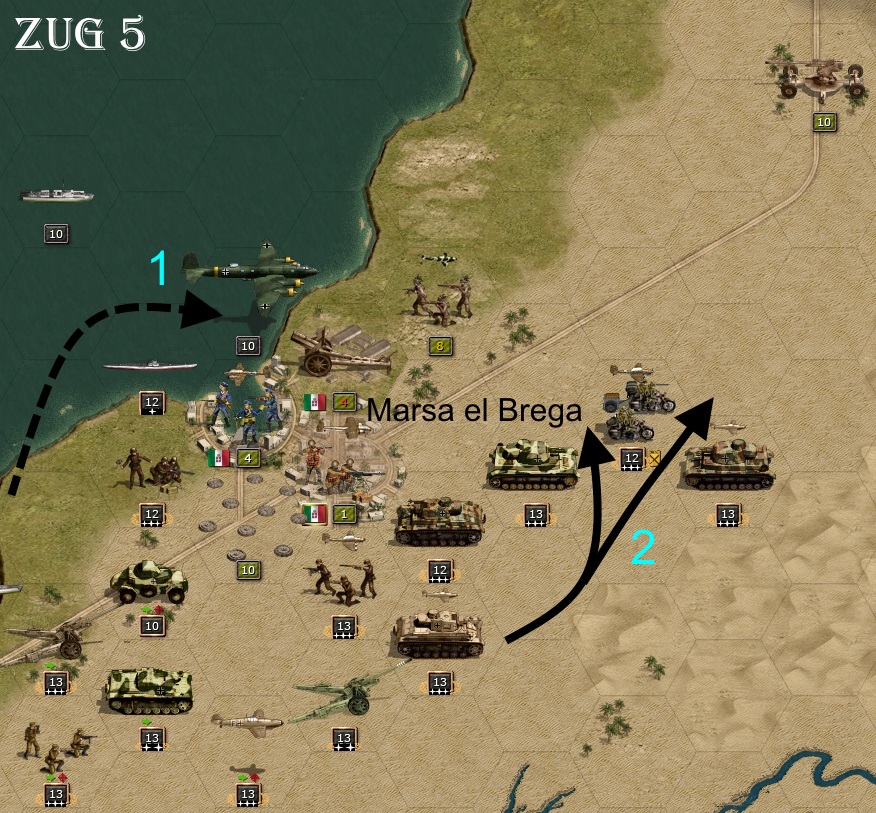
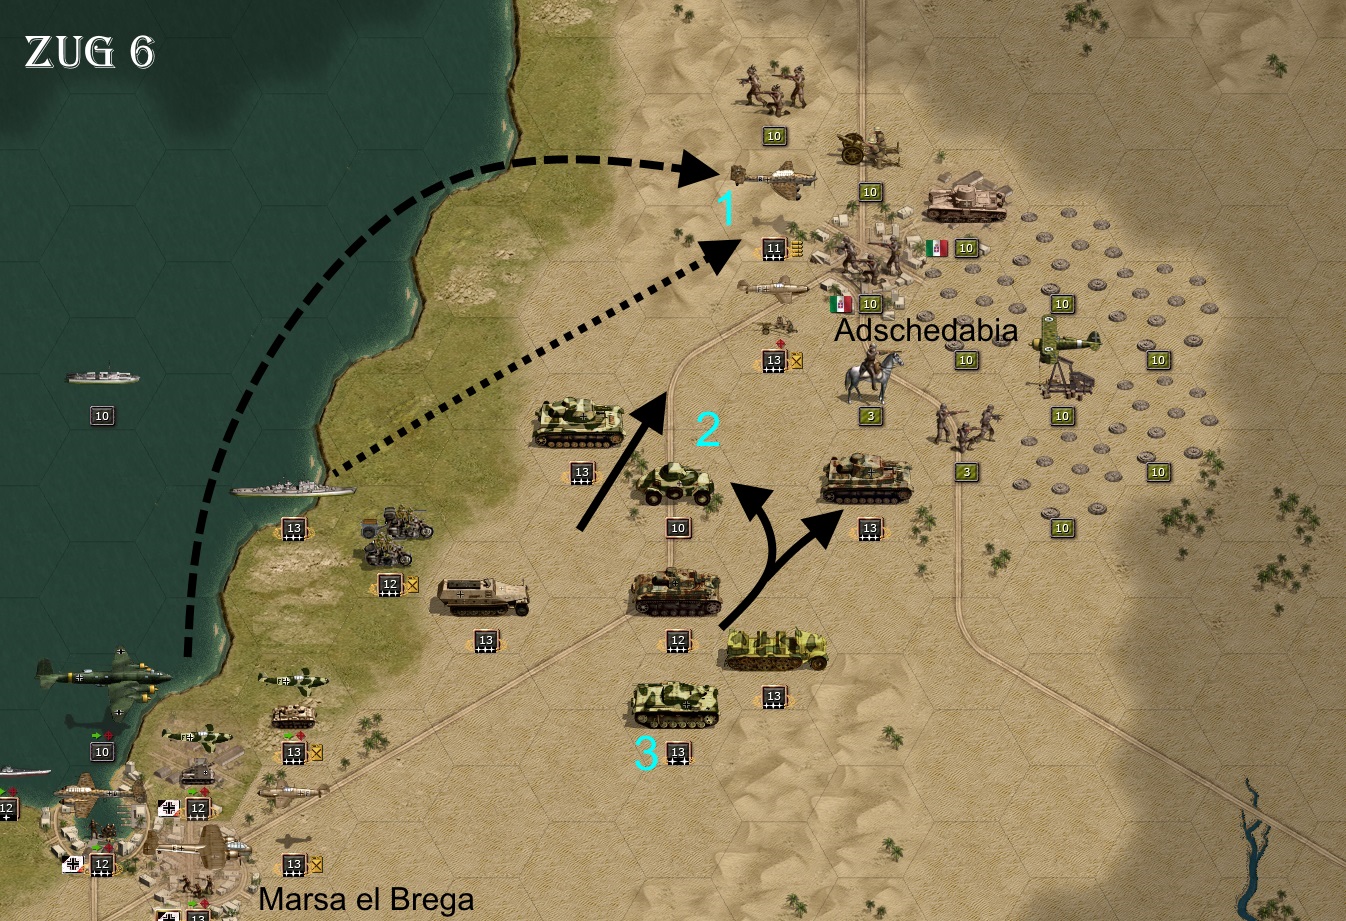
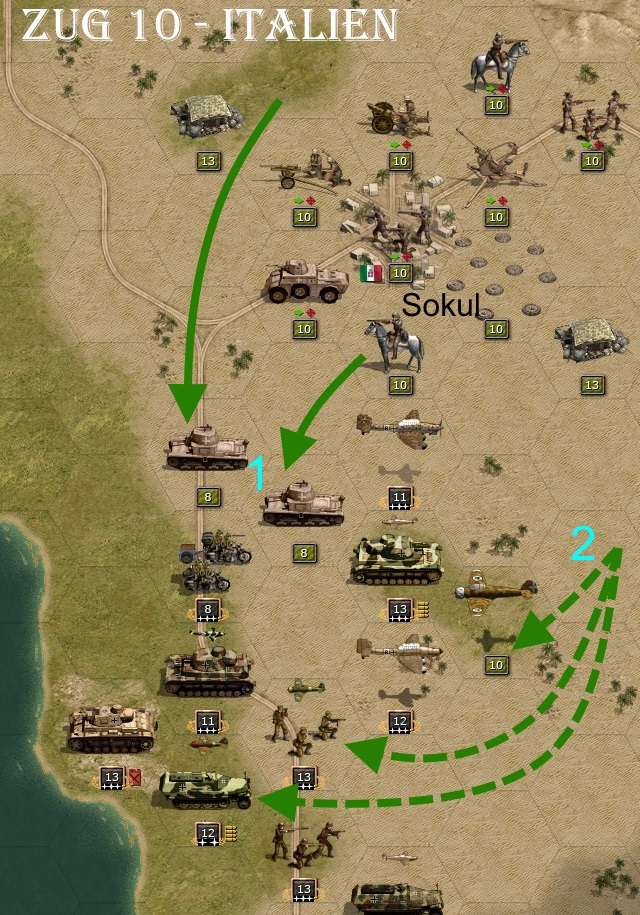
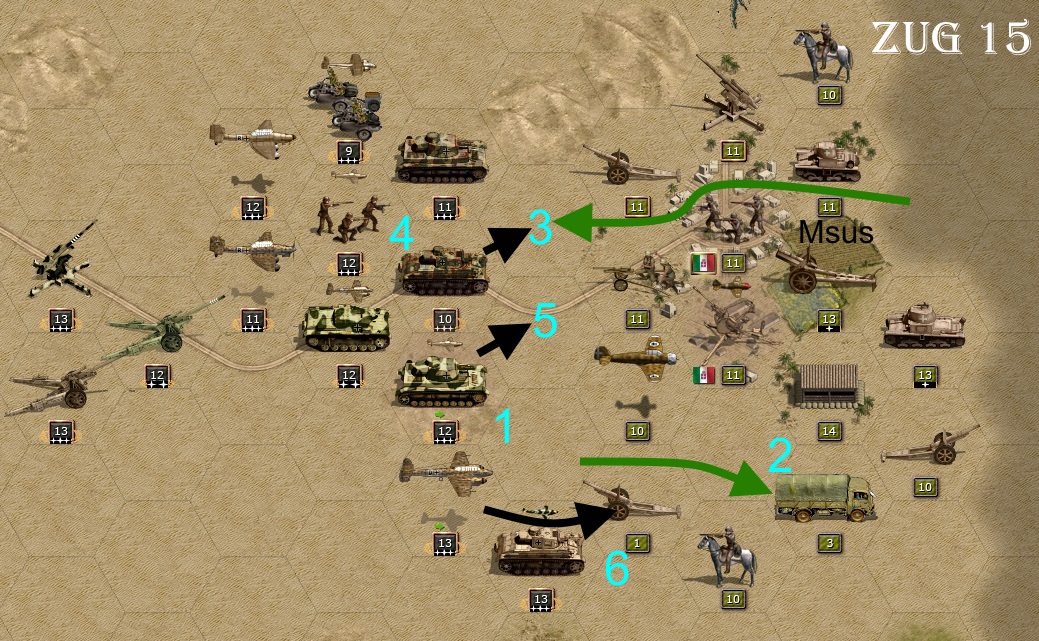
(27) The artillery eliminates the 9cm AA (1). The friendly AA (with a range +1 hero) moves one hex to the southeast and fires at the enemy hero fighter, which loses 11 (!) strength points (2). A Me109 turns back and attacks a second fighter, which loses 7 strength points (3).
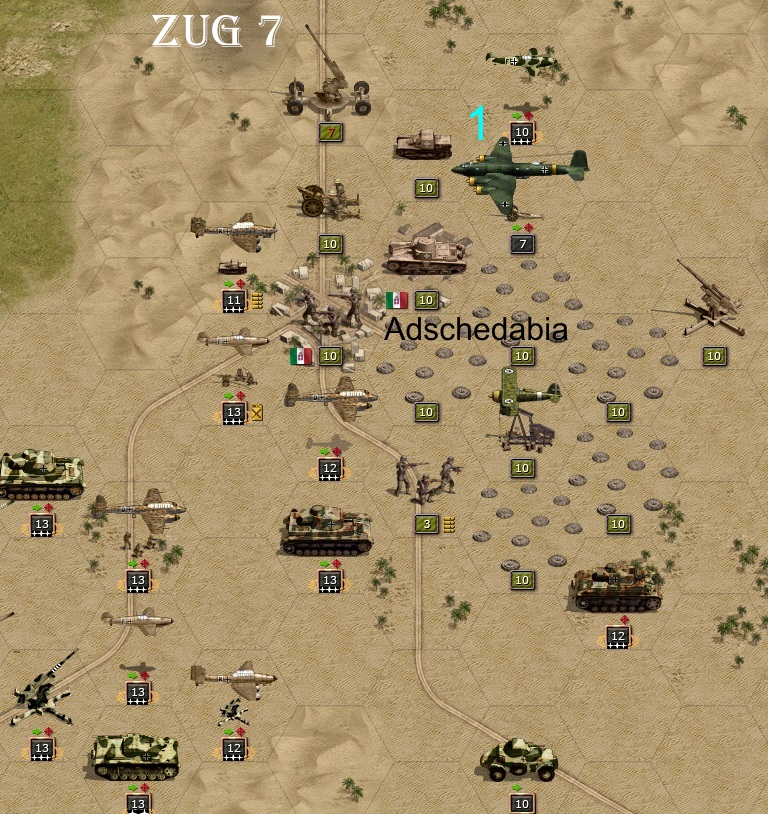
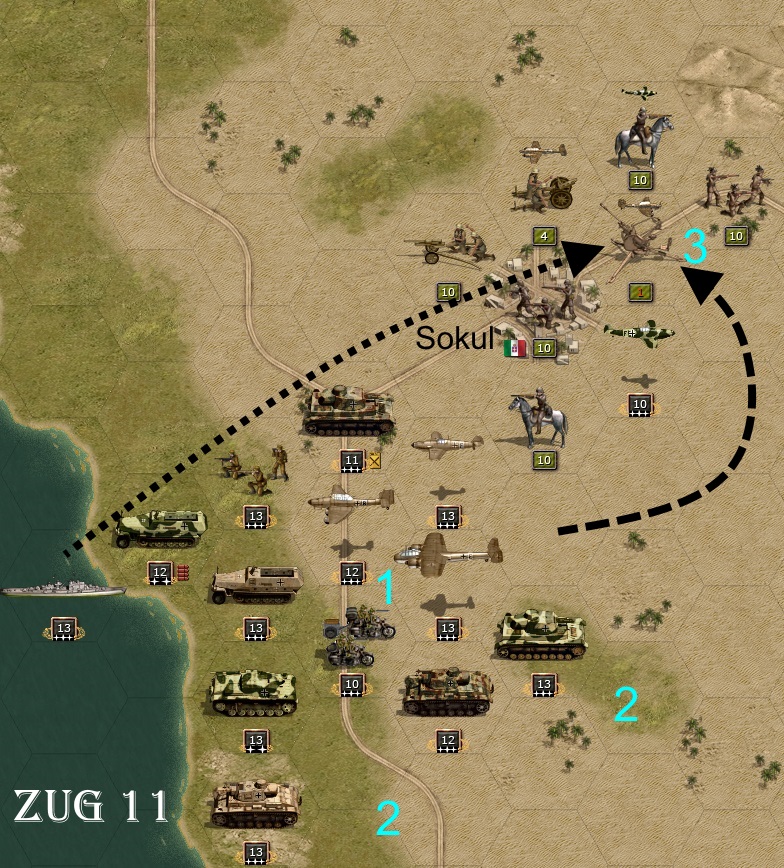
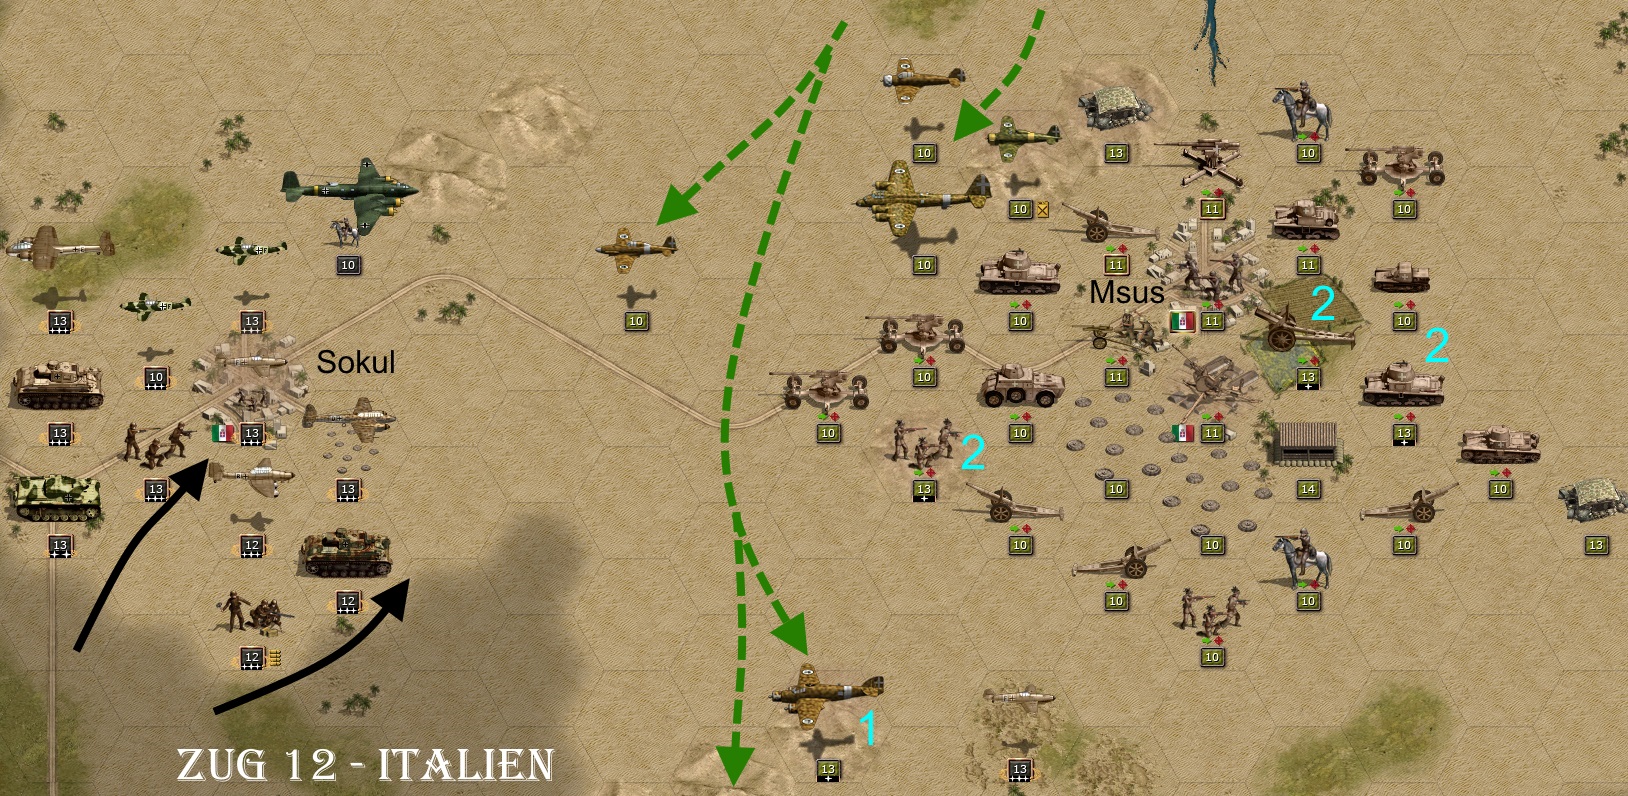
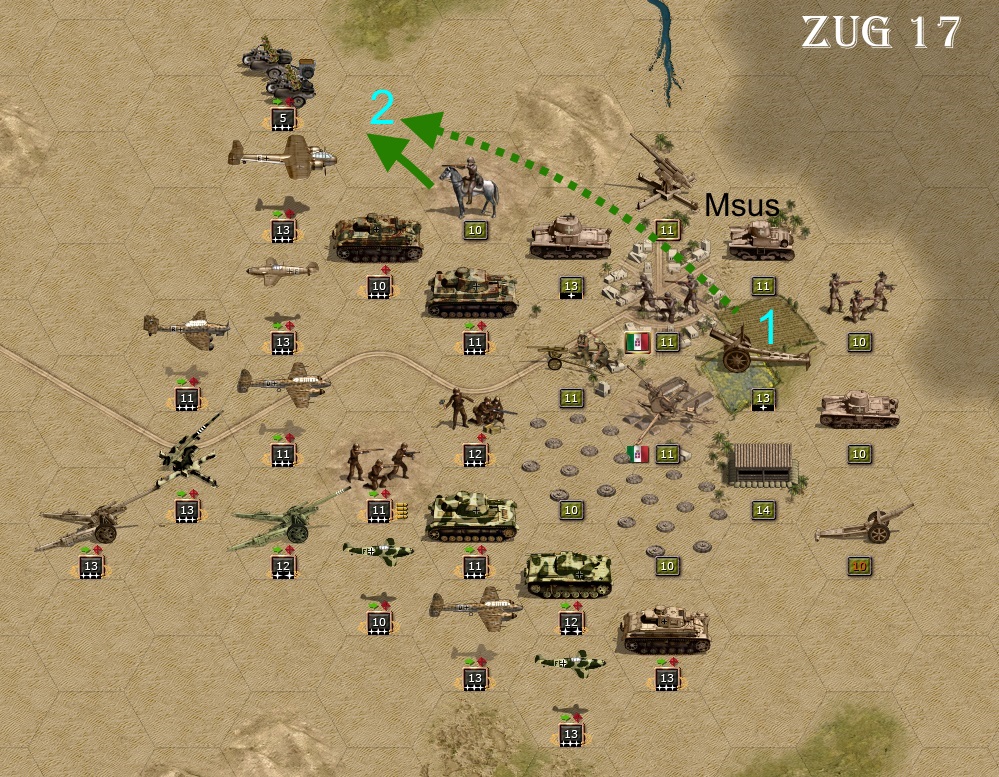
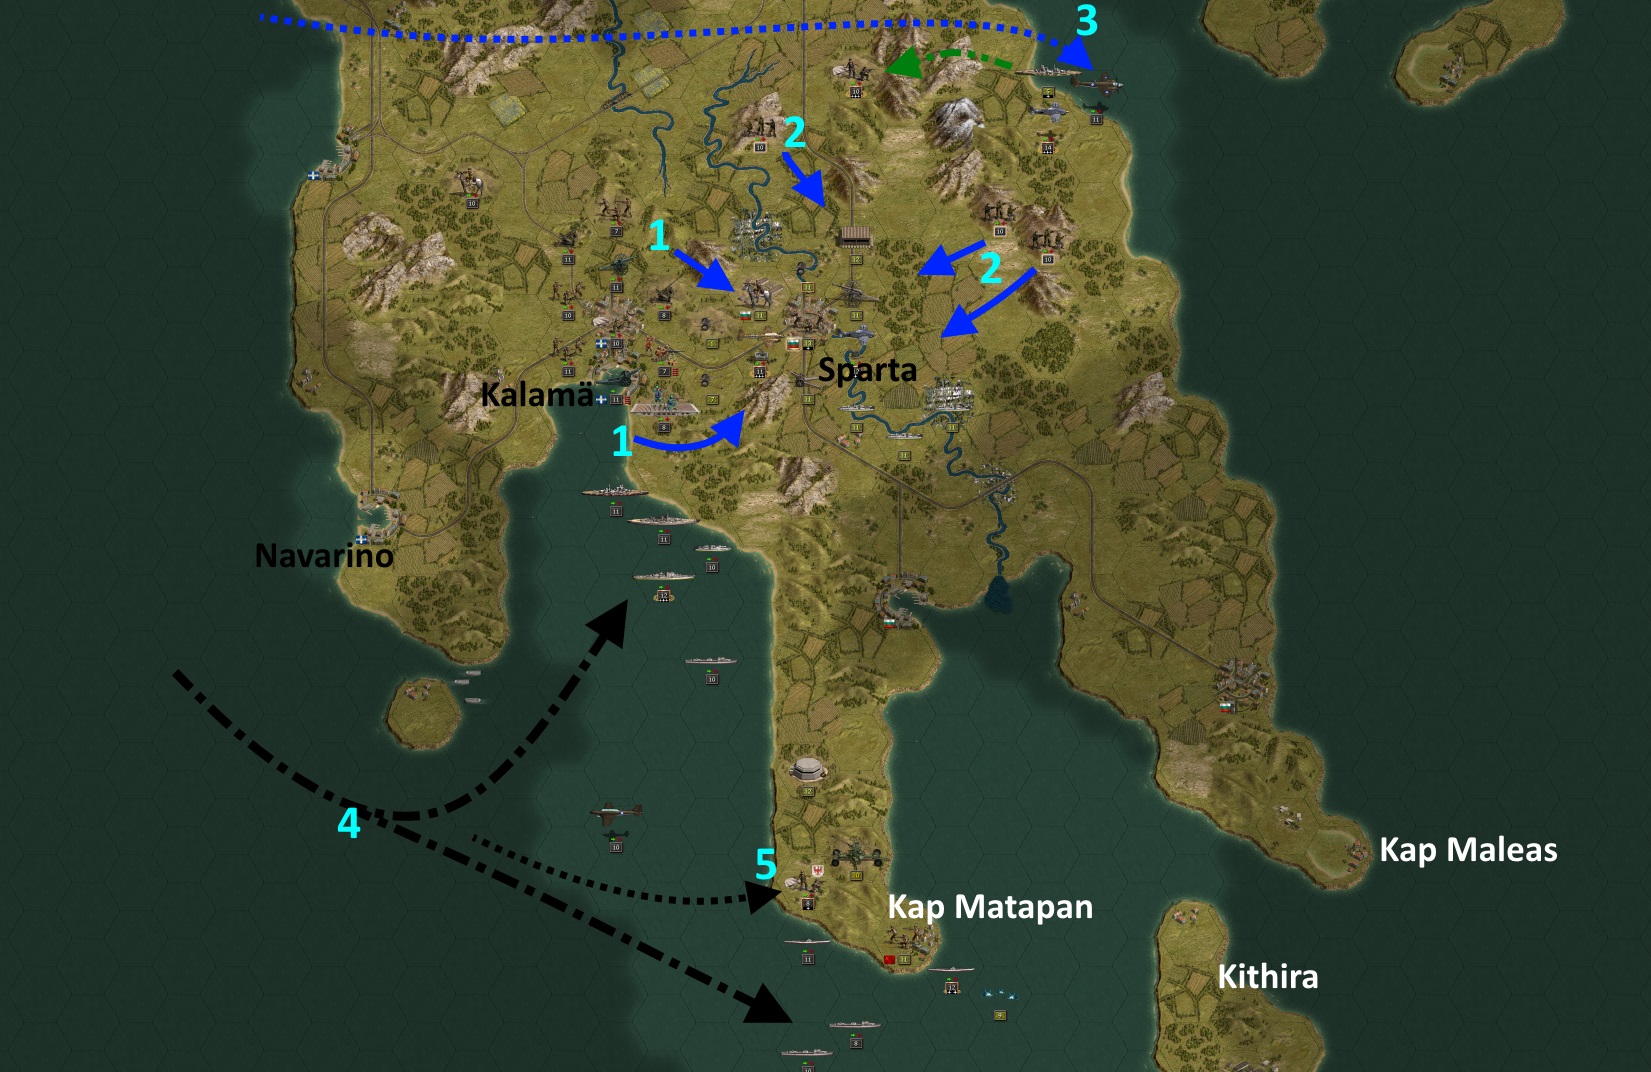
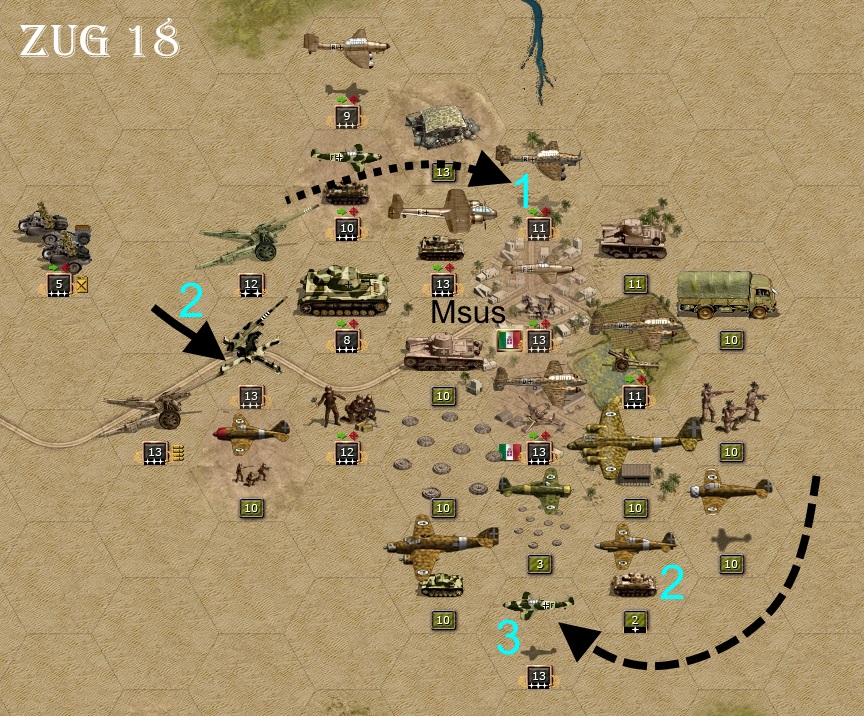
(28) With a Stuka and the Do217, the two artillery units are further weakened (1). The Me110 destroys the last remaining AA (2) and then moves to its own airfield due to lack of fuel. One tank unit attacks the field fortifications, but remains in place so that it can continue to be covered by the fighters that previously shot down the two stricken Italian fighters. The second Me110 attacks the last remaining enemy fighter and halves its strength (4). A Me109 approaches from the south (5) and can intervene in the next turn. The enemy still keeps his 3 bombers fully intact, but has only one fighter left with half its strength. This means that my bombers can manage without cover for a short time.
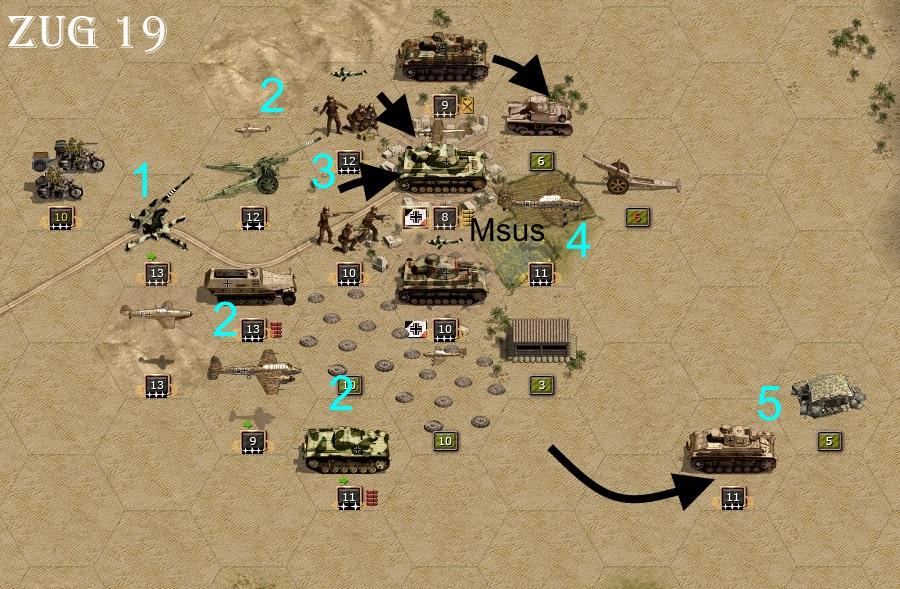
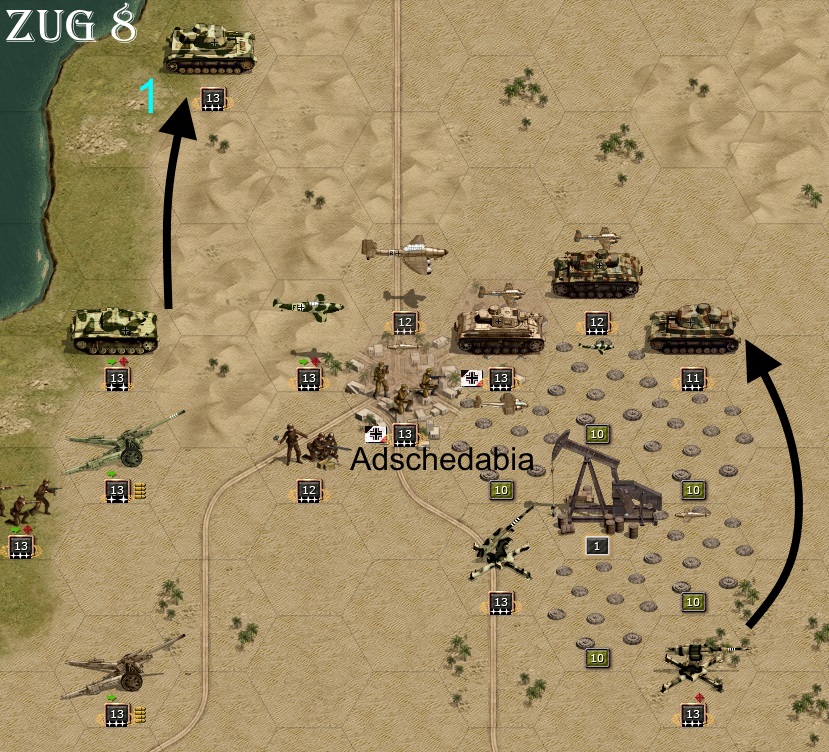
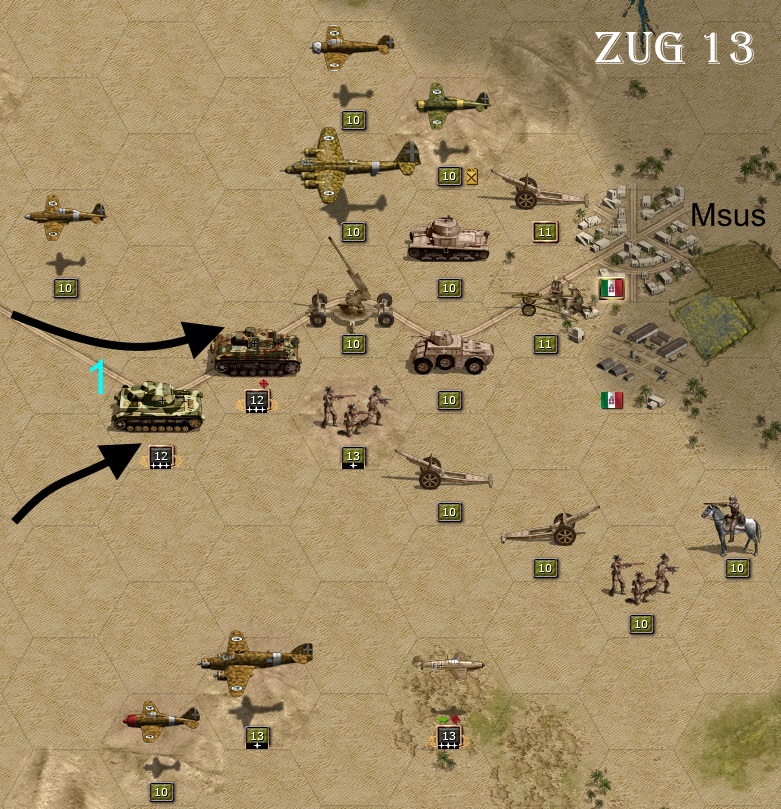
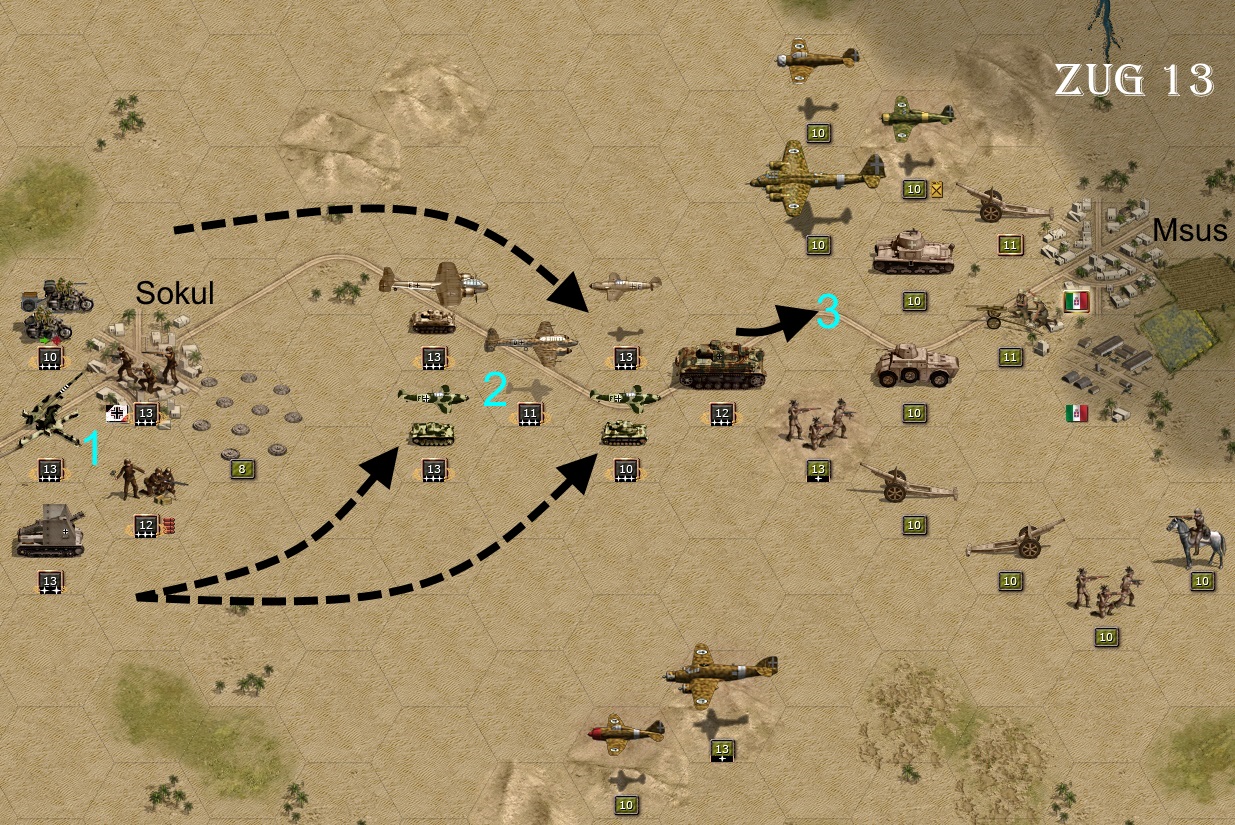
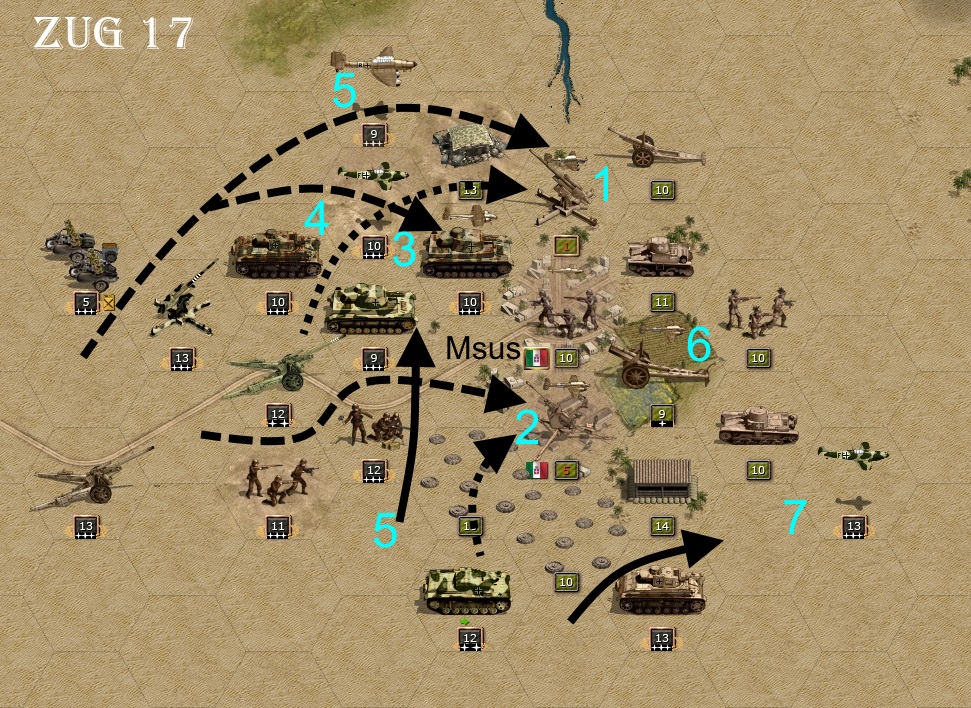
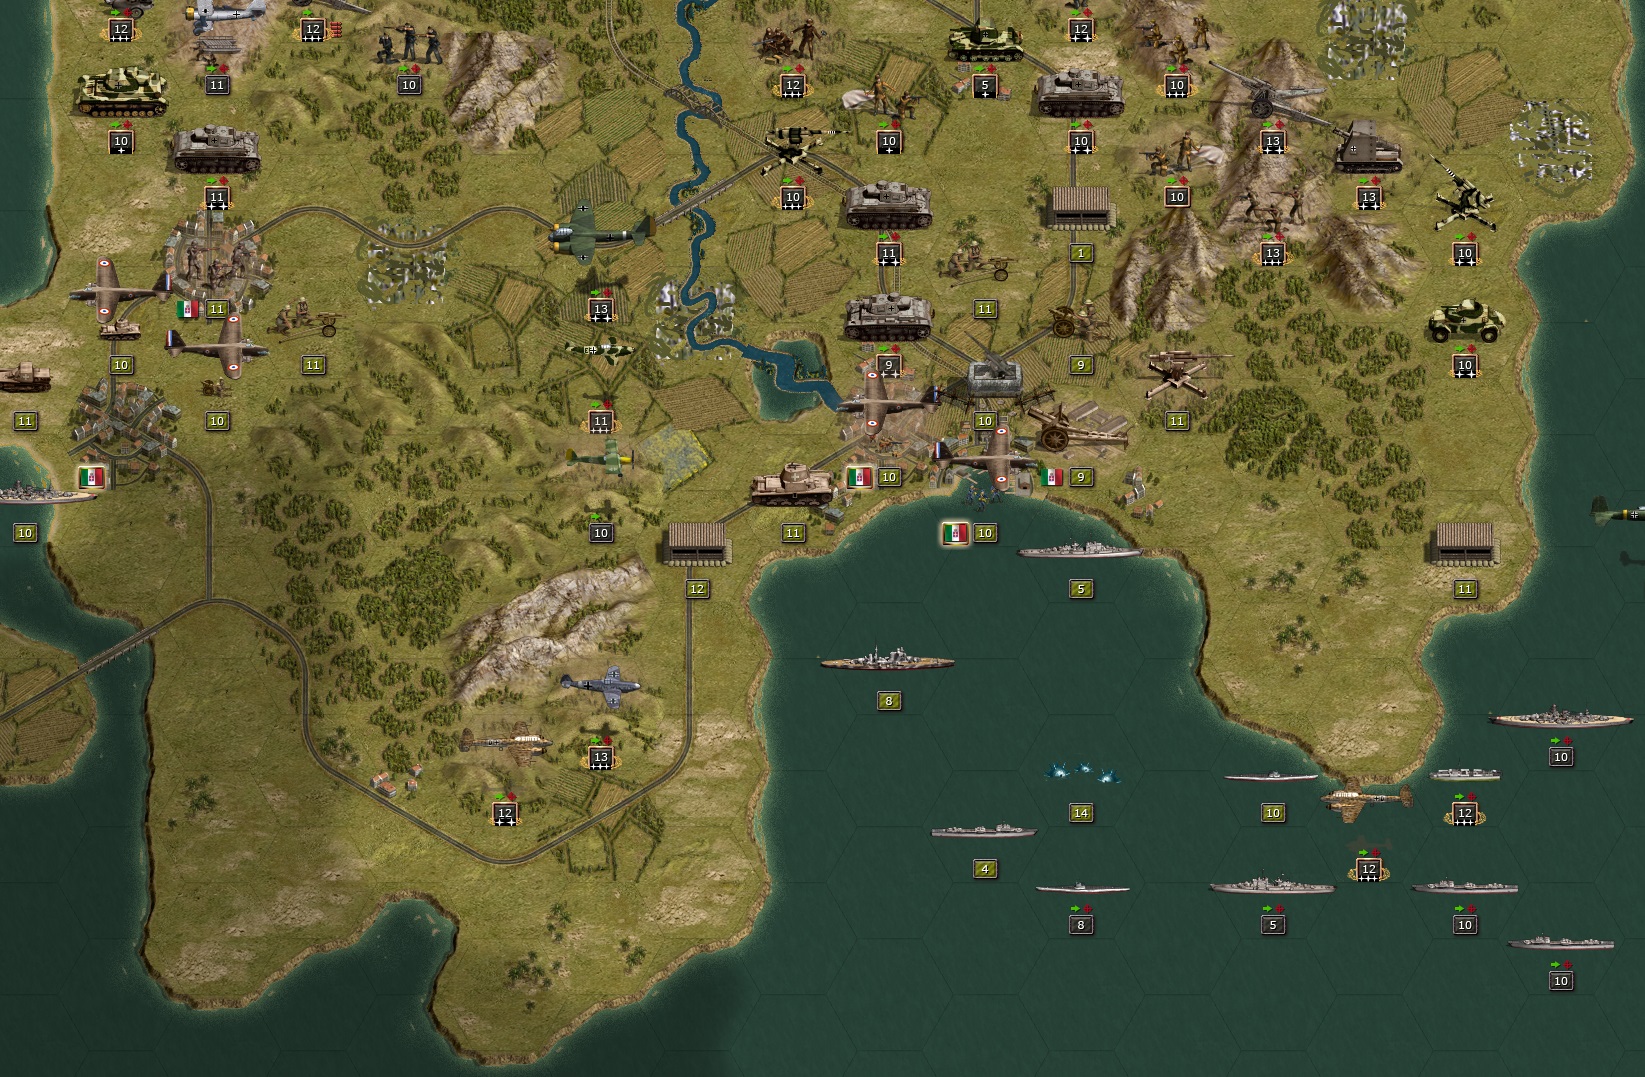
(29) The enemy bombers hardly find a point of attack and can only cause minor damage. Subsequently the fighter is shot down by the AA (1) and the 3 bombers (2) by the Me109 and a Me110. With infantry and artillery Msus is taken (3). The I/StG3 Stuka destroys the battered hero artillery (4). While a tank unit (5) rushes into a camouflaged MG position and loses 2 strength points (5). However, this only slightly delays the successful conclusion of the battles at Msus.
This last scenario of the second campaign will run for another 19 turns until the two main objectives Bengasi and Derna have been conquered. But I will not go into that here, if only because of the otherwise excessive length. My aim is to present one possible way of successfully mastering the campaign. There may also be other variants, and each player will certainly have his or her own preferences. In my observations or descriptions so far, however, I have noticed that most people regard the AA as ballast and do not give it any special attention. Again and again I see Lets Plays where even otherwise good players forget the AA, even though it is present on the map, against enemy planes or only use it after their own fighters have been deployed as sweepers. I consider this to be a crucial mistake.
It is true that mobile AA in particular has only a low efficiency at the beginning. In addition, in the original game mobile AA can only be used against planes, and in the Grand Campaign up to 1941 there are not very many of them. Nevertheless, I recommend including an 8.8 from 1939 and a mobile AA from 1940 in the core area to slowly build them up and give them experience. In all further battles this will clearly pay off if they are then not forgotten on the battlefield.
In every scenario, and indeed in every game, you have to ask yourself at the beginning what the key position is. In Panzer Corps, in my opinion, it is clearly the mastery of airspace. In this respect, it must be said that the developers of this game were completely right, because air domination was the clear guarantee of victory in World War 2. Only rarely did the side win a battle that did not dominate the airspace. Arnhem in September 1944 was such an exception. Anyone who has ever dropped his paratroopers into too heavily defended terrain knows why. Why the planes are so important now can be seen from how uniquely fast a centre of gravity can be formed with them. Within a very short time, an enormous density of fire can be concentrated on a limited, decisive area, which means that even a strong defence cannot hold out for long.
I think many players will agree with me on this. They also like to equip their core troops with bombers and fighters in sufficient numbers. In this respect, the makers of the game should perhaps have called it 'Air Fleet' or something similar, instead of Panzer Corps. Now, as far as the key position of the game is concerned, one should go a step further and ask how air supremacy is achieved. Basically quite simple - the enemy planes must be destroyed and the enemy AA eliminated.
The enemy planes can be decimated by fighters (and some tactical bombers like the Me110) and your own AA. Here the sequence must be observed. Shots by AA are preferable to fighter attacks, as the AA does not receive counterfire. The AA acts here similarly to artillery in ground combat. So the AA shoots first - and at whom? It is a matter of air superiority first. The enemy bombers act on ground targets, so they are secondary in terms of pure air superiority. So the enemy fighters, who are a danger to the bombers and the fighters, are to be eliminated in the first place. At the same time, the area over which the planes are moving plays an important role. Is the area occupied by own or foreign ground troops. Does the enemy have AA nearby that can intervene in the air battles? If so, it should be eliminated as a matter of priority in order to keep losses low, especially among the fighters. How do I effectively eliminate AA? One way is to put a tank next to the AA and hit it - boom. Now, you are usually not lucky enough to have the enemy AA exposed, but it works from the rear. It gets really nice when several AA units are encountered with an overlapping field of fire. Then it gets tricky. Here, own artillery with a long range is an important tool. That is why I rarely equip myself with launchers, which are usually only designed for short range. With an artillery strike, the enemy AA can be suppressed to some extent and usually be hit a little. This is immediately followed by an attack with a tactical bomber as strong as possible. A Stuka is particularly useful here, as it can hit the AA precisely and damage it badly, or even destroy it completely if you are lucky. Once the AA is out of play, the enemy planes are attacked by the fighters and the enemy ground units by the remaining bombers. A massive centre of gravity build-up takes place, first softening up the enemy line and then causing it to collapse.
To me, this gives the primary order of attack - enemy AA, then fighters, bombers, artillery and only then tanks and other targets. Conversely, this also means that when I have friendly fighter cover, I prefer my bombers to ground units. Ground troops can usually withstand an air strike sooner than a bomber. Moreover, a ground unit can usually only receive one air strike per turn. In contrast, a friendly bomber may well be attacked by 2 or 3 of the enemy's fighters in one turn, which can easily be its end. In order to provide cover for the ground troops, the own AA comes into play again, which also has an important defensive effect, whereby a series of enemy air strikes can be defeated at a high loss for the AI.
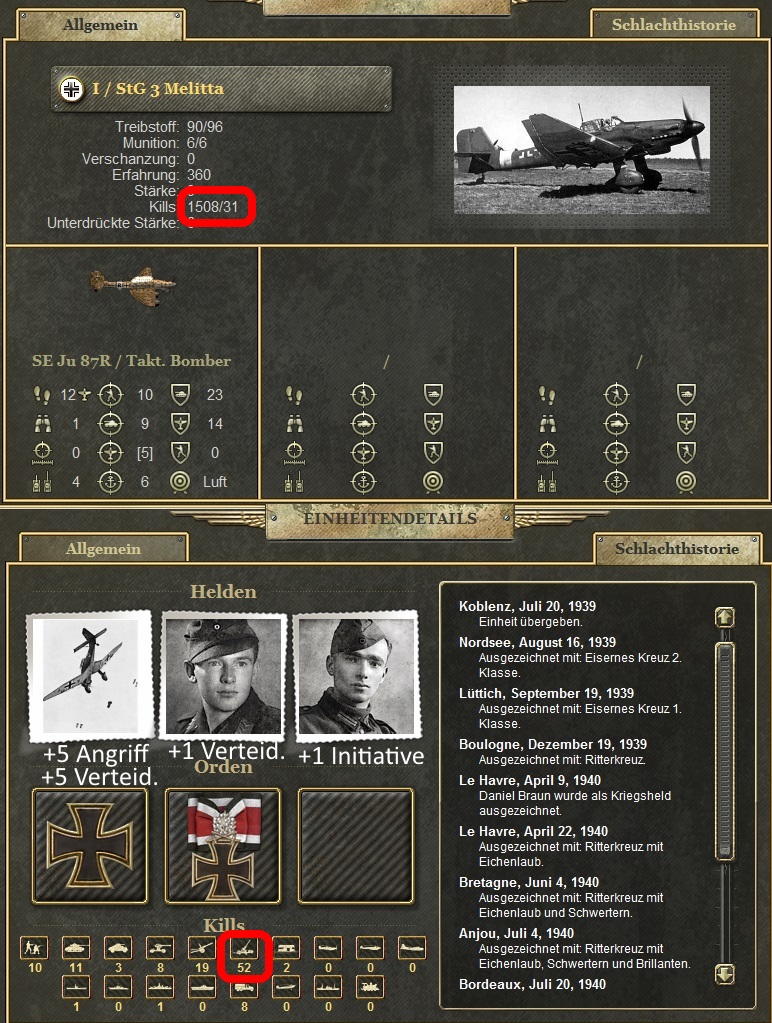
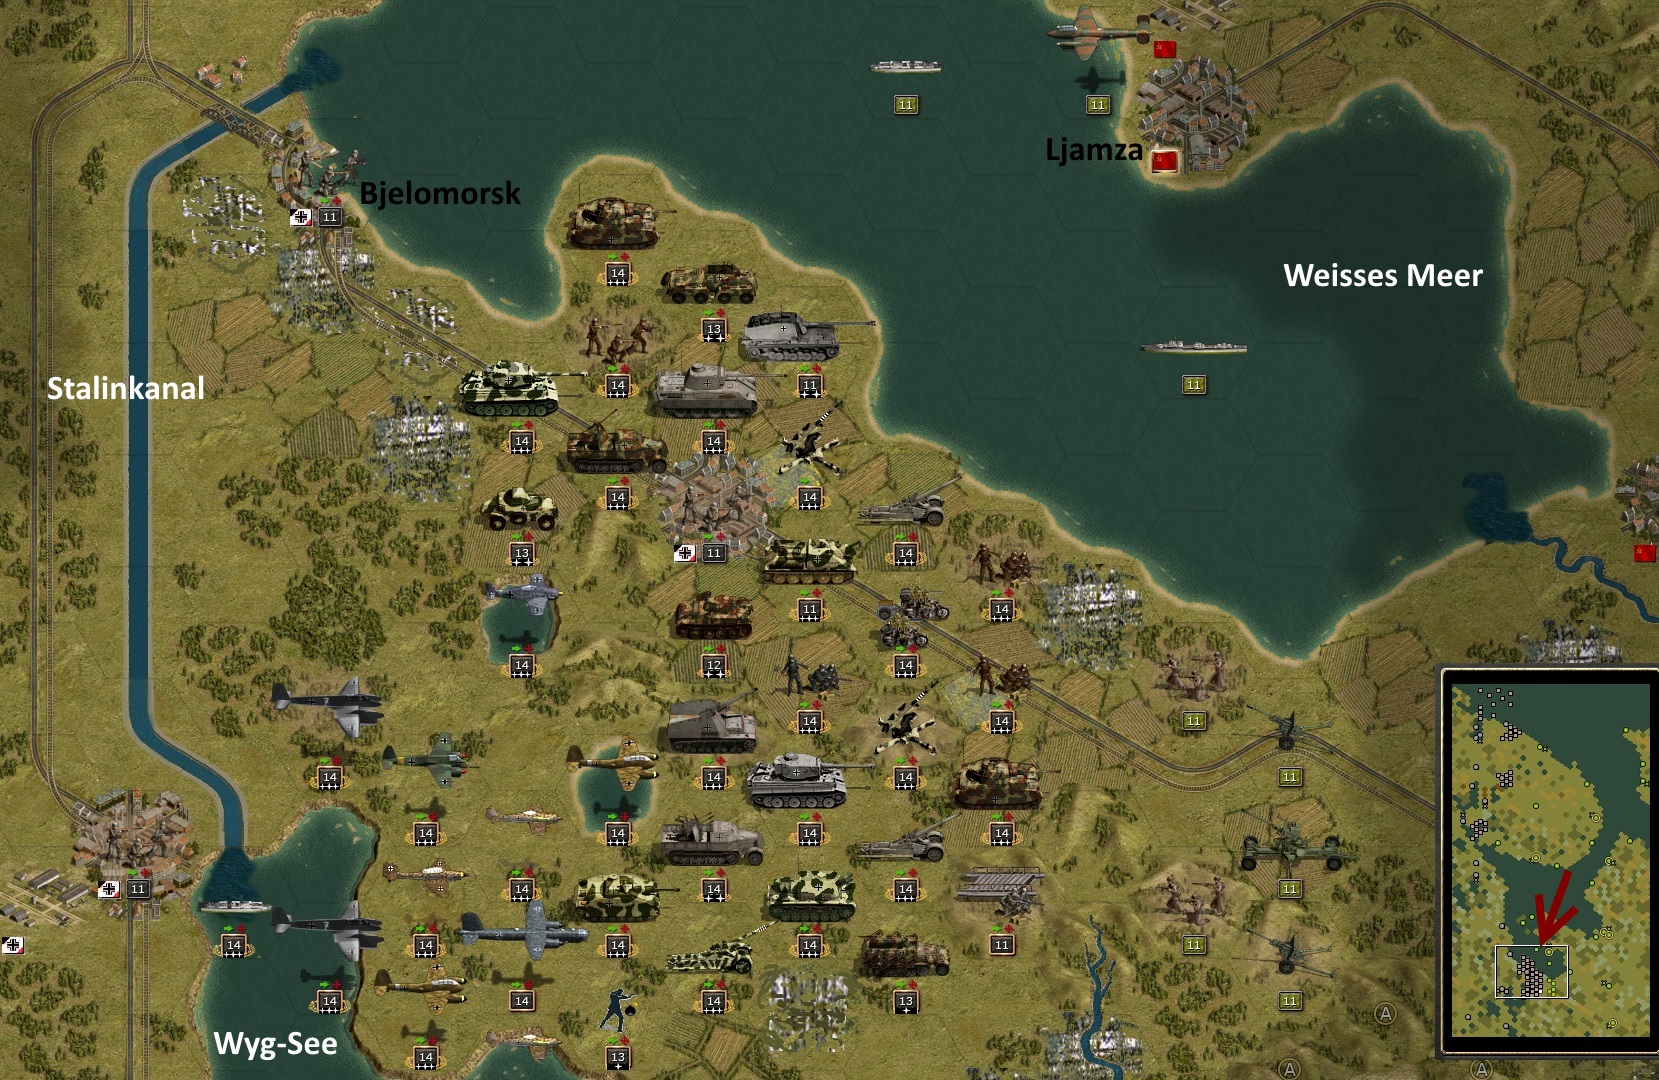
Ultimately, however, each player must follow his own intention. There is not only one way to reach the goal. Finally, I would like to draw attention to a unit that played an important role in my little presentation. It is the Special Stuka (I/ StG3), which is equipped with the heroine Melitta von Stauffenberg (+5 attack, +5 defence) and is handed over in the 3rd scenario of the 2nd campaign (Koblenz). The figure is similar to the 'Rudel-Stuka' (+9 attack, +9 defence, +1 movement there) in the Grand Campaign. As soon as this flier has some experience, which does not take long with the many battles, this unit can become a real killer, a unit that can take out enemy figures with one blow. If you then find the right field of activity for it, it can develop into a real killer squad, as you can see in the last picture. Where do you ever find a unit that destroys 52 AA units in 18 scenarios !?