Page 9 of 14
Re: DAW - Der andere Weg - The other way
Posted: Thu Sep 12, 2024 12:14 pm
by eskuche
Sonja89_1 wrote: Wed Sep 11, 2024 6:37 pm
However, I can imagine that a very strong AI would choose such a composition or another unusual variant...
Being likened to AI by a German is a high praise for an American

Re: DAW - Der andere Weg - The other way
Posted: Thu Sep 12, 2024 12:20 pm
by eskuche
Sonja89_1 wrote: Wed Sep 11, 2024 6:45 pm
The 1st scenario of the 2nd campaign begins like the first campaign in Saarland.
An interesting map, which one may play differently with foreknowledge of certain changes in objectives. I typically still head to Luxembourg regardless. Entrenched units are great fodder for experience gain (which is modulated by the attack::defense differential). Best to start leveling up those auxiliary unit Gustav applicants immediately! On my second playthrough I really started appreciating the value of mobile airfields more. In the future I would almost certainly make auxiliary AA into mobile airfields as a new thought.
Re: DAW - Der andere Weg - The other way
Posted: Thu Sep 12, 2024 4:45 pm
by Sonja89_1
eskuche wrote: Thu Sep 12, 2024 12:20 pm
In the future I would almost certainly make auxiliary AA into mobile airfields as a new thought.
That's right, the mobile airfields can be very helpful. However, you must remain focused when using them, as they can only supply 1 flying unit at a time. If 2 flying units run out of fuel in the same turn, one unit will be lost.
Incidentally, I have a “Japanese” attitude to robotics and AI, so I'm very positive about it. Fortunately, the zealous obstructionists (administrators and jurists) here in Europe will ultimately be forced by America and Asia to go along with this development, even if they would prefer to sleep through it.
Re: DAW - Der andere Weg - The other way
Posted: Wed Sep 18, 2024 6:56 pm
by Sonja89_1
In the 2nd scenario “Pfalz" (Palatinate), the player has to fend off a fierce French counterattack. The attack goes northwards from northern Alsace along the Rhine and through the Palatinate Forest. The enemy's final objective is Mainz. Initially, the player only has a few weak and widely scattered aux units at his disposal in addition to the core troops, which the French advance hits with full force. The losses in this mission can be correspondingly high. In fact, this 15th scenario in total is the battle with the heaviest losses for me and the AI so far.
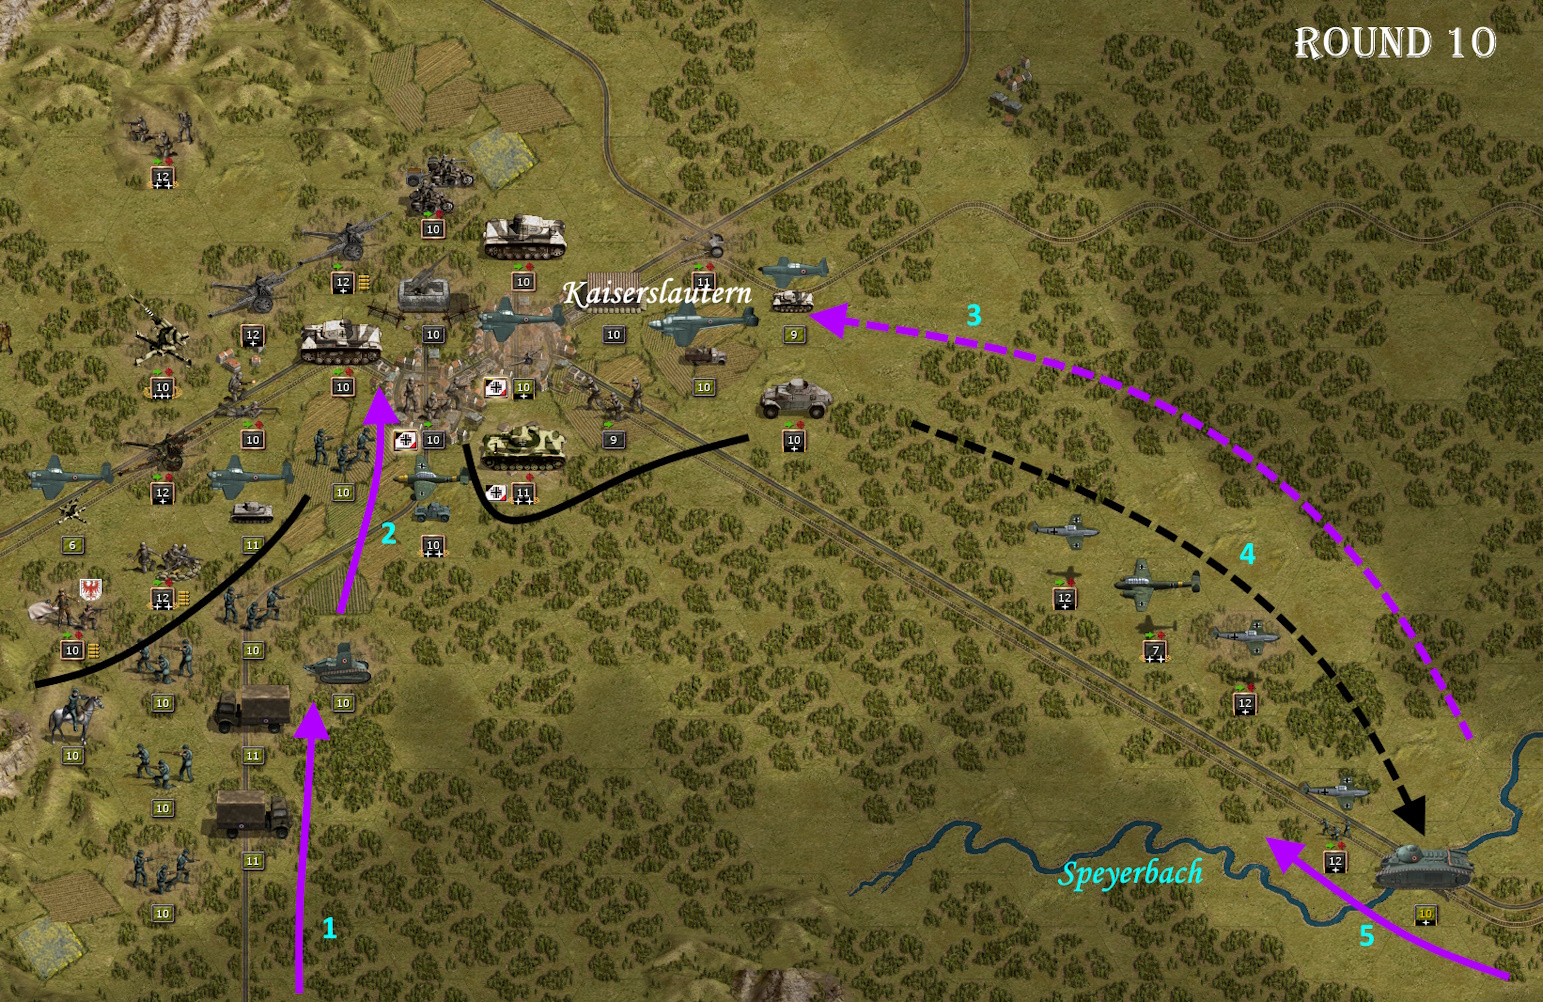
- Pfalz-10.jpg (970.52 KiB) Viewed 10596 times
In the first picture we take a look at the situation in turn 10. My core force is defending around Kaiserslautern and fending off the next enemy wave. To my advantage, the French have to stick to the only north-facing road as far as possible due to the many wooded areas (1). Nevertheless, they advance as far as Kaiserslautern (2). Heavy air attacks (3) accompany the advance. But even my air units are not idle and confront French troops in the area of the Speyerbach (4). However, I let the initially overpowered Char B1 (5) attack further north and then attack him with infantry in the forest area, thus taking him out of the game.
The two main attack axes (6 + 7) of the French are visible on the strategic map. The attack on Kaiserslautern can be completely blocked by my core force. Meanwhile, however, the enemy attack on Neustadt and Speyer and subsequently on Ludwigshafen (8) progresses relatively easily for the French. Short-term resistance could be put up, but the enemy was too strong to hold them off any longer. Only on the heights of Worms (9) do I succeed in establishing a balance of forces with the reinforcements of Aux troops (10) now arriving. The heaviest fighting then took place in this area, with the heaviest losses for both sides. Only at the end of the mission do I succeed in disengaging enough core troops from the defensive battle near Kaiserslautern and also liberate Speyer and Ludwigshafen in a counterattack via Neustadt.

- Pfalz-27.jpg (1016.47 KiB) Viewed 10596 times
Re: DAW - Der andere Weg - The other way
Posted: Wed Sep 18, 2024 7:16 pm
by eskuche
This scenario is quite interesting regarding the distribution of core forces. I airdrop 2 Brandenburger squads to the east to help ambush enemy vanguard recon along the roads. Allowing enemies north of Worms allows you the recapture prestige and also better terrain to force surrounds. I always fall for the greedy trap of trying to attack through Neustadt and towards (7); these are completely unnecessary. There is plenty of prestige in terms of auxiliary to evacuate here.
Regarding the western defense, it is not trivial, as depending on where and when you block the enemy lines, their artillery may stack up in the background and form an overwhelming force. In these situations I find camouflaged units (AT and Brandenburgers) extremely useful, since they can effectively attack more than once a round, in order to thin the enemy ranks. Finally, strong enemy mobile anti-air units with heroes first show up here, if I remember correctly.
Re: DAW - Der andere Weg - The other way
Posted: Thu Sep 19, 2024 8:12 pm
by Sonja89_1
eskuche wrote: Wed Sep 18, 2024 7:16 pm
Finally, strong enemy mobile anti-air units with heroes first show up here, if I remember correctly.
It is true that the first mobile enemy AA units appear in this mission, including one with a hero figure. These units can be very unpleasant for your own air forces.
In fact, it is advantageous to use the ample space available to evade them and let the French conquer a few cities to gain additional prestige later on when they recapture. Just don't start the counterattack too late.
Re: DAW - Der andere Weg - The other way
Posted: Wed Sep 25, 2024 3:36 pm
by Sonja89_1
The “Koblenz” mission concludes the starting trilogy of the 2nd campaign. The first three scenarios of this campaign are connected to a certain extent. The French first let us advance on Saarbrücken (scenario 1), which only led us deeper into their trap. Then came their attack in the Palatinate (scenario 2), and finally the western attack on Koblenz. Everything is conceived as an extensive encirclement of the southern Rhineland. However, before the enemy can form a large encirclement, the player has the opportunity to lure the enemy into a trap in the 3rd scenario “Koblenz”. To do this, however, it is necessary not to oppose the French attack straight away, but to let them push through to Koblenz and only then push into their weakened flank. So if you have enough discipline and follow the instructions in the briefing, this mission will be much easier to accomplish.

- Koblenz-24.jpg (931.63 KiB) Viewed 10395 times
24th turn - the mission is already well progressed. The French have advanced as far as the Rhine and the lower Moselle. Again and again they try in vain to cross the Moselle at Koblenz and just south of it (1). The defensive position is so favorable that it can be held relatively easily even with weaker troops. South of Koblenz, the enemy can form a small bridgehead with individual units from time to time, but it is not possible to establish a permanent foothold. On the eastern bank of the Rhine on the Ehrenbreitstein heights stands the German headquarters, which must not be destroyed (2). After the rear lines were penetrated, the French ran out of supplies. They run out of fuel and ammunition. Now even weakened own troops can help to clear the cauldron (3).
The strategic map shows the overall operation. The French start from Prüm (4) and Bittburg with two attack axes via Gerolstein, Daun, Mayen and via Wittlich (5) and Cochem in the direction of Koblenz. The geography narrowed the attack more and more until it came to a head at Koblenz. Meanwhile, the Aux attack troops gather north of Adenad (6) and the core troops south of Zell (7). Wait for the right moment until the “mouse” has scurried into the trap (8). Then attack from the north and south and form the cauldron (9). The weakened troops then head east to “collect” the trapped French, while the intact troops conquer the still strongly defended Bittburg with an encircling attack (11).
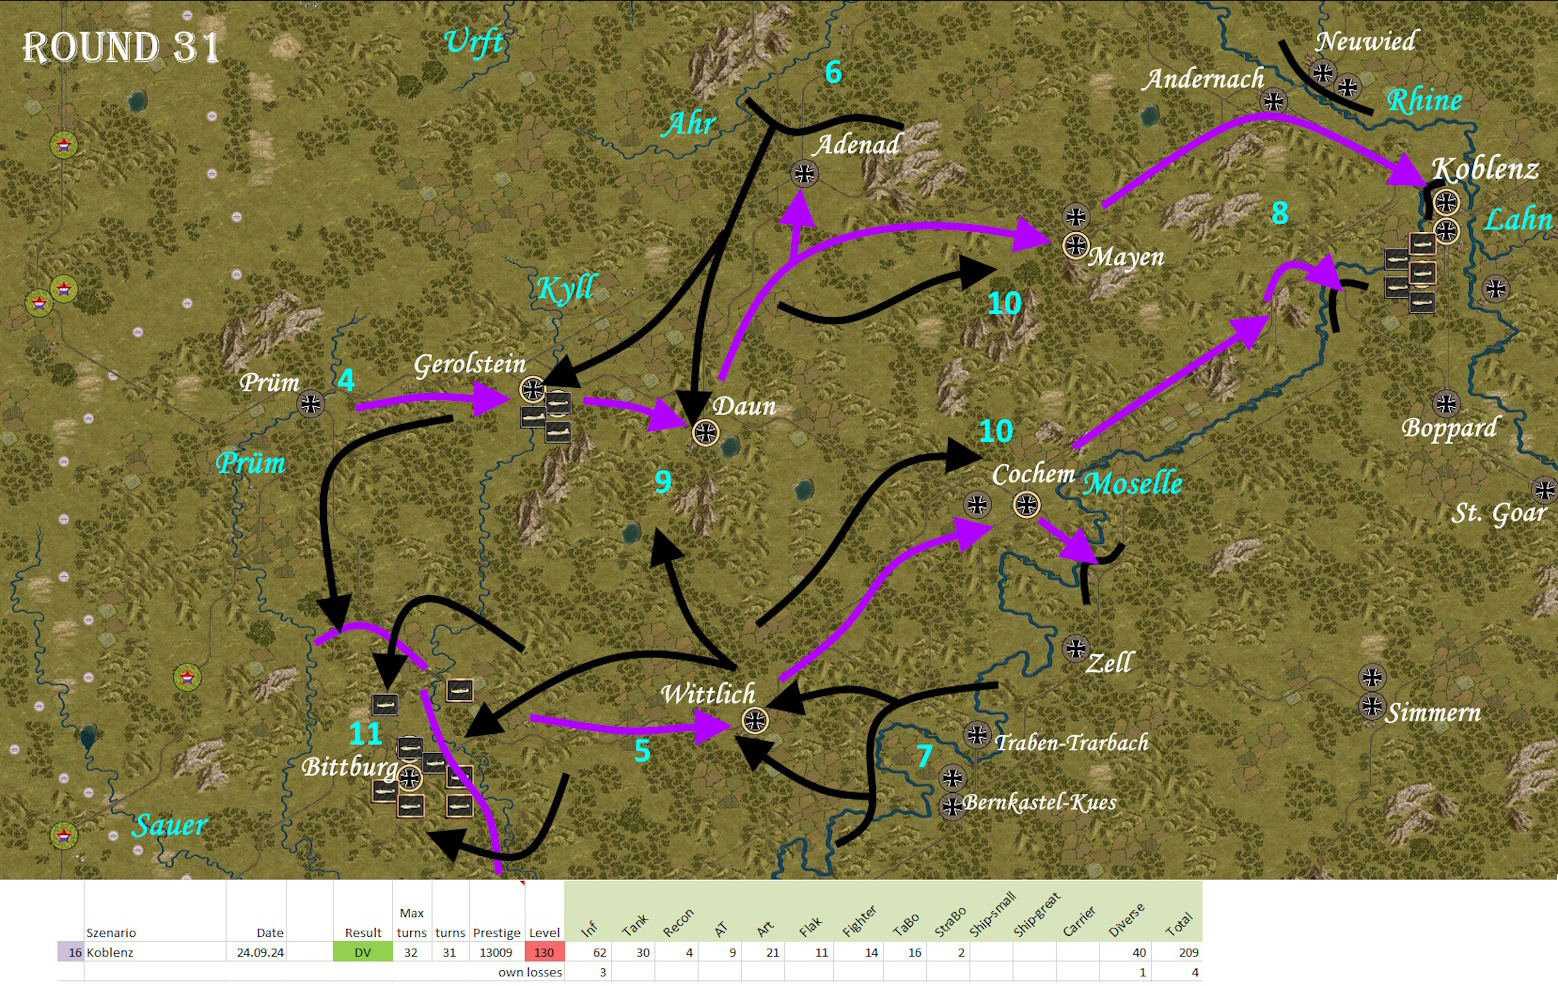
- Koblenz-31.jpg (955.98 KiB) Viewed 10395 times
In terms of difficulty, I have now reached the level of “Field Marshal” + “Rommel” with this mission. Now come the increases (Guderian + Manstein), which have a direct effect on the course of the game. So it's slowly getting noticeably harder.
Re: DAW - Der andere Weg - The other way
Posted: Wed Oct 02, 2024 2:21 pm
by Sonja89_1
After the “Koblenz” mission, the player has the choice between 3 paths - France-West, France-East or Italy. I will choose the rather inconspicuous path France-East via Reims, Strasbourg, Lyon to Toulon for this run. The first scenario in this path, called “Givet”, caused me the most problems during the two test runs in 2016+2017. I finished both test games with a “loss” at the time. I defused it twice afterwards. Now I should finally be able to achieve a DV, right?

- Givet-15.jpg (938.97 KiB) Viewed 10100 times
In the first picture we are already in turn 15, with our own troops approaching Givet and attacking the French forces east of the Meuse (1). A Panzer IV unit was hit hard by a French counterattack and thrown back (2). I subsequently take this unit out of the battle and lead it back. Southeast of it, one of my Panzer III units is attacked and decimated by Belgian mountain troops in a clearing surrounded by forest fields (3). With some effort, I manage to wear down these stubborn opponents. Meanwhile, my airborne forces (4) gather for the decisive blow. First, however, the enemy air defense must be weakened with an artillery strike. This is followed by a Stuka attack with a simultaneous attack by all airplanes on all available enemy ground units around Givet. A paratroop (5) is also waiting in the rear to take possession of the airfield north of Givet (not shown here).
Strategic map: The attack of the core troops (6) on the strong French defense line begins from the deployment on both sides of the river Kyll. After the breakthrough in the center, the enemy defense is rolled up from the flanks. This is followed by the conquest of Luxembourg (7). Care should be taken not to get too close to the Maginot Line to the south. All in all, I needed a little too much time for the breakthrough and the capture of Luxembourg. By the time I could get ready to attack across the river at the Meuse (8), 14 turns had already passed. The actual river crossing at Givet then took place quickly, but this was followed by a fierce counterattack by the French, which cost valuable time. Although I was still able to reach Maubeuge on the Sambre and get my hands on a second Meuse crossing at Charleville (10), there was not enough time left for the final primary objective of Sedan (11). I had to make do with an MV. But let's look on the bright side - there's no additional difficulty increase for the next mission. Besides, I didn't suffer a single total loss in this scenario, although some units were hit hard.

- Givet-24.jpg (1010.65 KiB) Viewed 10100 times
Re: DAW - Der andere Weg - The other way
Posted: Wed Oct 09, 2024 7:23 pm
by Sonja89_1
In the 5th scenario “Reims”, the attack continues from the Meuse crossings at Charleville and Sedan towards the southwest. According to the scenario name, the main objective is Reims. The special feature of this mission is the fierce French counterattack with tanks, which the player must master in addition to the locations to be conquered. After only achieving an MV in the previous mission, there was no further increase in difficulty here. The level was therefore “Field Marshal” + “Rommel” + shortening the duration of the game by 1 round.

- Reims-9.jpg (970.79 KiB) Viewed 9836 times
By the 9th turn, I had fought my way close to Reims (1). However, the infantry in the city was already under considerable pressure from the strong French garrison. The troops suffered heavy losses. In this situation, there was an extensive counterattack from the French side (2+3). The French cross the Marne and advance to the north. At Soissons, I deploy my Stuka groups on the enemy tank columns, weakening them considerably (4). Nevertheless, they continue to advance unwaveringly towards Laon and drive directly in front of my strong 8.8 detachment (5). How will this end? East of Reims, 2 French bomber groups attack my units (6). The infantry in the forest is only hit relatively lightly and the armored unit - not at all, as it is covered by flak. The tank attack at this point is repelled by a well-positioned Pak detachment (7).
Strategic map: From the Meuse crossings, the advance is divided into 3 groups in a southerly and westerly direction (8). After overcoming the Aisne, Reims was attacked from two sides, frontally and from the north (9). At the same time, the French launched their first strong counterattack, advancing west of Reims as far as Laon (10), where they ran out of strength and the attack collapsed. When Reims falls into my hands after fierce resistance, the other primary objectives (11) are much easier to conquer. Just as I reach Vitry, a final heavy counterattack is launched in the direction of Epernay (12), but this can be repelled. The last enemy armored units are wiped out and the battle is successfully concluded.

- Reims-21.jpg (604.38 KiB) Viewed 9836 times
Re: DAW - Der andere Weg - The other way
Posted: Wed Oct 16, 2024 3:59 pm
by Sonja89_1
After the “Reims” mission, the troops turn to the east and attack the French in Lorraine between Verdun and Nancy on a reverse front, so to speak. As a result, the troops mainly encounter a rather unprepared defense. There is also little chance of encountering heavier French tanks in this mission. A certain problem are the rivers that lie across the direction of advance (Aisne, Meuse, Moselle). This becomes a particularly tough nut to crack with the main objective of Nancy, which is located between the Moselle bend and the Meurthe.

- Nancy-12.jpg (998.12 KiB) Viewed 9620 times
The first picture, which shows the situation at the beginning of the 12th turn, once again highlights the problem of the strong defense of the main objective behind two rivers. Four strong enemy units (Pak, artillery, heavy infantry and flak) with superior strength and hero bonus are concentrated near Nancy, which can be really nasty (1). In addition, there is an additional air defense and an HQ with a wide field of view and firing range of 5, which makes an unnoticed and damage-free approach very difficult. At least I have a unit of Brandenburgers at the start, which can approach from the south undetected for several turns due to their camouflage (2). When all units are in attack position, the Brandenburgers cross the Moselle to the north and attack the enemy headquarters (3). This is reduced to 4 strength points by the attack and can only cause minor damage. Since you can gain 1000 prestige points (500 for “Rommel”) by capturing the HQ (place 3 of your own units next to this figure at the same time), I do not destroy it in the following turn.
A division of assault pioneers in boats approaches from the north across the Moselle (4). It won't do much damage to the empty enemy artillery in the boats, but it can ensure that the enemy artillery is limited in its ammunition. My 3 artillery units (one with +1 movement and one with +1 range), which move into good firing positions, are particularly important. Two of them take my primary target, the enemy flak on the Meurthe, under fire. Then my strongest armored force (6) moves forward and takes this dangerous enemy out of the game - bang! The slightly damaged French reconnaissance vehicle blocking the northern approach to Nancy is destroyed by another armored unit (Panzer III) (7). This is followed by attacks of my level bomber on the air defense and further attacks of the air force on the enemy defense. Within these 4 turns, the defenses in Toul and Nancy collapse without any heavy losses.
Strategic map: Starting from Valmy and St. Dizier, Verdun and Bar-le-Duc are taken relatively quickly (8). The crossing of the Meuse, on the other hand, proves more difficult (9). I attack somewhat hastily and get a few bruises. In the meantime there was a rainy day, which I used to safely reconnoitre the Nancy area on the following lap. I now know what to expect there and plan the decisive final attack from the north. But first I have to get Metz in my hands. With my slightly experienced and a newly deployed (Polish) paratrooper unit, I land far in the rear of Metz (10). In the process, my “old” paratroopers receive heavy fire from Maginot fortresses (11). Nevertheless, the quick assault on Metz succeeds from 2 sides (12). During the fighting, however, I lose my Kradschützen, on which the enemy fire was too concentrated - my first total loss of a core unit in the 2nd campaign so far. There will probably be a few more to come. Then comes the final attack on the remaining objectives (13), which can be seen in the first image. There is no defense, no matter how strong, that cannot be stormed by a good troop with the right means.

- Nancy-15.jpg (809.48 KiB) Viewed 9620 times
Re: DAW - Der andere Weg - The other way
Posted: Wed Oct 23, 2024 6:59 pm
by Sonja89_1
The year 1939 comes to an end with the 7th scenario “Strasbourg” of the 2nd campaign. After a long time, it is once again a winter scenario with corresponding restrictions due to the weather. In fact, I am often slowed down by the increased fuel consumption, which increasingly drags out the mission. In addition to capturing the primary objectives, the conditions for a DV are the destruction of all fortresses and forts of the Maginot Line and the preservation of at least 3 of the 4 camps with French prisoners. After all, it is an advantage that the attack comes from the west and the enemy can only defend itself in the narrow strip between the Vosges and the Rhine.

- Strassburg-11.jpg (1013.64 KiB) Viewed 9212 times
The first picture shows the main attack across the Saar at the beginning of the 11th turn (1). Meanwhile, my own units could be gathered around Strasbourg and Hagenau. To the north, some of my units, including 88 mm flak and paratroopers, have fought down several forts of the Maginot Line (2). The first attacks on the main defensive ring have begun (3). In addition to the strong, well-entrenched infantry, there is a fortress, an anti-aircraft unit and 2 artillery units in the center, one of which is particularly dangerous due to its superior strength and hero unit (4). In the picture there are 2 Stukas and an ME-110 over these targets to wear them down. Unfortunately, snowfall keeps getting in the way, slowing me down and forcing me to attack again. The losses in my own ranks increase and weaken the troops. On the left of the picture you can see an armored unit (Panzer IVD), which is retreating somewhat battered. The high visibility through the forts coupled with the long-range artillery (Range +2 = 5 hexes total) make every approach a gauntlet run. What a devil of artillery. Instead of waiting dutifully until I come and take it out of the game, it gives my 88mm Flak a sensitive hit (5). Following this, I lose an armored unit west of Hagenau with the Char B1 (still visible in the picture) when I position it too clumsily (6).
Strategic map: Of the 4 camps with prisoners of war, I was unfortunately only able to preserve 1. In the other 3 camps, the prisoners froze to death (7). They just can't stand anything, those French
It didn't help that I was able to fulfill the other conditions, the DV was gone. Otherwise, you can see the starting positions at Metz and Nancy (8) with the eastward attack north along the Maginot Line (9). The strong defense at Strasbourg has to be fought down laboriously, which costs a lot of time. I am only in Strasbourg on the 16th turn and have to hurry. I leave the French defense in the Vosges untouched and push southwards via Schlettstadt (10) and Colmar to Mulhouse (11). At the end of turn 29 I reach Belfort. 3 turns later, this tough mission ends with a lost core unit and an unusual new core force.
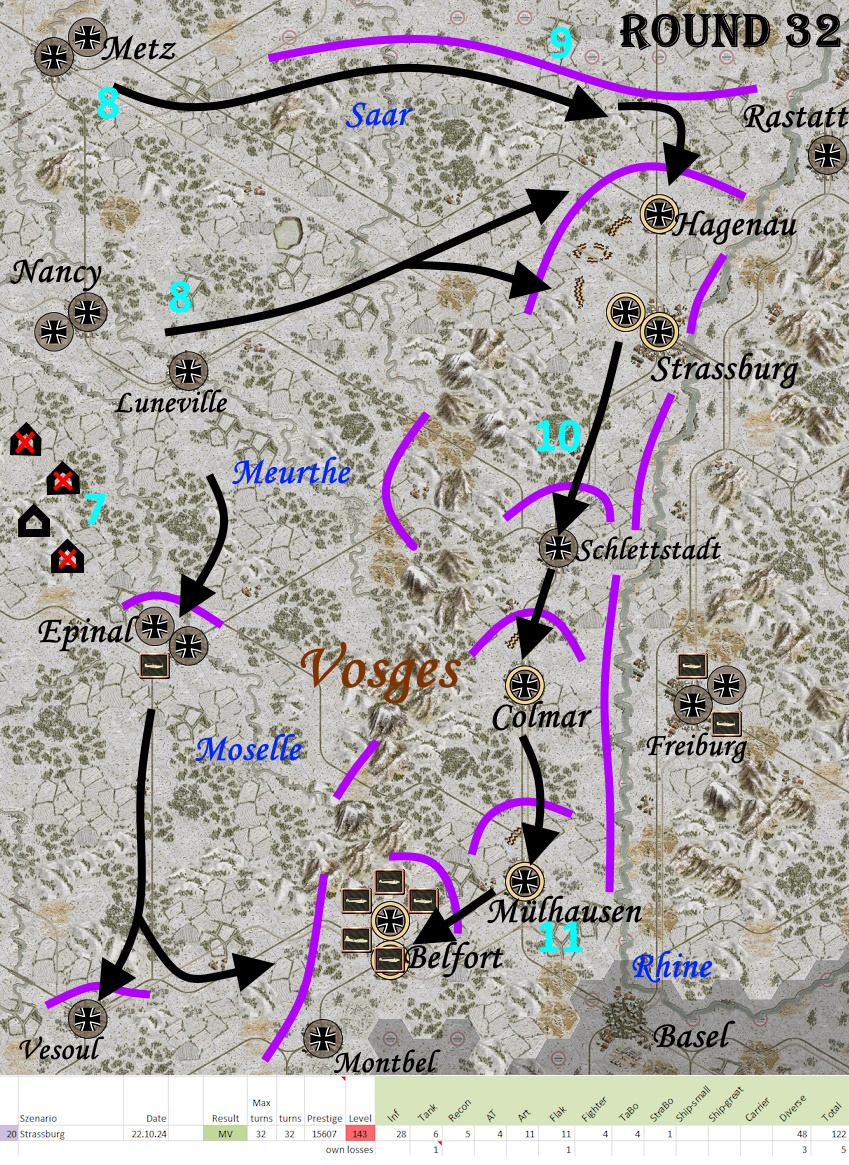
- Strassburg-32.jpg (747.48 KiB) Viewed 9212 times
Re: DAW - Der andere Weg - The other way
Posted: Thu Oct 24, 2024 6:36 pm
by eskuche
What are your thoughts on towed AA and AT? In Nancy, even if you do not go for many Brandenburgers, you can inch up with artillery mode AA and an AT camouflaged. This can, in conjunction with smart recon placement, get some surrenders and let you escape without being shot at by artillery and HQs.
Re: DAW - Der andere Weg - The other way
Posted: Thu Oct 24, 2024 8:02 pm
by Sonja89_1
eskuche wrote: Thu Oct 24, 2024 6:36 pm
What are your thoughts on towed AA and AT? In Nancy, even if you do not go for many Brandenburgers, you can inch up with artillery mode AA and an AT camouflaged. This can, in conjunction with smart recon placement, get some surrenders and let you escape without being shot at by artillery and HQs.
True, that would be an alternative. However, there had better not be any enemy counterattacks in this area, otherwise it could easily end in carnage - for both sides.
Re: DAW - Der andere Weg - The other way
Posted: Wed Oct 30, 2024 8:10 pm
by Sonja89_1
The campaign begins with the scenario “Dijon” in 1940. It is April, the weather is mostly good. After a break of several months, the enemy is heavily entrenched. The mission is designed for speed and is 28 turns long (30 in the standard version). To achieve a DV, you have to capture the objectives 5 rounds faster. This means that you must not take too much time for side issues.

- Dijon-17.jpg (1015.74 KiB) Viewed 8856 times
In the first picture, we jump straight to the beginning of the 17th round. This is a decisive moment. I had just fought my way up to Dijon (1) and was about to storm the city when a very strong enemy group (2) approaches from the west and encounters my units, some of which are already somewhat exhausted. These particular enemy units have an experience of 310, a strength of 14 each and a very strong hero figure each. Even without the additional difficulty level I selected, they have an experience of 250 and a strength of 13. They are an absolute killer force in this concentration. I had already seen 3 of these enemy units coming in the previous round. So they don't come as a complete surprise. But I thought to myself “it will be alright” and stuck with Dijon to wear down my battered opponents. I shouldn't have done that. My best tank detachment, which is no longer quite fresh, takes a heavy hit from the Somua unit and is thrown back (3).
There is almost nothing left of it and it only survives because the Char-B1 unit turns further east and attacks my paratroopers positioned in the forest (4). The enemy advance also continues east across the Saône towards Besançon. There, enemy artillery first receives hits from my bombers and then, due to a lack of reconnaissance, encounters my defenses and suffers considerable losses (5). A ray of hope, after all. Nevertheless, there is only one sensible option left in this situation - retreat, and that is Pronto (6)! The situation is made even more difficult by the fact that some of my units are running out of ammunition. At least I still have a clear advantage thanks to my omnipresent air force. Only the very strong enemy flak (7) has a very bad effect here. This little monster shoots the two Aux air units off the board before I can finally destroy this mobile flak.
Strategic map: Attack through the center of the enemy front (8) in a straight line towards Besançon (9). After the first primary objective is captured, a bridge unit is placed between the two main crossings over the Saône at an undefended river position (10). This gives you quick access to the west side of the river, where you can fan out quickly in various directions. Just as I had fought my way through Dijon's cover, the French launched a massive counterattack (11), forcing me to retreat temporarily. As the enemy focuses his attack on Besançon, I can gradually wear him down with my air units. At times it looked like a lost mission, but at the very end I managed to capture the 3 remaining primary objectives (12). However, the price for this MV was high and cost me a lot of prestige (13). You shouldn't afford such “successes” too often and you're not always so lucky.
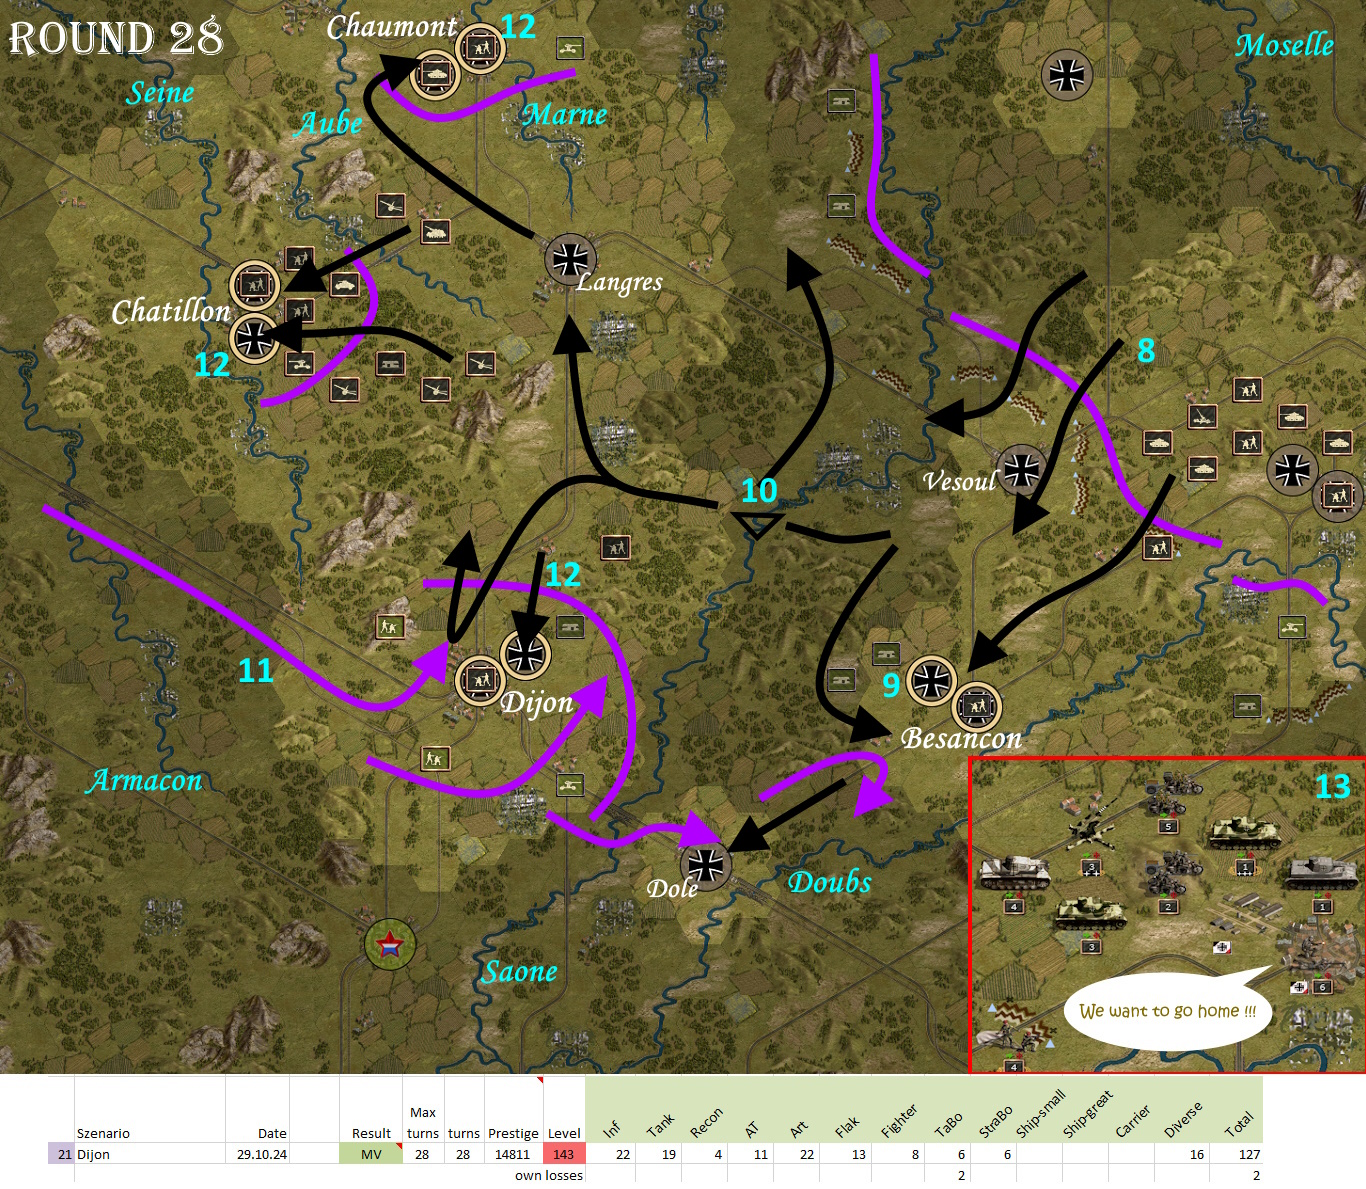
- Dijon-28.jpg (1017.62 KiB) Viewed 8856 times
Re: DAW - Der andere Weg - The other way
Posted: Wed Nov 06, 2024 4:11 pm
by Sonja89_1
The 9th scenario “Lyon”, the 22nd mission in total, finally saw the first failure. I didn't manage to complete all the primary objectives within the time frame I had set. The shortened number of rounds due to the higher difficulty level had a decisive effect here for the first time. For one MV I had to capture all the primary objectives, and for one DV I also had to take possession of a French chemical factory before it was dismantled.

- Lyon-23.jpg (1003.61 KiB) Viewed 8733 times
Shortly before the 20th lap, I arrive before the main destination of Lyon. The following picture shows the situation at the beginning of turn 23. My best tank unit has worked its way through the outer defense line (1) and is now directly in front of the city. On the other side of the Saône, paratroopers are also in front of the city (2). Three anti-aircraft units of the enemy are still shielding the airspace (3). I will be able to remove two of them from the game and then start air strikes. The city falls by the end of turn 25. Further east, a small battle group prepares to cross the Rhone (4).
Strategic map: From Dijon and Besançon, two groups of roughly equal size move west and east of the Saône towards the Rhone (5). Two strong defensive lines (6) had to be overcome. Lyon is then conquered by a concentrated attack (7). After that I try to reach the last objective Chambery, which I ... almost succeed. In the end, at least one move is missing to achieve success after all - see small picture (8). Despite the failure, I am more satisfied with this mission than with the “Dijon” scenario, where many units also suffered badly due to my mistakes. In “Lyon” I was able to achieve a loss ratio of 1 to 133 and no other unit was threatened with total loss. In this way, you can also cope well with a lost scenario.

- Lyon-30.jpg (763.27 KiB) Viewed 8733 times
Re: DAW - Der andere Weg - The other way
Posted: Wed Nov 13, 2024 7:23 pm
by Sonja89_1
After 3 scenarios without DV, I have once again achieved a complete success in “St. Etienne”. This mission consists of a “normal” conquest part, followed by a very fierce counterattack from the 14th turn onwards and the completion of a small special mission at the end. Special care must be taken to prepare for the French flank attack in time.
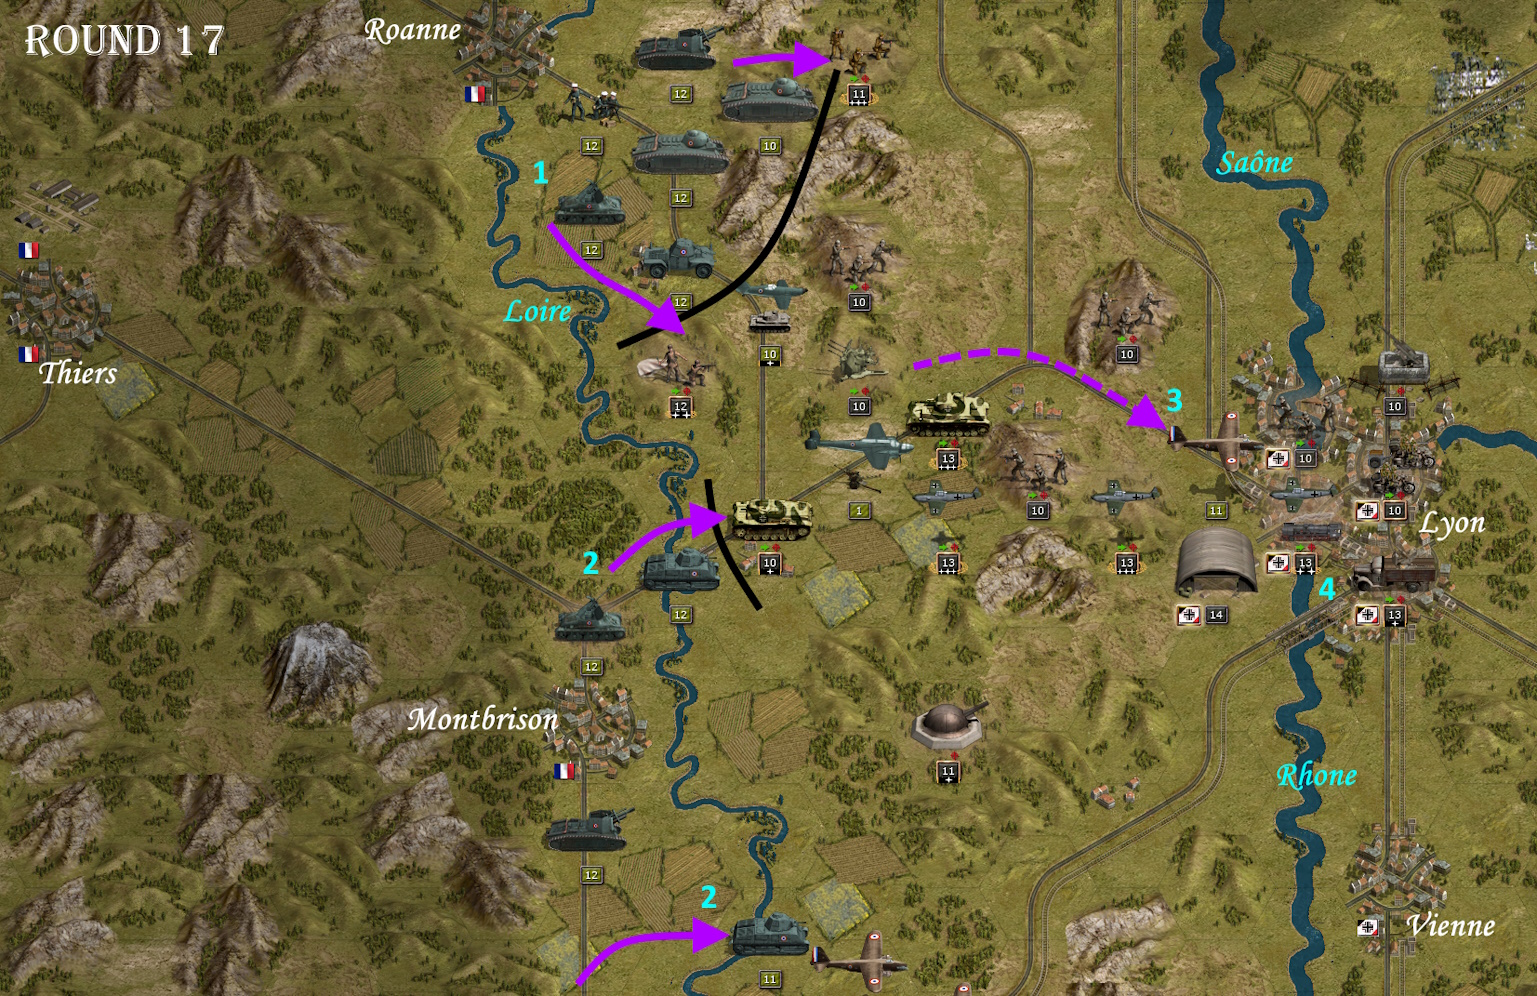
- StEtienne-17.jpg (945.68 KiB) Viewed 8567 times
Here you can see the beginning of the French counterattacks. The enemy crosses the Loire at Roanne (1) and presses hard against my line in the small mountainous region. He also tries to cross the river further south (2). In addition, there are extensive air attacks and actions by paratroopers up to the gates of Lyon (3). In return, I also try to bring my own troops from the southern area back to Lyon with the help of the railroad (4). It is a mutual race to see who can bring up reserves faster.
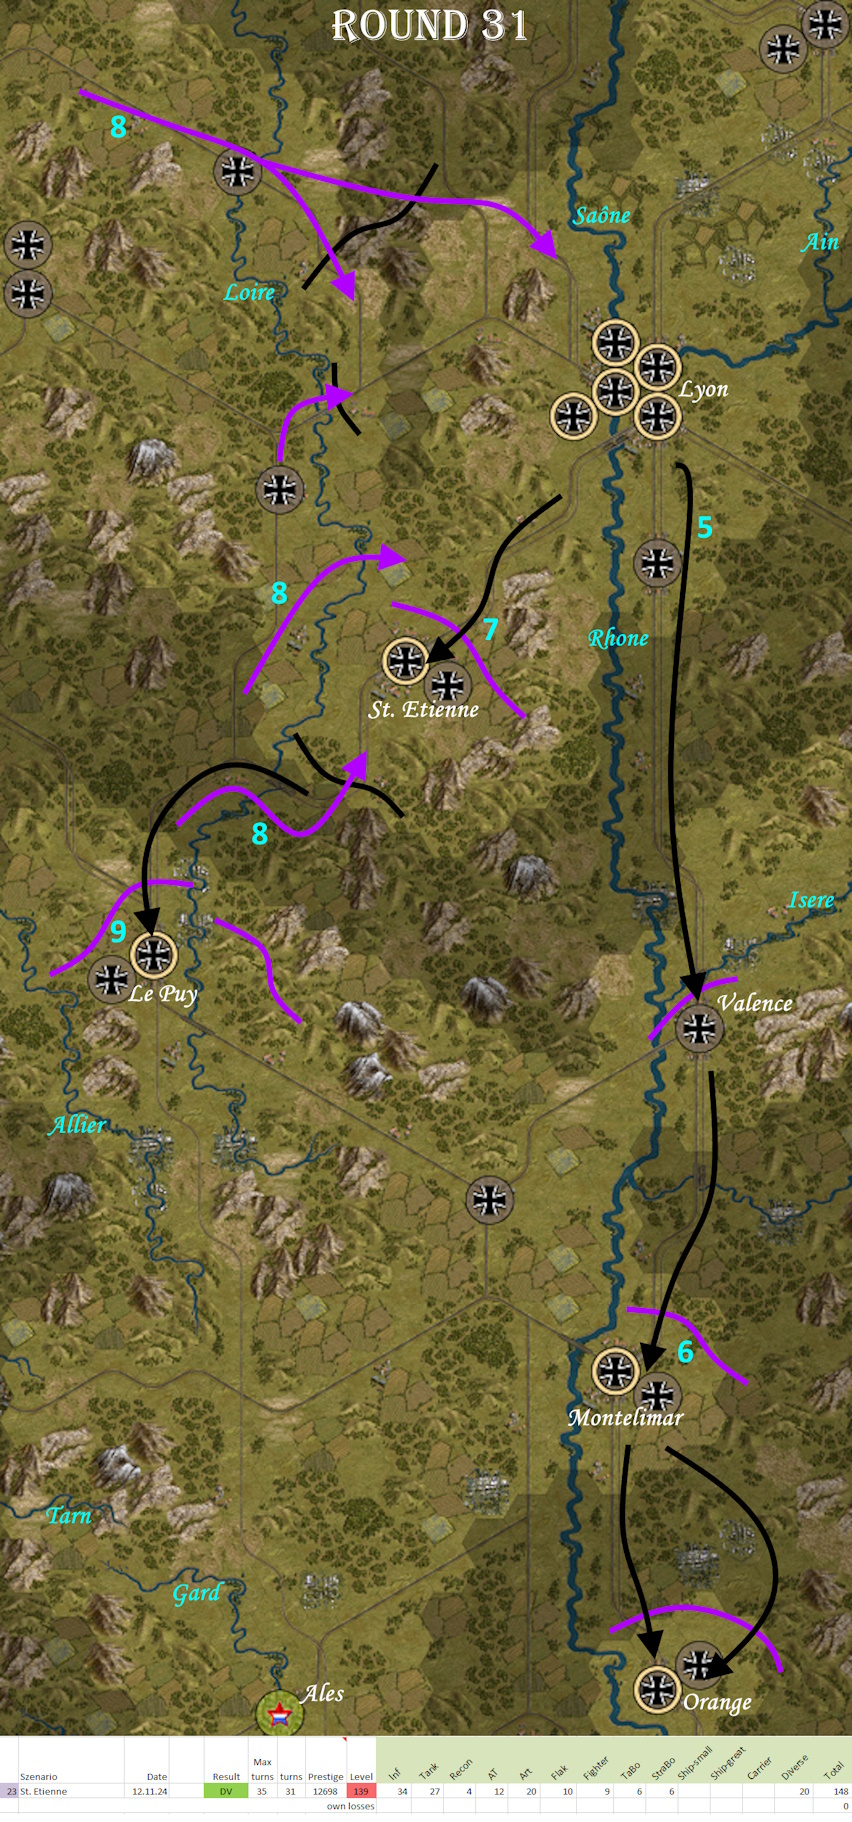
Strategic map: First I advance east of the Rhone downstream (5) until I have reached the last two main objectives (6). In the center, I first successfully attack St. Etienne and can quickly conquer it (7). I can also defeat the defense of Le Puy until the counterattack begins (8). Le Puy, which I had temporarily abandoned in order to take up a better defensive position behind the Loire, can be regained relatively easily after the enemy onslaught (9).
- StEtienne-31.jpg (804.23 KiB) Viewed 8567 times
Re: DAW - Der andere Weg - The other way
Posted: Wed Nov 20, 2024 8:12 pm
by Sonja89_1
The “Grenoble” mission takes you to the mountainous region of the Western Alps. Here, infantry and air forces are more in demand than tanks. The battle is particularly focused on the two main target areas of Grenoble and Embrun. In between, the aim is to advance as quickly as possible along the valley roads. However, partisans and avalanches make success difficult for the player.
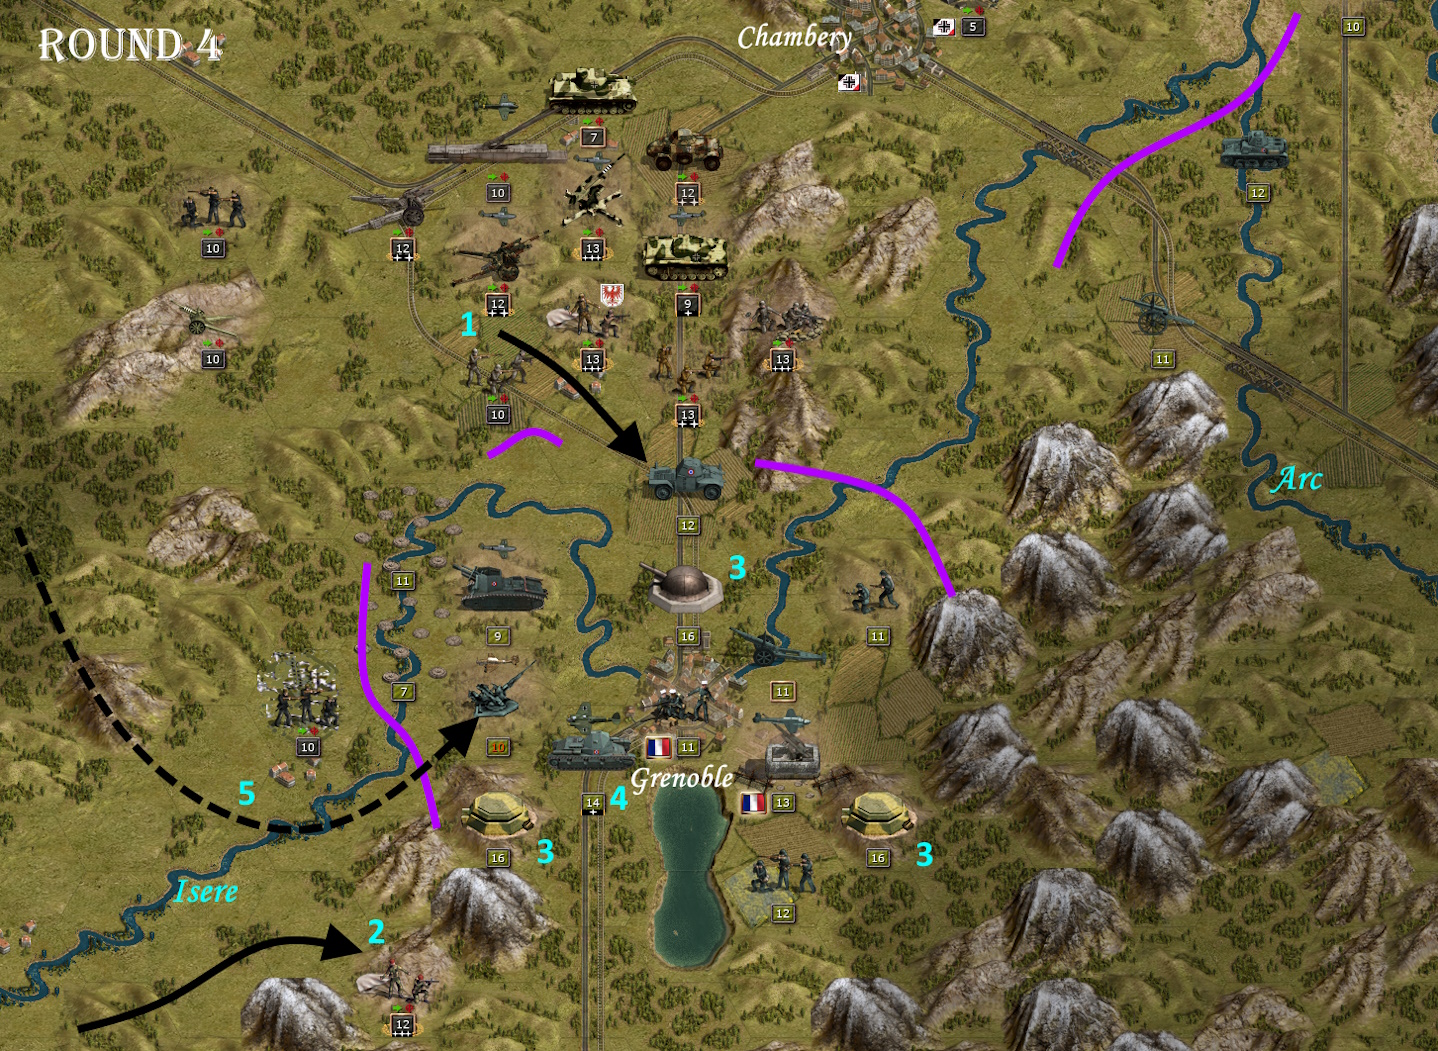
- Grenoble-7.jpg (967.43 KiB) Viewed 8356 times
After the first few turns, the French bridgehead defenses north of the Isere are successfully eliminated (1). From the western flank, own paratroopers can advance (2), ready for a coordinated attack. Grenoble is surrounded by 3 strong fortresses (3), which are not easy to storm. In addition, a very strong French armored unit (4) is ready to deal very hard blows as soon as the opportunity arises. However, the first and most important target of your own artillery and subsequent Stukas (5) is the enemy anti-aircraft guns. Once it has been knocked out, your own aircraft units can break even the toughest resistance in a short time.
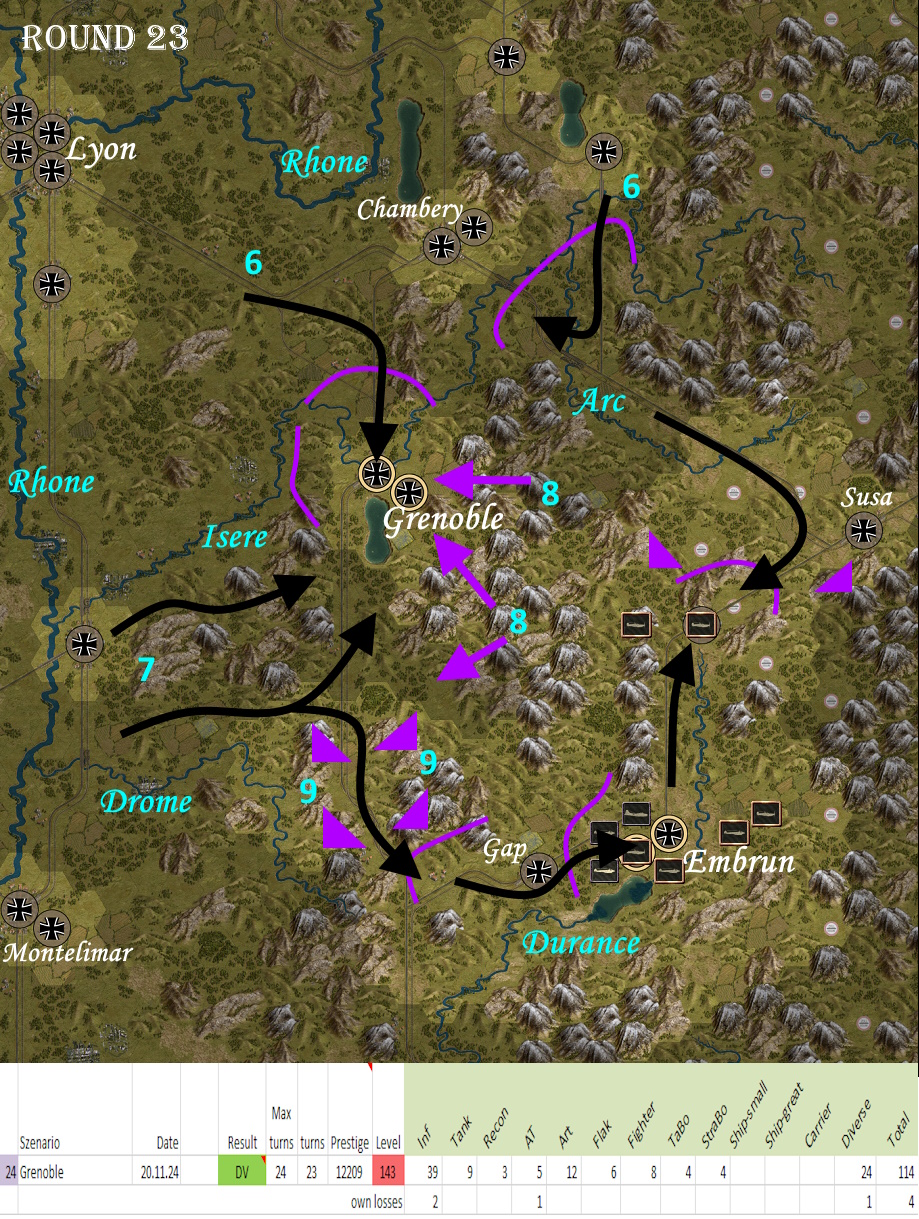
Strategic map: My first attack comes from the north and northwest (6). In addition, a flanking attack from the west (7) brings significant advantages. Things are going well. But watch out - partisans (8), who are active from the mountains, are pressing against Grenoble, which has just been conquered. This city should not be left unguarded. In addition, avalanches (9) are causing me a lot of trouble. Of my core troops, one tank and one artillery unit are decimated down to 1 strength point and almost wiped out. Nature is often a much more formidable opponent than the worst enemy.
- Grenoble-23.jpg (741.8 KiB) Viewed 8356 times
Re: DAW - Der andere Weg - The other way
Posted: Wed Nov 27, 2024 4:42 pm
by Sonja89_1
The “Central Massif” scenario also takes you into a mountainous region. However, the unfavorable terrain in this low mountain range is somewhat easier to circumnavigate than in the Alps. For an MV it is sufficient to conquer the three main objectives, the DV requires the capture of all flag hexes. As time is short in this mission and at this high difficulty level, my goal is an MV right from the start.
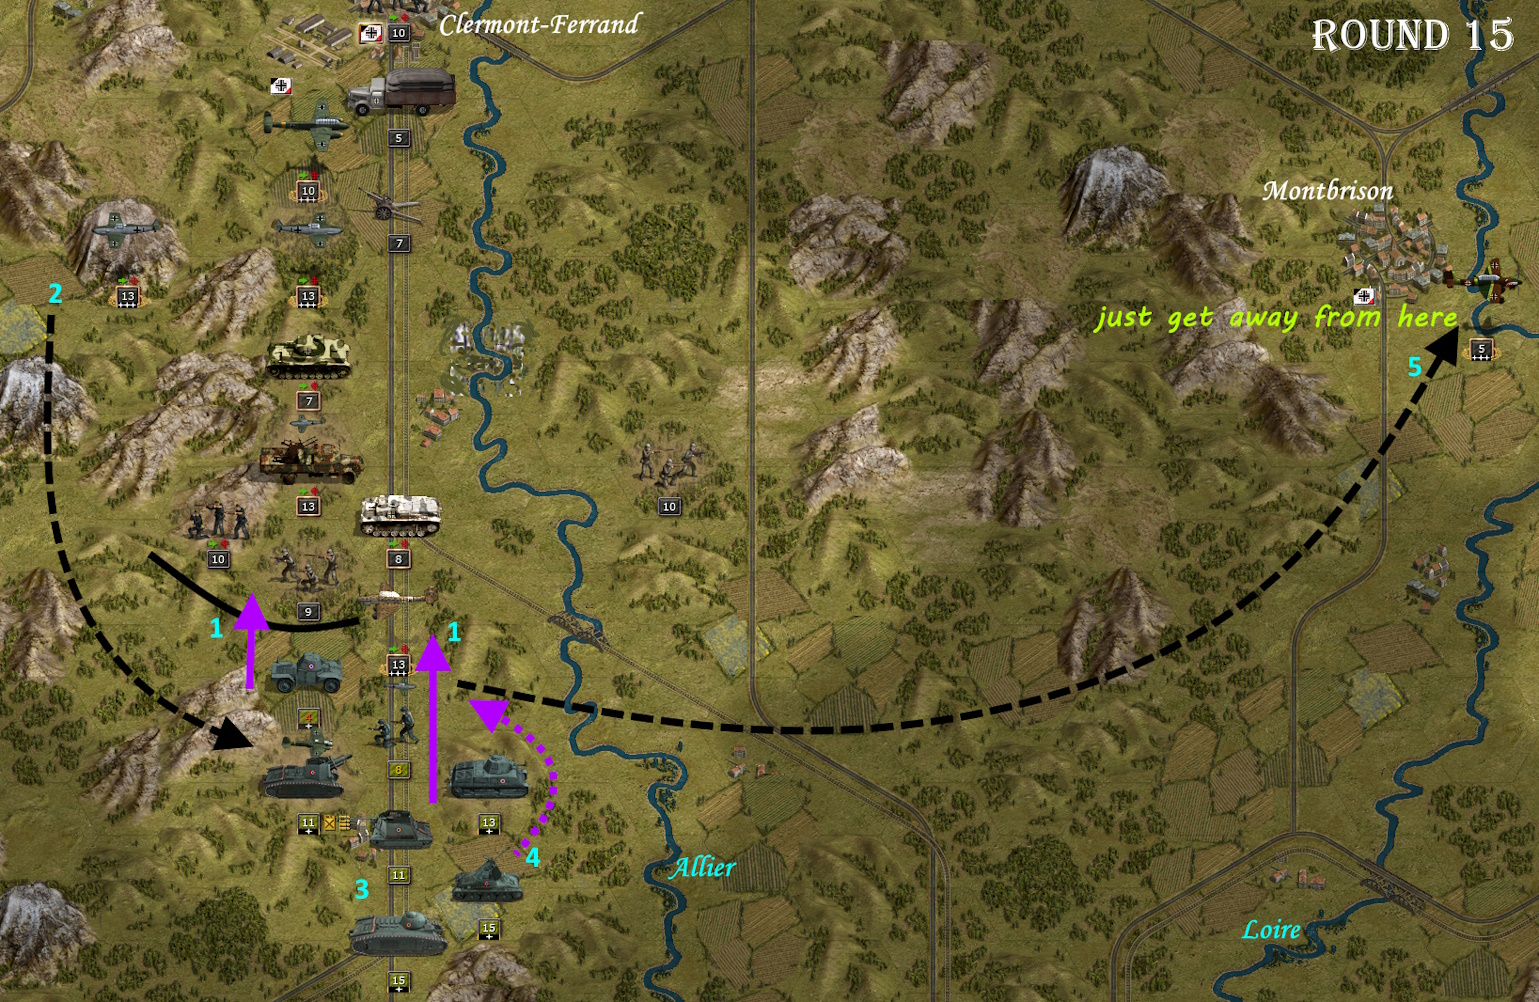
- Central-Massiv-15.jpg (943.3 KiB) Viewed 8170 times
The first image begins with a jump to the 15th turn. I have already conquered Clermont-Ferrand when a French counterattack comes from the south (1). I counter this advance with my own air attacks (2). Although the French attack is not very extensive in terms of numbers, it includes 6 very strong enemy units that can crush weakened troops in a single blow (3). Among them is also a common anti-aircraft gun (4), which heavily damages one of my Stuka groups (5), whereupon I move it out of the battlefield. The other planes are also moved back at first. Only when the “evil” flak ventures further forward can I suppress it far enough with my own flak in ground combat mode to then sweep it completely off the field with my second Stuka group and a bit of luck. That was the best scene of the mission. After that, I can use my planes to attack his overpowered units, which are making slow progress on the narrow strip between the mountains and the river.
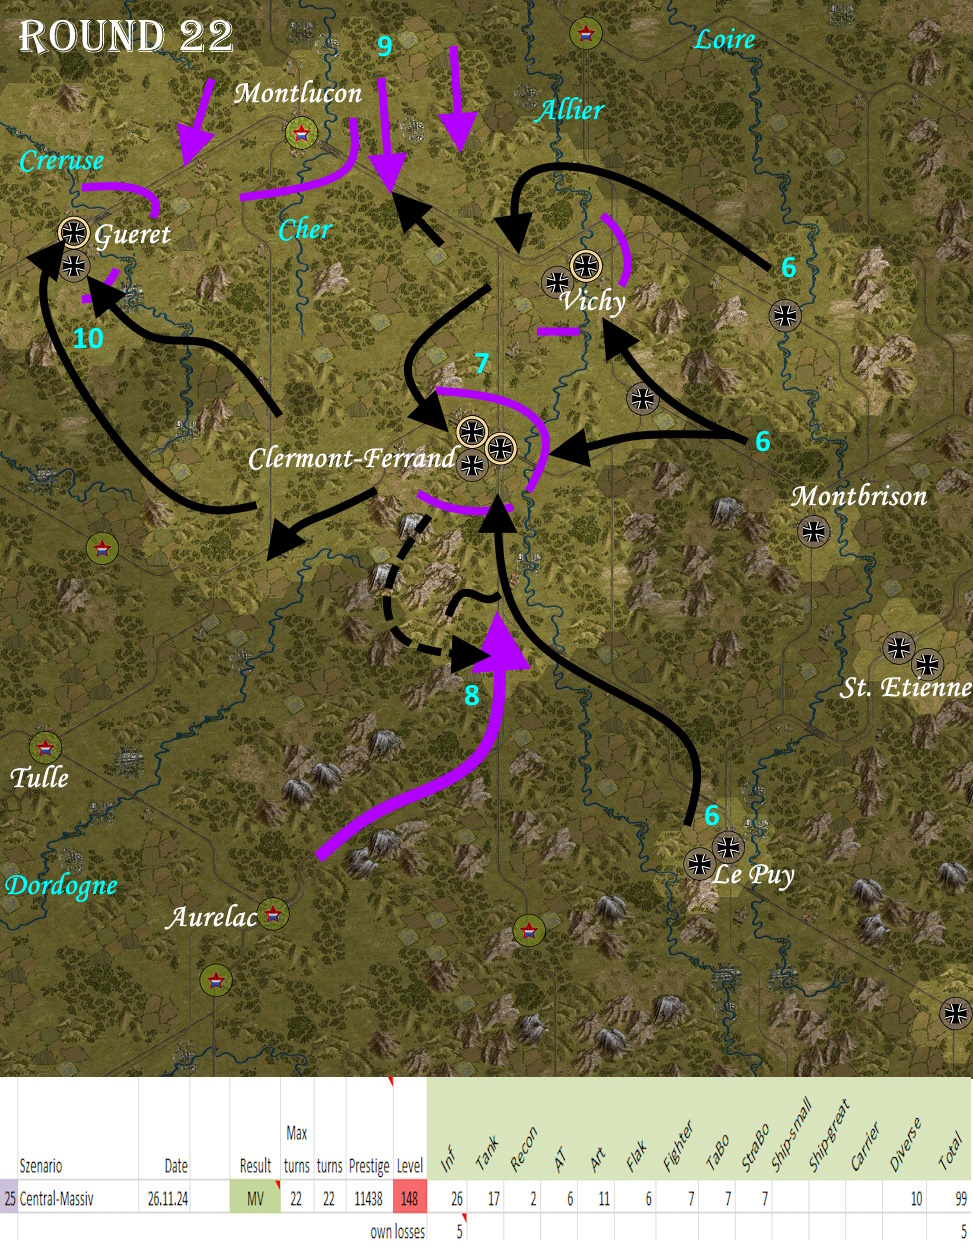
Strategic map: From the bridgeheads on the upper reaches of the Loire, I launch a concentrated attack on Vichy and Clermont-Ferrand simultaneously (6). Vichy is easier to take and falls first. Only then do I succeed in conquering Clermont-Ferrand from 3 sides (7). In the process, I lose a core unit (Kradschützen detachment) that I sent forward for reconnaissance but did not withdraw at the end of the turn. An unnecessary loss due to my own negligence. The fierce French counterattack (8) from the southeast was already visible in the first picture. At the same time, a number of partisans infiltrate from the north (9), but their advance does not have much effect. I approach the last main objective directly from the southeast (10) without going through Motlucon.
I have this scenario at difficulty level 148, which corresponds to “Rommel” + “Field Marshal” + 2/5 “Guderian” + 2/5 “Manstein”. I'm definitely reaching my limits here. I still manage to achieve successes, but my own units suffer more. The increased prestige consumption shows that I am living off the substance. If I continue to play the same way, I would have to start losing several scenarios without a fight to lower the level until the balance is restored. However, this would ruin the campaign game. I will therefore adapt the handling for changing the difficulty level. From now on, I will only increase the level when I get 3 DVs in a row. As before, I will lower the difficulty when I lose a scenario and additionally when the final prestige level has dropped by more than 3000 points within the last 5 scenarios. Let's see how the game then develops.
- Central-Massiv-22.jpg (763.98 KiB) Viewed 8170 times
Re: DAW - Der andere Weg - The other way
Posted: Thu Dec 05, 2024 3:55 pm
by Sonja89_1
The “Toulon” scenario marks the end of the campaign branch in eastern France. Our attack finally reaches the Mediterranean coast. In this mission, the player encounters a very tough French defense that is not easy to overcome. This time, I myself was wonderfully unsuccessful. Exactly, I wasn't able to fully achieve the primary mission objectives. Unlike “Lyon”, it wasn't a narrow failure, but a clear miss. Below is a brief description of what happened.
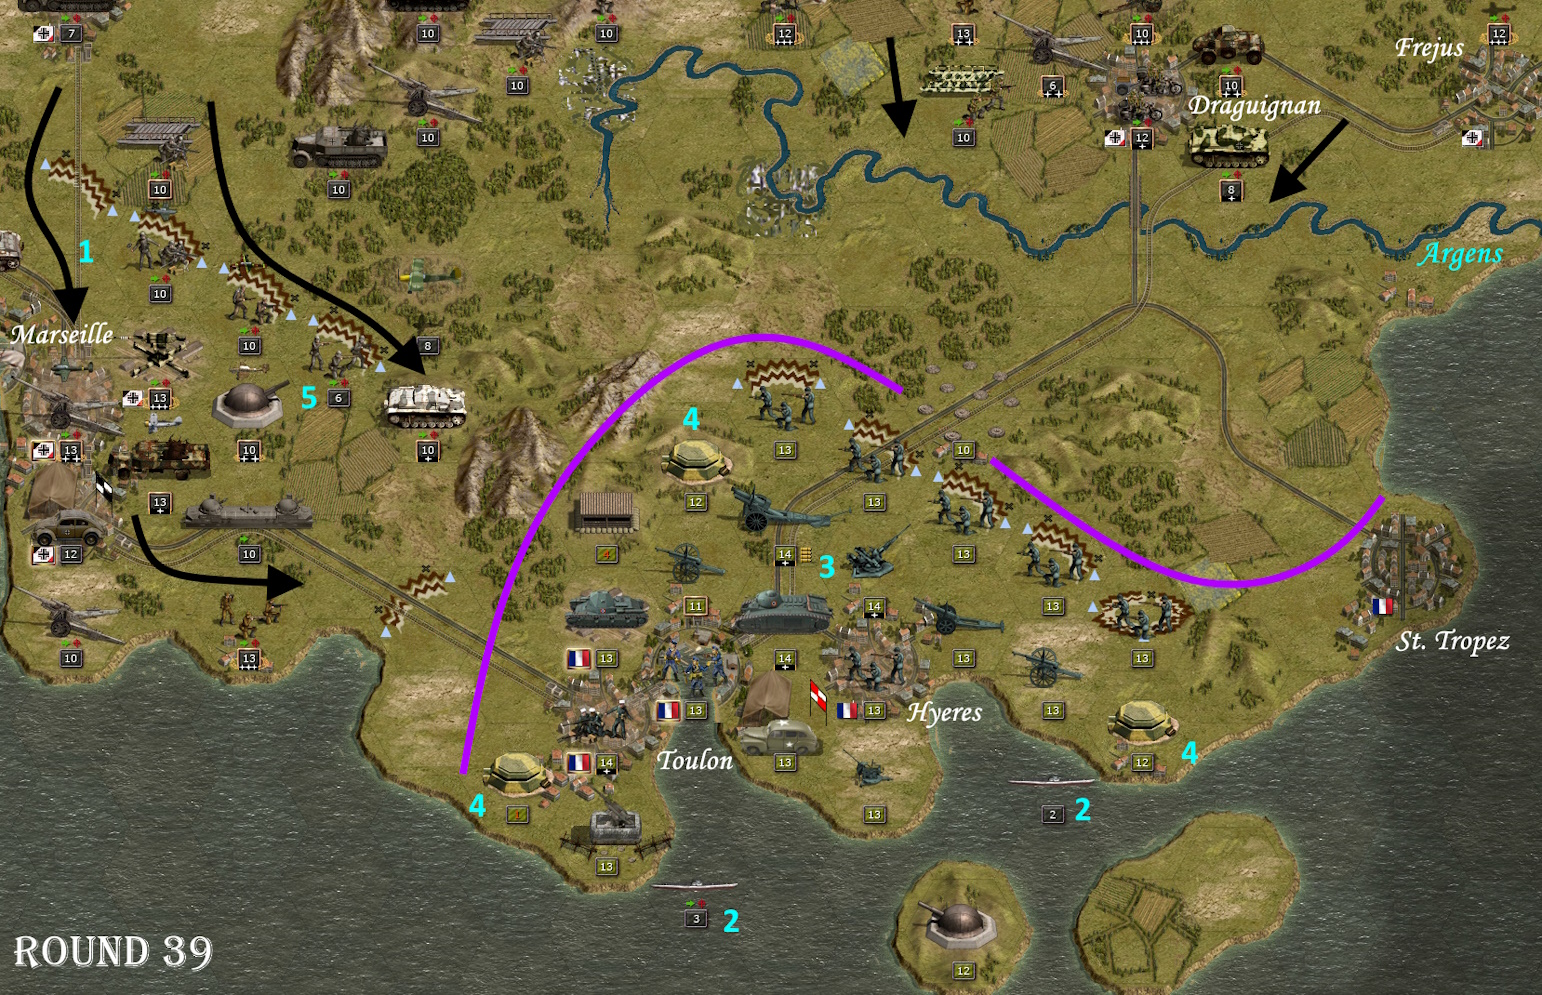
- Toulon-39.jpg (941.5 KiB) Viewed 7932 times
In the first picture you can already see the final situation at the end of the 39th turn. My units had conquered Marseille on the western edge (1) and turned east towards Toulon. 2 heavily battered submarines (2) reconnoitred the coast off Toulon. A Fieseler Storch circled over the northern area. In the center of the enemy defense there are still 5 very strong units (3) (Foreign Legion - HW infantry, Char-B1, 155 mm Art., 47 mm Flak, HQ). Especially the artillery, the flak and the HQ, each with a range of 5 hexes and high attack values, are very strong obstacles that inflict heavy losses. In addition, there are three fortresses with a visual range of 4 hexes at the corner points (4). It's no coincidence that my units keep such a wide distance. In the final turns I had started to reduce the ammunition of the enemy artillery with a decoy (5) on a good cover hex. Thanks to the good cover, the infantry only lost a few strength points. At the same time, I was able to considerably weaken the western defense of Toulon. The best way to overcome such a defense is a well-coordinated mass attack that overloads the strong enemy cover. I was able to successfully complete this scenario in 32 turns during the test runs 7 years ago. However, that was on “General” difficulty level at the time.
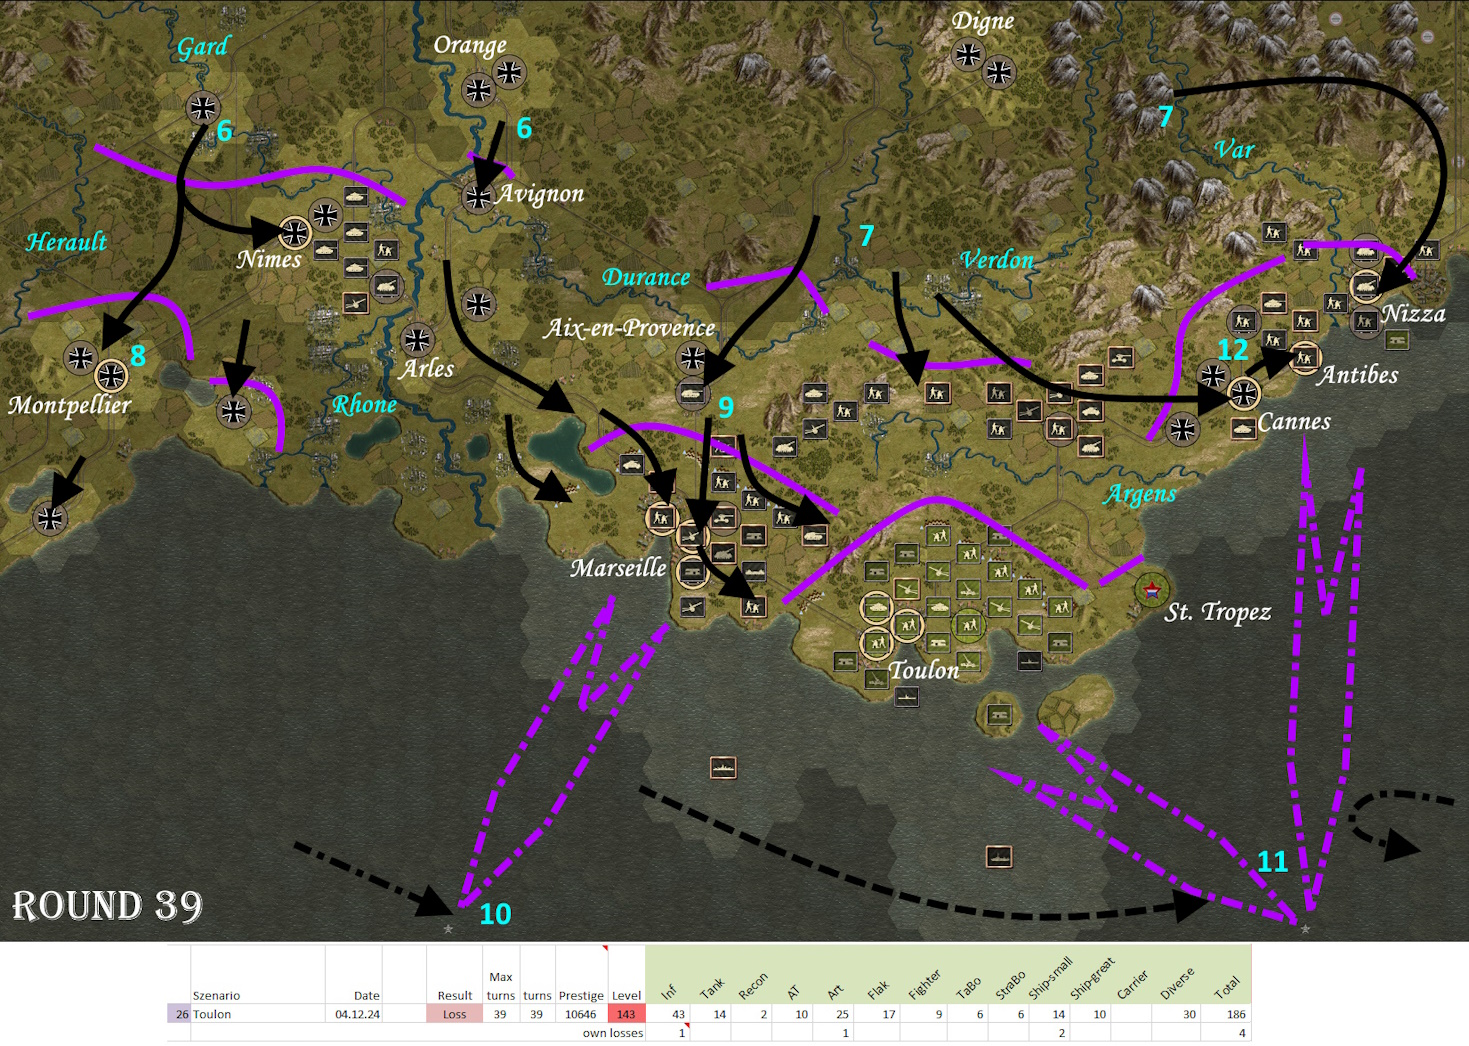
Strategic map: My core units on both sides of the Rhone begin their attack south towards Nimes and Avignon (6). Further east, Aux units advance slightly towards the coast (7). After taking Montpellier (8), I throw all my core units to the east side of the Rhone and start attacking Marseille (9). I'm still well on schedule. At the same time, mountain infantry start their attack on Nice on the eastern edge of the map. The attack on the coastal region triggers the French evacuation. A total of 12 transport ships make their way south to the two escape hexes (10+11). To achieve a DV, at least 9 transport ships must be sunk. However, I only manage to destroy 5 of these ships, the rest escape. Afterwards I manage to conquer the coast between Cannes and Nice (12). In the end, time is too short for a final attack on Toulon.
I think I could have scored an MV with a better game, even at this difficulty level. But it wasn't enough this time. For the next scenario, I will reduce the difficulty setting by 3 levels. After all, I skipped a campaign exit due to the lost scenario, which, together with the rapidly dwindling prestige, justifies 3 levels. I already outlined at the end of May that I would keep the exits disabled in this variant. I hope to bring the downward spiral to a halt soon. After all, the missions from Toulon onwards (Toulon, Orleans, Paris, Sicily, Tunis, Gabes) are extremely hard and difficult to play.
Let's see how the next mission goes.
- Toulon-39S.jpg (835.33 KiB) Viewed 7932 times
Re: DAW - Der andere Weg - The other way
Posted: Thu Dec 12, 2024 5:19 pm
by Sonja89_1
In the “Orleans” mission, you achieve an “MV” for capturing all primary objectives and a “DV” if you also keep two specific areas free of enemy ground units at all times. I narrowly failed to achieve the latter, as an enemy unit was able to occupy such a HEX field for a short time. Otherwise, the scenario went very well and successfully. My own losses were limited almost exclusively to minefields. Even the loss of strength points for the core units was relatively low, given the high number of enemy units.
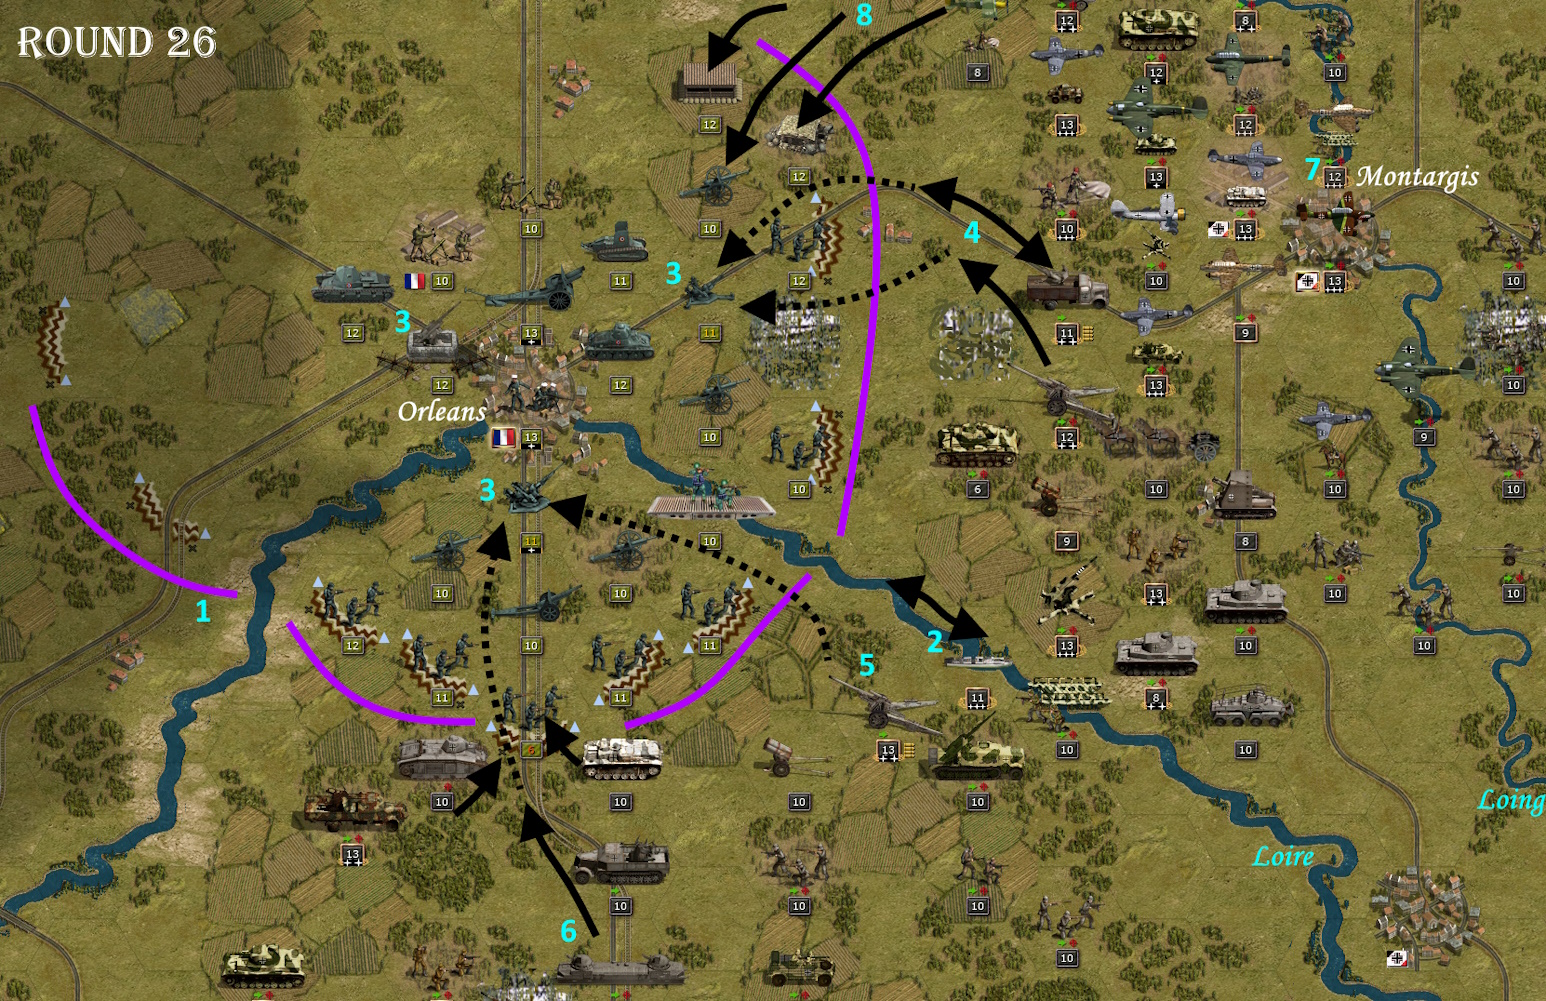
- Orleans-26.jpg (995.73 KiB) Viewed 7778 times
The first picture shows the situation in the early part of the 26th turn. You can see the defensive ring of the French around the important hub of Orleans (1). In the previous turns, my troops have moved into the most favorable attack position possible. My small riverboat fires salvos at the enemy infantry in small advances and decimates their encampment levels (2). The French defense is very strong and well entrenched. The overpowered artillery north of Orleans is particularly dangerous. It has an increased attack value and a range of 5 hexes! This must be taken into account when approaching. However, the backbone of the enemy position is once again the anti-aircraft guns (3), which provide cover for each other and the artillery. The priority is to smash this supporting pillar. On the eastern attack front, I have a mobile anti-aircraft gun in ground combat mode with a +1 range and a 15 cm artillery unit (1+ movement) that can suppress an enemy anti-aircraft gun (4). In the southern area, an artillery (+1 range) (5) followed by an armored train (6) shoots the very strong enemy anti-aircraft guns with an increased attack value and a range of 5 hexes into a dazed state. Now the moment has come for my two first-class Stukas (7) at Montargis. They sit over the two battered anti-aircraft units and bring them to the edge of destruction. The way is clear for my remaining planes, which massively attack the most worthwhile targets. In the following turn, the two enemy anti-aircraft units can be completely destroyed. This leaves only the French air defense west of Orleans, which inflicts a few losses on my Aux planes, but can no longer stop my onslaught. The decisive ground attack comes via the north-eastern corner of the defensive ring (8) and hits hard and fast. By the end of turn 28, the enemy defense will have completely collapsed.
Strategic map: My core and aux units (9) attack from the south. At the same time, the French launch fierce counterattacks at Châtillon-sur-Seine (10) and Tours (11), which can also be repelled with the help of minefields. The counterattacks from north of the Loire on Tours continued until the end. The final attack on Orleans (12) has already been described in detail in the previous section.
Now that this important city has been taken, the way is clear for the next mission - to Paris!
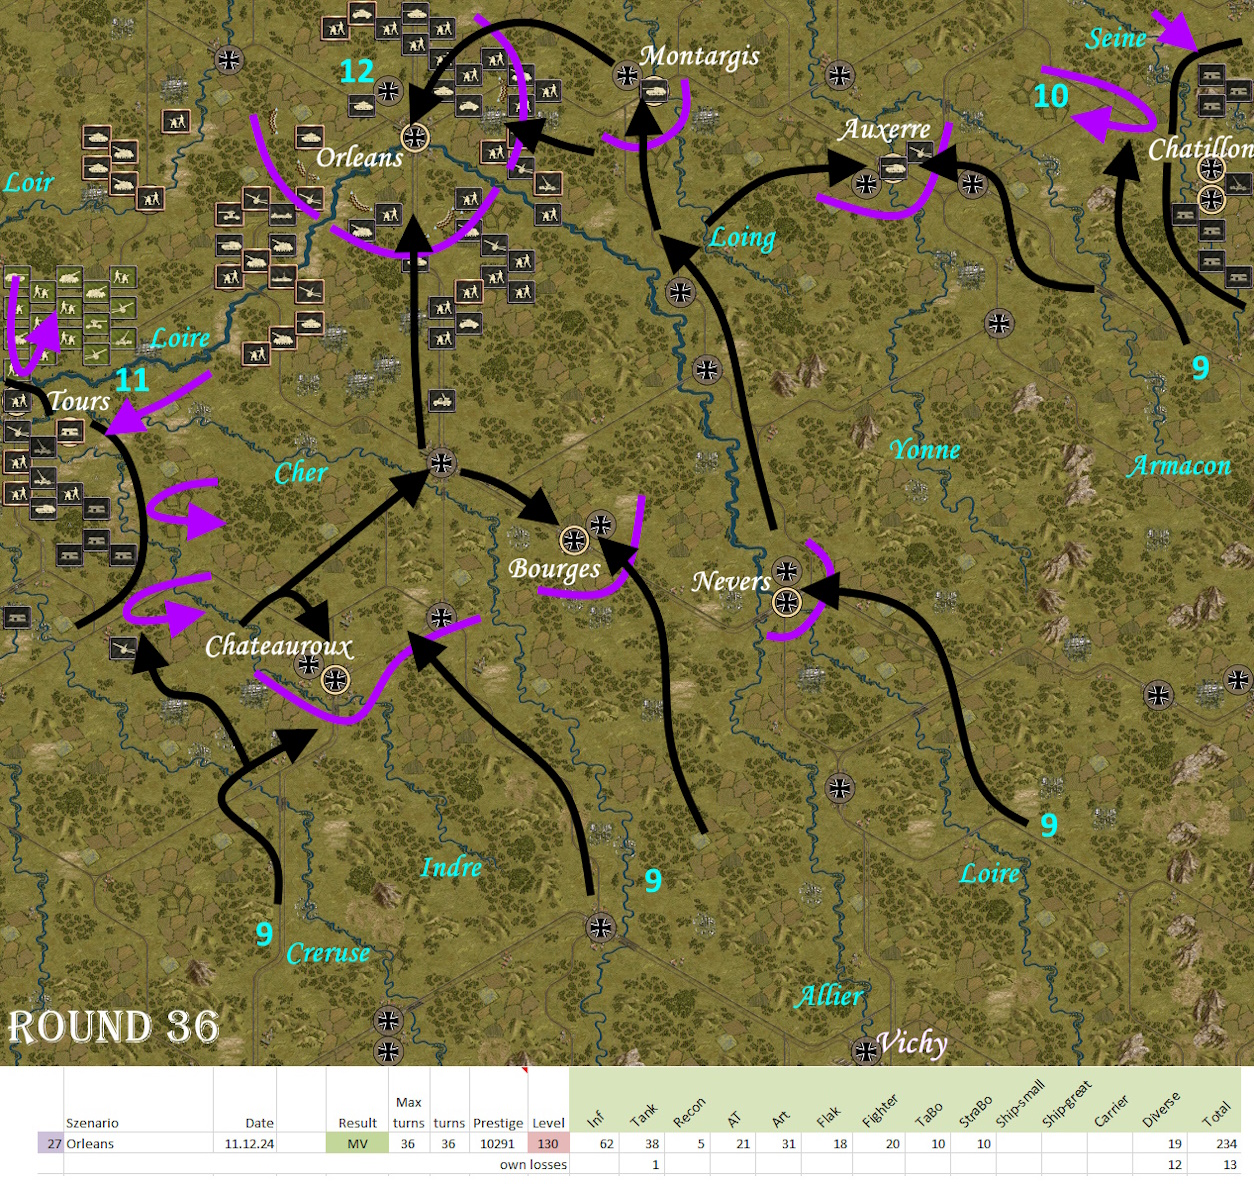
- Orleans-36.jpg (971.21 KiB) Viewed 7778 times